background image

 1-8

Setting Up the Printer

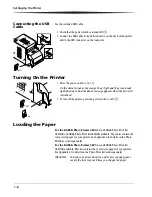
Connecting the USB 
Cable

Use the included USB cable. 

1.

Check that the power switch is turned off (

).

2.

Connect the USB cable to the USB connector on the back of the printer 
and to the USB connector on the computer. 

Turning On the Printer

1.

Press the power switch to on ( 

|

 ).

On the operator panel, the orange Power light and the green Ready 
light illuminate, and the Ready message appears when the printer is 
initialized.

2.

To turn off the printer, press the power switch to off (

).

Loading the Paper

For the KODAK Photo Printer 6800

, have a KODAK Photo Print Kit 

6800/4R or KODAK Photo Print Kit 6800/6R available. These kits contain the 
correct size paper for your printer. See Appendix A for details on the Photo 
Print Kits (sold separately).

For the KODAK Photo Printer 6805

, have a KODAK Photo Print Kit 

6805/3R available. This kit contains the correct size paper for your printer. 
See Appendix A for details on the Photo Print Kit (sold separately).

IMPORTANT: 

To keep your prints dust-free and to prevent paper jams, 
empty the trim tray each time you change the paper.

OFF

OFF

ON

Summary of Contents for 6805

Page 1: ...KODAK Photo Printer 6800 6805 User Guide for KODAK Photo Printer 6800 6 in KODAK Photo Printer 6805 5 in ...

Page 2: ...Eastman Kodak Company 343 State Street Rochester New York 14650 Eastman Kodak Company 2003 Kodak is a trademark of Eastman Kodak Company ENERGY STAR is a U S registered trademark 6B8601 ...

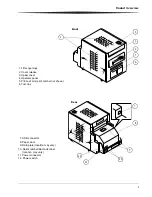
Page 3: ...nings 2 Cover release 3 Upper cover 4 Operator panel 5 Print exit slot print catcher not shown 8 Paper door 9 Data plate location may vary 10 Serial number Bar code label 11 Power connector 7 USB connector 5 6 Trim tray 7 12 Power switch 10 location may vary 11 ...

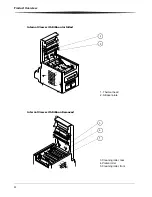
Page 4: ...ii Product Overview Internal View with Ribbon Installed 1 2 1 Thermal head 2 Stripper plate Internal View with Ribbon Removed 3 5 4 3 Cleaning roller rear 4 Platen roller 5 Cleaning roller front ...

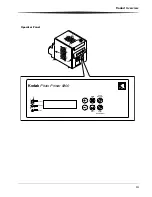
Page 5: ...Product Overview iii Operator Panel Kodak Photo Printer 6800 Power Ready Error Rewind Clear Paper Enter Paper Advance Menu ...

Page 6: ......

Page 7: ... Online User Guide 1 11 2 Installing the Printer Driver Software Installing the Printer Driver 2 1 Customizing Printer Properties 2 2 Customizing Printing Preferences 2 2 Uninstalling the Printer and Printer Driver 2 2 3 Calibrating the Printer Installing the Calibration Software 3 1 Using the Calibration Utility 3 1 Uninstalling the Calibration Software 3 8 Resolving Calibration Error Messages 3 ...

Page 8: ...Recovering from a Power Interruption 6 4 Appendix A Important Printer Information System Requirements A 1 Printer Specifications A 1 Printer Supplies A 2 Paper and Ribbon A 2 Handling and Storing the Paper and Ribbon A 3 Thermal Printer Cleaning Kit A 3 Print Catcher A 3 Packing and Transporting the Printer A 3 ENERGY STAR Partner A 3 Getting Help A 4 Appendix B Safety and Regulatory Information I...

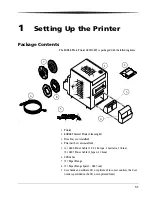
Page 9: ...g Kit 3 Trim Tray not installed 4 Print Catcher not installed 5 4 6800 Power Cable 1 US 1 Europe 1 Australia 1 China 2 6805 Power Cable 1 Japan 1 China 6 USB Cable 7 2 Paper Flange 8 2 Paper Flange Spacer 6805 only 9 User Guide and software CD not pictured in some countries the User Guide is provided on the CD not in printed form A161_0005BC 1 3 2 4 5 6 7 8 ...

Page 10: ...ed prints See Appendix A for details on the Print Catcher sold separately USB cable included For the KODAK Photo Printer 6805 have the following items available before you begin your printer setup KODAK Photo Print Kit 6805 3R which contains the correct paper and ribbon for your printer See Appendix A for details on the Photo Print Kit sold separately USB cable included IMPORTANT The printer weigh...

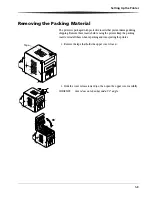
Page 11: ...during shipping Remove these inserts before using the printer Keep the packing inserts reinstall them when repacking and transporting the printer 1 Remove the tape that holds the upper cover closed 2 Slide the cover release toward you then open the upper cover carefully IMPORTANT Cover does not open beyond a 90 angle Tape 90 ...

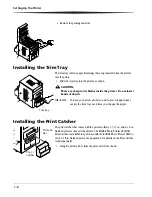
Page 12: ... dust free and to prevent paper jams empty the trim tray each time you change the paper Installing the Print Catcher The print catcher that comes with the printer collects 3 5 x 5 in and 4 x 6 in finished prints as they exit the printer The KODAK Photo Printer 6800 6R Print Catcher is available for purchase with the KODAK Photo Printer 6800 to catch 6 x 8 in finished prints See Appendix A for deta...

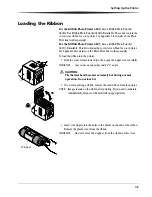
Page 13: ... Print Kits sold separately To load the ribbon into the printer 1 Slide the cover release toward you then open the upper cover carefully IMPORTANT Cover does not open beyond a 90 angle CAUTION The thermal head becomes extremely hot during normal operation Do not touch it 2 If you are replacing a ribbon remove the used ribbon from the printer NOTE Images remain on the ribbon after printing If you n...

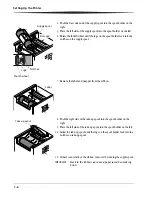
Page 14: ...el and wrapper from the ribbon 8 Push the right side of the take up spool into the spool holder on the right 9 Place the left side of the take up spool into the spool holder on the left 10 Adjust the take up spool until the lugs on the spool holder lock into the notches on take up spool 11 If there is any slack in the ribbon remove it by turning the supply spool IMPORTANT Slack in the ribbon can c...

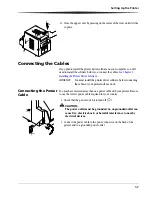
Page 15: ...all the printer driver software before connecting the cables or your printer will not work Connecting the Power Cable You may have received more than one power cable with your printer Be sure to use the correct power cable required for your country 1 Check that the power switch is turned off CAUTION The power outlet must be grounded An ungrounded outlet can cause fire electric shock or harmful int...

Page 16: ... turn off the printer press the power switch to off Loading the Paper For the KODAK Photo Printer 6800 have a KODAK Photo Print Kit 6800 4R or KODAK Photo Print Kit 6800 6R available These kits contain the correct size paper for your printer See Appendix A for details on the Photo Print Kits sold separately For the KODAK Photo Printer 6805 have a KODAK Photo Print Kit 6805 3R available This kit co...

Page 17: ... roll c Place the black paper flange on the right side of the paper roll NOTE Be sure to match up the lugs on the green paper flange with the notches on the left side of the paper roll If you do not attach the paper flange properly the paper roll will not fit into the printer 3 For the KODAK Photo Printer 6805 attach the paper spacers before attaching the paper flanges 4 Open the paper door The op...

Page 18: ...t 24 in 607 mm of blank paper This reduces the possibility of fingerprints or other damage to the prints It does not decrease the 750 4 x 6 in print capacity of the paper roll see page A 2 The operator panel displays the Ready message Making a Test Print Make a test print to check that the printer is installed and set up correctly 1 Press Menu once until Test Print Mode appears 2 Press Enter to st...

Page 19: ...k etup Guide are also provided on the CD that came with your printer The Guides are in PDF format ADOBE ACROBAT Reader also provided is required to read them Follow the on screen directions to install ADOBE ACROBAT Reader if you do not already have it installed on your system ...

Page 20: ......

Page 21: ...Administrator privileges to install the printer driver 1 Insert the CD that came with the printer into your CD ROM drive The CD Browser launches automatically If it does not double click the Kodak680x exe file in the CD root directory 2 Select your language 3 Click Software NOTE Before installing the software read the Printer Driver Readme file for important information and updates about the softw...

Page 22: ...s 4 On the Layout tab click Advanced The Advanced Options dialog box appears 5 Adjust the printing preferences appropriately for your printer Uninstalling the Printer and Printer Driver NOTE You must have Administrator privileges to uninstall the printer and printer driver 1 For your operating system do the following 2 Right click the printer you want to remove and select Delete 3 Click Yes to del...

Page 23: ...ling the Printer Driver Software 2 3 4 Select File Server Properties 5 Select Drivers 6 Highlight the printer driver you want to remove and click Remove 7 Click Yes to delete the printer driver 8 Click Close ...

Page 24: ......

Page 25: ...into your CD ROM drive The CD Browser launches automatically If it does not double click the Kodak680x exe file in the CD root directory 2 Select your language 3 Click Software NOTE Before installing the software read the Calibration Software Readme file for important information and updates about the software 4 Click Calibration Software to start the installer 5 Follow the on screen instructions ...

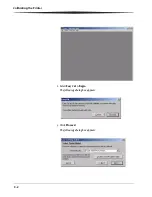
Page 26: ...3 2 Calibrating the Printer 2 Select Easy Cal Begin The following dialog box appears 3 Click Proceed The following dialog box appears ...

Page 27: ...file selection dialog box appears 6 Browse to C WINNT Kodak Plug Ins Printing folder NOTE The exact path to the export module folder may differ depending on your operating system 7 Select the folder that the export module is in and then click OK 8 Click Next The following dialog box appears 9 Confirm that the printer model listed is the printer you want to calibrate If the printer model you want t...

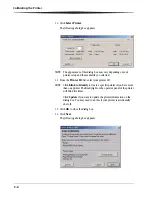
Page 28: ... list select your printer ID NOTE Click Blink to Identify to locate a specific printer if you have more than one printer The Ready light on the operator panel of the printer will blink five times Click Update if you want to update the printer information on the dialog box You may need to do this if your printer is accidentally shut off 12 Click OK to close the dialog box 13 Click Next The followin...

Page 29: ...fferent printer setup than what is listed continue with Step 15 15 Click Change Setup The following dialog box appears NOTE The appearance of this dialog box may vary depending on your printer export module 16 Click Select to change the media file for your printer A file selection dialog box appears 17 Select the media file and then click OK 18 Click OK to close the dialog box 19 Click Next The fo...

Page 30: ...information is correct click Next to send the default table to the printer NOTE The previous table is overwritten The following dialog box appears 21 Click Printer Status to find out more information about your printer The following dialog box appears NOTE Click Update if you want to update the information on the Printer Status dialog box You may need to do this if your printer is accidentally shu...

Page 31: ...utral has the least amount of color 25 Enter the number of the most neutral cluster in the Cluster Number box in a range from 201 249 26 Click Done The printer calibration begins When calibration is complete the following dialog box appears 27 Click Quit to close the Calibration Utility Your printer is now calibrated NOTE The neutral cluster should be in the center of the test print if the printer...

Page 32: ...K to locate the media file using the File Selection dialog box See Step 16 on page 3 5 Uninstall then reinstall the calibration software See Installing the Calibration Software on page 3 1 The selected file will not work with this printer Please choose another An inappropriate media file was selected for the printer Click OK to locate the media file using the File Selection dialog box See Step 16 ...

Page 33: ...e calibration software is unable to find the printer with the selected Printer ID Close the calibration software Check that the printer cables are secure Check that the printer is turned on and the operator panel Ready light is illuminated Run the calibration software and try choosing the printer again The printer is not ready The printer is not ready for calibration Check that the printer cables ...

Page 34: ...er cover is open or not latched Close the upper cover by pressing on the center of the cover until it clicks Printer error 2500 Please call for service _ Contact your KODAK representative for service Have available the error code number the printer model number and serial number listed on the printer data plate Printererror2504 Pleasecall for service _ Contact your KODAK representative for service...

Page 35: ...ods Store prints at a relative humidity between 30 and 50 Avoid exposure to high intensity light sources particularly fluorescent light and sunlight which are rich in ultraviolet radiation Avoid exposure to vinyl items those made of polyvinyl chloride PVC or any plastic that contains plasticizer If you use transparent sleeves make sure that they are not PVC based Understanding the Operator Panel L...

Page 36: ...and ready to make prints Making a test print Test Print Mode Press enter to make a test print See Making a Test Print on page 1 10 Check remaining paper status Remain XXX YYY None XXX represents how many remaining prints you can make with the current paper roll YYY represents the total number of prints on a paper roll The counter is reset each time you press Paper Rewind Checking the ribbon status...

Page 37: ...xterior cabinet print catcher and trim tray with a damp lint free cloth 2 Vacuum the filter openings to remove dust Performing Routine Maintenance To maintain good print quality 1 Clean the stripper plate platen roller and cleaning rollers monthly using the alcohol pads included in the KODAK Thermal Printer Cleaning Kit 2 Only clean the thermal head when necessary Do not include the thermal head i...

Page 38: ...release toward you then open the upper cover carefully IMPORTANT Cover does not open beyond a 90 angle CAUTION The thermal head becomes extremely hot during normal operation Wait approximately five minutes to begin cleaning the head after you open the upper cover 3 Remove an alcohol pad from its packaging Move the pad along the entire length of the thermal head in one direction only When you clean...

Page 39: ...ectly IMPORTANT There are two cleaning rollers in the printer They are not interchangeable Clean them separately to prevent reinstalling them in the wrong position 1 Remove the rear cleaning roller by pulling up on the black knob 2 Remove an alcohol pad from its packaging Wipe the rubber section of the roller with the pad 3 Reinstall the rear cleaning roller in the printer Push the black knob unti...

Page 40: ...5 4 Maintaining the Printer 5 Close the upper cover by pressing on the center of the cover until it clicks in place 6 Allow the alcohol to dry completely about five minutes before you resume printing ...

Page 41: ...Fit to Page or Clip options may not be offered by all photo printing applications Adjust the image size to match the paper size Make sure the Portrait Landscape setting matches the orientation of the picture For details see the photo printing application online Help NOTE It is not necessary to adjust the image resolution dpi to match the printer resolution The printer driver automatically scales y...

Page 42: ...are the same width Load the correct paper or ribbon See page 1 8 or page 1 5 Paper Jam XX The paper is stuck in the printer or paper path See Clearing a Paper Jam on page 6 3 Cover Open The upper cover is open or not latched Close the cover by pressing on the center of the cover until it clicks Paper Guide Error The paper and paper guide sizes are different Load the correct paper See Loading the P...

Page 43: ...ease the 750 4 x 6 in print capacity of the paper roll see page A 2 The operator panel displays the Ready message Method 2 If the Paper Jam message is still displayed on the operator panel 1 Turn off the printer and open the upper cover 2 Remove the ribbon from the printer CAUTION Prevent damage to the printer Do not pull abruptly on the paper 3 Slowly and carefully pull the jammed paper out of th...

Page 44: ...the printer Remove the front cleaning roller see Cleaning the Cleaning Rollers on page 5 3 and remove the segment of paper Recovering from a Power Interruption CAUTION If the printer loses power while printing the printer stops with the thermal head positioned against the platen roller The platen roller could be deformed and damaged if the thermal head is left in this position If a power outage oc...

Page 45: ...operating systems USB High Speed 2 0 compliant host device Printer Specifications Dimensions Width Depth Height 11 4 in 290 mm 19 6 in 496 mm 13 6 in 346 mm Weight without ribbon and paper 56 lbs 25 kG Operating environment Temperature Relative Humidity 50 to 95 F 10 to 35 C 20 to 80 Power Voltage Frequency auto detection of the following ranges 90V to 132V 48 Hz to 62 Hz 180V to 264V 48 Hz to 62 ...

Page 46: ...mm 11 seconds 6 x 8 in 152 x 203 mm 19 seconds 3 5 x 5 in 90 x 127 mm 11 seconds KODAK Photo Print Kit 6800 4R Specifications Storage specifications 86 F 30 C or lower 60 relative humidity or lower Capacity 750 prints paper and ribbon Paper and ribbon width 6 in 152 mm Ribbon patch length 4 in 102 mm KODAK Photo Print Kit 6800 6R Specifications Storage specifications 86 F 30 C or lower 60 relative...

Page 47: ... any maintenance procedures where you use alcohol pads Print Catcher The KODAK Photo Printer 6800 6805 comes with a print catcher that collects 3 5 x 5 in and 4 x 6 in finished prints Use the KODAK Photo Printer 6800 6R Print Catcher to collect 6 x 8 in finished prints Packing and Transporting the Printer 1 Remove the paper and ribbon from the printer 2 Reinstall the packing materials see page 1 3...

Page 48: ...A 4 Important Printer Information Getting Help Help with your printer is available from the following sources Troubleshooting section in this manual Chapter 6 Your KODAK Customer Service representative ...

Page 49: ...r Do not operate the printer with a damaged power cable Always unplug the power cable from the printer before cleaning or when the printer is not in use If the printer has been dropped or damaged be sure a qualified service person examines the printer before you use it Do not block the filter openings on the printer cabinet Do not expose the printer to moisture or water Do not allow any foreign ob...

Page 50: ...E To avoid burns use caution when closing the cover CAUTION HOT SURFACE The thermal head becomes extremely hot during normal operation Do not touch it CAUTION SHARP OBJECTS The metal edges of the printer may be sharp CAUTION SHARP CUTTER BLADE There are sharp cutter blades inside the printer Do not insert hands or objects P N 2J5439 1641132233 P N 2J5451 1641132182 P N 2J5452 1641132183 ...

Page 51: ...ference in which case the user will be required to correct the interference at his or her own expense Requirements of the EMC directive 89 336 EEC were met through compliance with the following EN 55022 94 class B with Amendments A1 95 and A2 97 EN 55024 98 ITE Immunity includes the following EN61000 4 2 ESD EN61000 4 3 Radiated rf immunity EN61000 4 4 EFT EN61000 4 5 Surge EN61000 4 6 Conducted r...

Page 52: ...ordance to JIS Z8731 Disposal This product contains a small amount of lead in the solder on the circuit boards Disposal of this material may be regulated due to environmental considerations For disposal or recycling information please contact your local authorities In the USA contact the Electronics Industry Alliance at http www eiae org ...

Page 53: ... 1 7 contents package 1 1 D disposal B 4 E error messages calibration 3 8 operator panel 6 2 H handling paper A 3 prints 4 1 ribbon A 3 help with your printer A 4 humidity paper and ribbon specifications A 2 printer specifications A 1 I installing calibration software 3 1 paper 1 8 print catcher 1 4 printer driver 2 1 ribbon 1 5 trim tray 1 4 K KODAK Photo Print Kit A 2 KODAK Photo Printer Print C...

Page 54: ...ces customizing 2 2 properties customizing 2 2 setting up 1 1 settings 4 2 specifications A 1 printer disposal B 4 printer driver installing 2 1 uninstalling 2 2 printer problems resolving 6 1 printing making prints 4 1 test print 4 2 prints handling and storing 4 1 making 4 1 problems 6 1 R radio frequency compliance B 3 Ready message operator panel 4 2 recycling B 4 reordering supplies A 2 ribbo...

Page 55: ... making 1 10 thermal head cleaning 5 2 transporting the printer A 3 trim tray 1 4 troubleshooting clearing paper jam 6 3 error messages operator panel 6 2 potential problems 6 1 power interruption 6 4 U uninstalling calibration software 3 8 printer driver 2 2 unpacking 1 3 USB cable connecting 1 8 ...

Page 56: ......

Reviews: