background image

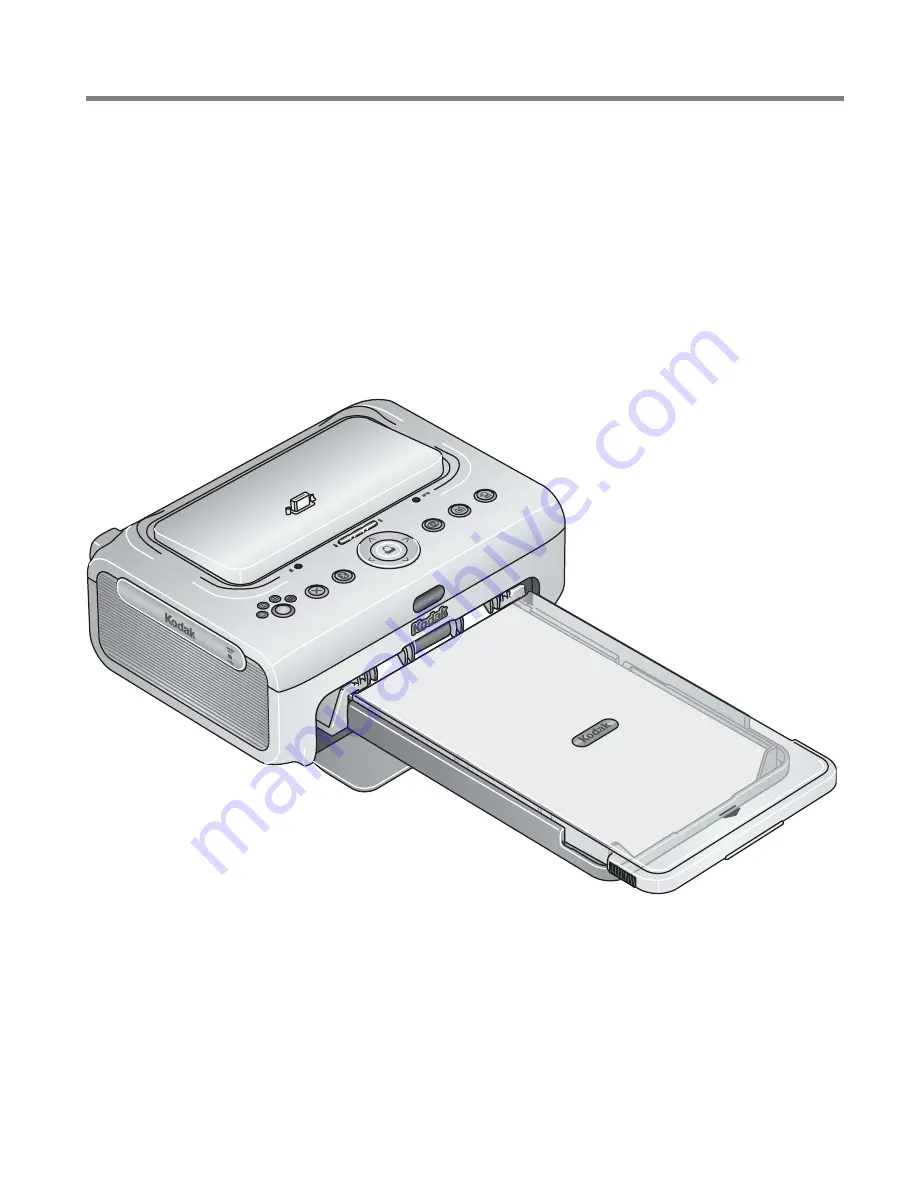
Kodak EasyShare 

printer dock plus series 3

User’s Guide

www.kodak.com

For interactive tutorials, 

www.kodak.com/go/howto

Summary of Contents for 8161960 - EasyShare Printer Dock Series 3 Photo

Page 1: ...Kodak EasyShare printer dock plus series 3 User s Guide www kodak com For interactive tutorials www kodak com go howto ...

Page 2: ...rd mark and logos are owned by the Bluetooth SIG Inc and any use of such marks is under license Wi Fi is a registered trademark of the Wi Fi Alliance Eastman Kodak Company is an authorized licensee of the SD trademark Kodak EasyShare Perfect Touch ImageLink and XtraLife are trademarks of Eastman Kodak Company P N 4J3802_en ...

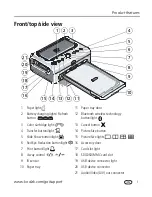
Page 3: ...3 Cancel button 4 Transfer button light 14 Picture Size button 5 Slide Show button light 15 Picture Size lights 6 Red Eye Reduction button light 16 Accessory door 7 Print button light 17 Card slot light 8 4 way control 18 SDIO SD MMC card slot 9 IR sensor 19 USB device connector light 10 Paper tray 20 USB device connector 21 Audio Video A V out connector 4 8 14 13 6 11 2 3 1 10 16 18 19 20 21 12 5...

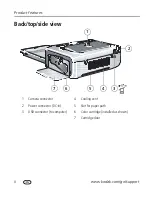
Page 4: ... support Product features Back top side view 1 Camera connector 4 Cooling vent 2 Power connector DC in 5 Slot for paper path 3 USB connector to computer 6 Color cartridge installed as shown 7 Cartridge door 3 5 7 6 2 1 4 ...

Page 5: ... the paper tray 7 2 Setting up your digital camera 8 Docking and charging your digital camera 8 Setting the picture quality 10 Tagging pictures for printing 11 3 Printing without a computer 12 Printing from your digital camera 12 Printing from the internal card reader 13 Printing from a Kodak card reader 14 Printing tagged pictures 15 Printing from a PictBridge compatible camera or device 15 Chang...

Page 6: ...rinter dock 35 Printing from a Bluetooth wireless technology enabled device 35 Printing and transferring over a Wi Fi wireless network 37 Printing from an infrared device 42 Using the Kodak remote control 42 6 Reviewing pictures 43 Reviewing pictures on the camera screen 43 Displaying pictures on a television 43 Running a slide show 44 7 Care and maintenance 45 General care 45 Cleaning the paper f...

Page 7: ...rt v 9 Appendix 68 Printer dock specifications 68 Wireless channels 69 Important safety instructions 70 Extending battery life 71 Upgrading your software and firmware 72 Additional care and maintenance 72 Warranty 73 Regulatory compliance 75 ...

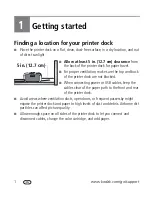
Page 8: ...the top and back of the printer dock are not blocked When connecting power or USB cables keep the cables clear of the paper path to the front and rear of the printer dock Avoid areas where ventilation ducts open doors or frequent passersby might expose the printer dock and paper to high levels of dust and debris Airborne dirt particles can affect picture quality Allow enough space on all sides of ...

Page 9: ...ng on your camera connector you may also need to use the optional Kodak dock adapter kit D 26 a Remove any packing material covering the connector b Place the rear tabs of the insert in the slots toward the back of the printer dock c Press the front of the insert down and snap into place Contact customer support for a dock adapter if it is not included with your product Visit www kodak com go dfis...

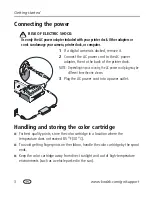
Page 10: ...back of the printer dock NOTE Depending on your country the AC power cord plug may be different from the one shown 3 Plug the AC power cord into a power outlet Handling and storing the color cartridge For best quality prints store the color cartridge in a location where the temperature does not exceed 85 F 30 C To avoid getting fingerprints on the ribbon handle the color cartridge by the spool end...

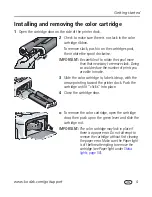
Page 11: ...duce the number of prints you are able to make 3 Slide the color cartridge in label side up with the arrow pointing toward the printer dock Push the cartridge until it clicks into place 4 Close the cartridge door To remove the color cartridge open the cartridge door then push up on the green lever and slide the cartridge out IMPORTANT The color cartridge may lock in place if there is a paper error...

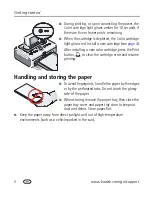
Page 12: ...lling a new color cartridge press the Print button to clear the cartridge error and resume printing Handling and storing the paper To avoid fingerprints handle the paper by the edges or by the perforated tabs Do not touch the glossy side of the paper When storing remove the paper tray then close the paper tray cover and paper tray door to keep out dust and debris Store paper flat Keep the paper aw...

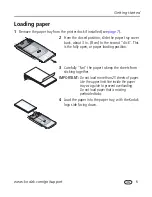
Page 13: ... 8 cm to the second click This is the fully open or paper loading position 3 Carefully fan the paper to keep the sheets from sticking together IMPORTANT Do not load more than 25 sheets of paper Use the upper limit line inside the paper tray as a guide to prevent overloading Do not load paper that is missing perforated tabs 4 Load the paper into the paper tray with the Kodak logo side facing down ...

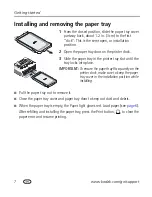
Page 14: ...he printer tray slot until the tray locks into place IMPORTANT To ensure the paper tray fits squarely on the printer dock make sure to keep the paper tray cover in the installation position while installing Pull the paper tray out to remove it Close the paper tray cover and paper tray door to keep out dust and debris When the paper tray is empty the Paper light glows red Load paper see page 6 Afte...

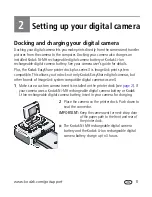
Page 15: ...compatible This allows you to dock not only Kodak EasyShare digital cameras but other brands of ImageLink system compatible digital cameras as well 1 Make sure a custom camera insert is installed on the printer dock see page 2 If your camera uses a Kodak Ni MH rechargeable digital camera battery or Kodak Li Ion rechargeable digital camera battery insert in your camera for charging 2 Place the came...

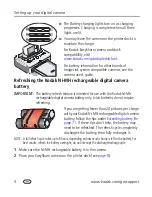
Page 16: ...s intended for use with the Kodak Ni MH rechargeable digital camera battery only Li Ion batteries do not require refreshing If you are getting fewer than 20 pictures per charge with your Kodak Ni MH rechargeable digital camera battery follow the tips under Extending battery life page 71 If these tips don t help the battery may need to be refreshed The refresh cycle completely discharges the batter...

Page 17: ...ra user s guide for battery compatibility Setting the picture quality Before taking pictures change the picture quality setting or resolution on your digital camera to 3 2 This ensures that the pictures you take are proportional to the printer dock paper preventing unwanted cropping of your pictures See your camera user s guide for more information Descending blinking green lights Discharging batt...

Page 18: ...r pictures Press to locate a picture Keep the print quantity as is or press to change it Repeat this step until the desired print quantity is applied to the pictures 5 Press the OK button then press the Share button to exit To tag all pictures in the storage location highlight Print All press the OK button then indicate the number of copies as described above To remove print tagging from all pictu...

Page 19: ... 15 To review and choose pictures to print press the Left Right control on the printer dock For each picture you want to print press to select the number of copies When finished with your selections press the Print button The Print light blinks and printing starts The paper cycles four times before it is ejected The first three passes apply layers of yellow magenta and cyan colors to the print and...

Page 20: ...wn then push the card into the card slot to seat the connector To print the current picture press the Print button NOTE If the memory card contains pictures tagged for printing instead of printing the current picture all tagged pictures are printed see page 15 IMPORTANT To avoid paper misfeeds or jams wait until printing is complete before removing paper the paper tray the color cartridge or the c...

Page 21: ...ock 3 Insert the memory card into the card reader see your card reader user s guide for details Do not insert more than one card at a time To print the current picture press the Print button NOTE If the memory card contains pictures tagged for printing instead of printing the current picture all tagged pictures are printed see page 15 IMPORTANT To avoid paper misfeeds or jams wait until printing i...

Page 22: ...printing is complete before removing paper the paper tray the color cartridge or the camera To bypass printing of tagged pictures press the Cancel button Printing from a PictBridge compatible camera or device The Kodak EasyShare printer dock plus offers PictBridge compatibility which lets you communicate with any PictBridge compatible camera or device 1 Open the accessory door on the printer dock ...

Page 23: ...ect a picture size see above then press and hold the Picture Size button for 4 seconds The selected Picture Size light blinks then glows steady Picture Size setting Number and size of prints per sheet 1 up full photo One 4 x 6 in 10 2 x 15 2 cm picture 2 up card size Up to two 2 1 x 3 3 in 5 4 x 8 5 cm pictures 4 up wallet size Up to four 2 x 3 in 5 1 x 7 6 cm pictures 9 up mini photo Up to nine 1...

Page 24: ...nting one copy and the 4 up option on the printer dock is selected three 2 x 3 in 5 1 x 7 6 cm pictures are printed on one sheet of paper For best results choose a picture size or number of copies on your camera or device that optimizes the use of white space on the paper NOTE When printing from a PictBridge compatible camera or device see page 15 picture size and number of copies are determined b...

Page 25: ...he memory card into the internal card reader or a connected Kodak 8 in 1 card reader sold separately 3 Press the Picture Size button repeatedly to select either 2 up 4 up or 9 up depending on the picture size you wish to print see page 16 4 Press the Print button to begin printing NOTE If you select more than one copy of a picture when tagging them on your camera duplicate pictures are printed on ...

Page 26: ...eader or a connected Kodak 8 in 1 card reader sold separately 3 Press the Picture Size button repeatedly to select either 2 up 4 up or 9 up depending on the picture size you wish to print see page 16 4 Press the Print button to begin printing Method 2 using the printer dock 1 Place the camera on the printer dock The current or most recent picture appears on the camera screen 2 Press the Left Right...

Page 27: ...d using the flash on your digital camera To turn red eye reduction default to always on Press and hold the Red Eye Reduction button for 5 seconds The Red Eye Reduction light blinks then glows steady Repeat to turn the default to always off NOTE The Red Eye Reduction button is disabled when printing from a computer If printing from a computer see page 30 use the Kodak EasyShare software on your com...

Page 28: ...nting without a computer Removing the perforated tabs from the paper IMPORTANT Remove perforated tabs only after printing Paper missing perforated tabs will not feed properly 1 Fold the tabs up then down 2 Remove each tab and discard ...

Page 29: ...e software before connecting the printer dock to the computer 1 Close all software applications that are open on your computer including anti virus software 2 Place the Kodak EasyShare software CD into the CD ROM drive 3 Load the software Windows OS based computer if the install window does not appear choose Run from the Start menu and type d setup exe where d is the drive letter that contains the...

Page 30: ...reen instructions IMPORTANT To use your printer dock with a computer you must install the printer driver If you choose Custom make sure the printer dock is selected The printer driver is automatically installed if you choose Complete 5 If prompted restart the computer If you turned off anti virus software turn it back on See the anti virus software manual for details For information on the softwar...

Page 31: ...port on your computer See your computer documentation for details 3 Plug the other end of the USB cable into the USB connector on the back of the printer dock On Windows operating systems the first time the printer dock is connected the new hardware wizard runs If prompted follow the instructions on the screen See your computer documentation for details NOTE If a Kodak Wi Fi card sold separately i...

Page 32: ...nu select Kodak printer e Select the printer dock then click Add The printer dock is added to your computer Add the printer dock to your computer Mac OS 10 4 a Open the finder window then click the Applications button Or open the Applications folder on your operating drive b Open the Utilities folder then double click Printer Setup Utility c Click Add d From the list of printers select the printer...

Page 33: ...r camera and in EasyShare software on your computer are updated according to the synchronization options you set in EasyShare software see page 27 No only transfer my pictures recommended if installing on an additional or secondary computer each time your camera connects to EasyShare software pictures and videos are transferred to your computer Synchronization is disabled NOTE You can change Sync ...

Page 34: ...rt them See your camera user s guide or click the Help button in the Kodak EasyShare software for details Each time your EasyShare camera connects to EasyShare software the updates you selected in your synchronization settings are made To change synchronization settings use the EasyShare software Sync and Transfer Manager Click the Help button in the Kodak EasyShare software for details To synchro...

Page 35: ...eat the connector 5 Press the Transfer button on the printer dock Kodak EasyShare software opens on your computer if it is installed The printer dock Transfer light blinks while the pictures are being transferred The Transfer light continues to blink until the Transfer or Print button is pressed or until the connection is no longer available IMPORTANT Do not insert or remove a card when the printe...

Page 36: ... USB connector from the card reader into the USB connector located on the side of the printer dock 5 Insert the memory card into the card reader see your card reader user s guide for details Do not insert more than one card at a time 6 Press the Transfer button on the printer dock Kodak EasyShare software opens on your computer if it is installed The printer dock Transfer light blinks while the pi...

Page 37: ...er dock is connected to your computer see page 24 2 Click the My Collection tab 3 Select the pictures you wish to print 4 Click the Print at Home tab 5 Make sure the printer dock is selected as the current printer 6 Change any other settings such as paper size and print layout then click Print Printing tagged pictures from your computer 1 Make sure Kodak EasyShare software is installed see page 22...

Page 38: ...ttings by selecting Print or Page Setup from the File menu depending on your application and operating system 4 Make sure the printer dock is selected as the current printer 5 Change any other settings as needed then click OK or Print Depending on your application and operating system you may first need to return to the main menu and select Print from the File menu NOTE The Picture Size and Red Ey...

Page 39: ...nge the color mode Windows 2000 XP OS 1 From the Start menu select Settings then select Printers NOTE Depending on your Start Menu configuration you may need to select Printers and Faxes from the Control Panel 2 Right click the printer dock icon then select Printing Preferences 3 Click the Color Correction tab 4 Select a color correction option then click OK Windows 98 ME OS 1 From the Start menu ...

Page 40: ...nting Windows OS based computer 1 Double click the printer icon in the system tray 2 Click the print job you want to cancel 3 Select Document then select Cancel Mac OS X 1 In Print Center double click the printer icon 2 Click the job you want to cancel then select Delete Canceling printing from the printer dock Press the Cancel button on the printer dock The print job is canceled and ejected from ...

Page 41: ...iguration Control Panel may be found in the Start menu 2 Double click Add Remove Programs 3 Select Kodak EasyShare software then click Remove 4 Select Modify to uninstall single components such as the printer driver or select Remove to uninstall all components 5 Follow the on screen instructions Restart the computer if prompted Mac OS X 1 Double click the operating drive for your system 2 Select L...

Page 42: ...es choose printing options and print NOTE The Kodak EasyShare printer dock plus series 3 supports OPP Object Push and FTP File Transfer profiles only By default the on board Bluetooth radio is on and ready to receive signals from a compatible Bluetooth technology enabled device To turn the Bluetooth radio off Press the Bluetooth button Press again to turn it on To turn the Bluetooth radio default ...

Page 43: ... wireless technology settings for your printer dock 1 Make sure the printer driver from the included Kodak EasyShare software CD is installed on your computer see page 22 then connect the printer dock to your computer with the USB cable see page 24 2 Open the Kodak wireless printer configuration utility Windows OS based computer a From the Start menu select Programs or All Programs b Open the Koda...

Page 44: ...details Printing and transferring over a Wi Fi wireless network Insert a Kodak Wi Fi card sold separately into the card slot Then print and transfer pictures using your printer dock on an existing Wi Fi wireless Infrastructure network or print pictures directly to your printer dock over a Wi Fi wireless device to device Ad Hoc network Example of a wireless Infrastructure network ...

Page 45: ...t to seat the connector The card slot light blinks as the printer dock scans for available networks Once connected the card slot light glows steady NOTE When properly inserted the card sticks out slightly serving as an antenna for receiving Wi Fi signals To remove the card push it in then release it When the card is partially ejected pull it out 3 Make sure the printer driver from the included Kod...

Page 46: ...lity opens on your computer d Next to Show select WiFi Primary e Change settings as necessary to match the settings of your Wi Fi wireless network Click Wizard to help guide you through the wireless setup process See the configuration utility Help for details Add the printer dock as a wireless printer to your computer a From the Start menu select Programs or All Programs b Open the Kodak folder th...

Page 47: ...lities folder then double click Printer Setup Utility c Select the printer dock from the list then click Utility d Change Wi Fi settings as necessary to match the settings of your Wi Fi wireless network See the wireless configuration utility Help for details 5 Close all programs on your computer then disconnect the USB cable between the computer and the printer dock 6 Optional To print a copy of t...

Page 48: ...syShare digital cameras only 1 Add the printer dock to your Wi Fi wireless network see page 38 IMPORTANT Add the printer dock to the same network as the computer you want to transfer from If you have two or more computers on the same network use the Kodak wireless printer configuration utility on your computer to choose which computer to transfer to see the wireless configuration utility Help for ...

Page 49: ...control or a wireless infrared device with your printer dock make sure the IR sensor on the printer dock is not obstructed For more information visit www irda org Purchase a Kodak remote control a Kodak wireless USB adapter and other accessories at a retailer of Kodak products or visit www kodak com go accessories Also be sure to visit periodically for new wireless printing accessories Using the K...

Page 50: ... accessory door on the printer dock 2 Connect the A V cable included from the printer dock A V out connector to the television or monitor video in port yellow and audio in port white 3 Set Video Out NTSC or PAL on your camera to the format used in the region you live in See your camera user s guide for details 4 Dock the camera see page 8 A message appears on the camera screen asking you to select...

Page 51: ... the printer dock During the slide show you can select pictures to print by pressing the Print button Press to choose the number of copies for that picture IMPORTANT If after you press the Print button you decide not to print the picture select 0 on the copies screen before resuming the slide show or press the Cancel button to exit the print screen altogether To resume the slide show press the Sli...

Page 52: ...ling vents Avoid blocking the back of the printer dock and paper tray exit Keep power and USB cables away from the paper path Keep the surrounding area vacuumed and litter free Protect the printer dock from tobacco smoke dust sand and liquid spills Avoid placing objects on the printer dock Keep the printer dock accessories and supplies away from direct sunlight and out of high temperature environm...

Page 53: ...RTANT Disconnect the power before cleaning 1 Remove the paper tray from the printer dock and leave the paper tray door open 2 Lightly moisten a lint free cloth with water IMPORTANT Do not use cotton or cotton swabs to clean the paper feed roller 3 Use the moistened cloth to gently wipe clean the surface of the paper feed roller Advance the feed roller with your thumb as necessary and continue clea...

Page 54: ...rchasing the AC power cord for the region to which you are traveling 1 Disconnect the power and remove all cables 2 Remove the paper tray from the printer dock close the paper tray cover and the paper tray door on the printer dock 3 Repack the printer dock in the original packing box or use the optional printer dock travel bag Purchase an AC power cord printer dock travel bag and other accessories...

Page 55: ...he paper 1 Remove the paper tray page 7 2 Inspect the paper supply make sure paper is not damaged in any way or removable tabs have not been detached Reload with new paper if necessary 3 Carefully fan the paper to keep the sheets from sticking together 4 Reload the paper tray Do not exceed the fill line 5 Re install the paper tray then press to resume printing Clean the paper feed roller page 46 M...

Page 56: ...e the paper supply from the paper tray Carefully fan the paper to keep the sheets from sticking together 4 Reload the paper tray Do not exceed the fill line 5 Re install the paper tray then press to resume printing If the Color Cartridge light is blinking quickly check the color cartridge IMPORTANT The color cartridge may lock in place if there is a paper error Do not attempt to remove the cartrid...

Page 57: ...er to keep the sheets from sticking together 6 Reload the paper tray Do not exceed the fill line 7 Re install the paper tray then press to resume printing Clean the paper feed roller page 46 Print is smudged Fingerprints may be on glossy side of paper Handle paper by the edges or by the removable tabs page 5 Print is spotted Check to see if the paper is dirty and use a dry lint free cloth to wipe ...

Page 58: ...for details Edit the picture using Kodak EasyShare software on your computer See the EasyShare software Help for details Make sure the printer dock is not placed in direct sunlight or is not operating in a high temperature environment Make sure the cooling vents are not blocked or dirty page 1 Pictures are cropped Change the picture quality setting or resolution on your digital camera to 3 2 See y...

Page 59: ... from a Kodak card reader NOTE The Kodak EasyShare printer dock is compatible with the Kodak 8 in 1 card reader sold separately Other Kodak USB card readers may work with the printer dock however other manufacturers card readers are not supported Check the USB connections from the card reader to the printer dock page 14 Re establish the connection disconnect then reconnect the USB cable from the c...

Page 60: ...ake sure Kodak EasyShare software is installed page 22 Install if necessary If you choose Custom installation make sure to install the printer driver Uninstall then reinstall Kodak EasyShare software page 22 Make sure your computer meets the minimum system requirements Upgrade your system if necessary Nothing happens when you try to print from a Bluetooth technology enabled device The internal Blu...

Page 61: ...ou try to print from an infrared device There is an obstruction blocking the infrared sensor Remove the obstruction Point the infrared device at the infrared sensor then try again Move within range of the infrared device See your device user s guide for details Printing is slow NOTE When printing a large number of prints printing may slow down to prevent the print head from overheating Make sure t...

Page 62: ...onnect then reconnect the power and try again IMPORTANT Upon reconnecting the power the color cartridge may advance to the next picture slot on the ribbon resulting in a supply mismatch see below Paper runs out before the color cartridge or vice versa Supply mismatch can result from several different situations including Scrapping of paper as a result of jams or other errors Gradual advancement of...

Page 63: ...card reader NOTE The Kodak EasyShare printer dock is compatible with the Kodak 8 in 1 card reader sold separately Other Kodak USB card readers may work with the printer dock however other manufacturers card readers are not supported Close unnecessary software applications and minimize remaining application windows Follow any messages on the screen that may have been hidden by other windows Disconn...

Page 64: ...running before the printer dock begins scanning for a network Out of range of the Wi Fi signal Make sure the printer dock is located within the operating range of the Wi Fi wireless network The printer dock network settings are incorrect Using the Wi Fi wireless configuration utility on your computer change the settings to match those of the network See the Wi Fi wireless configuration utility hel...

Page 65: ...move the cartridge see Paper light Light is off The color cartridge is properly installed and is working normally None required Light glows steady amber The color cartridge has five or fewer prints remaining None required Light blinks red There is a color cartridge jam Clear the jam page 49 then press Light glows steady red The color cartridge is depleted Install a new color cartridge page 4 then ...

Page 66: ...age 49 then press Printing stopped during mid print the paper may be damaged or is missing removable tabs page 50 Remove loose paper Check the paper supply Reload with new paper if necessary then press Light glows steady red The paper tray is empty Load paper page 6 then press The paper tray is not installed or is improperly installed Remove the paper tray check that paper is properly loaded and r...

Page 67: ...ight The camera was just placed in camera dock None dock is checking the charge status of the battery Ascending steady green lights The battery is charging Charging is complete when all three lights are lit Leave the camera on the dock to continue charging or maintain charge One blinking red light The battery is not properly installed Re install the battery The battery or connector pin is damaged ...

Page 68: ...se Check the USB connections from the device to the printer dock page 15 A device other than a compatible Kodak card reader or PictBridge compatible camera or device is connected Disconnect the device Connect a Kodak 8 in 1 card reader or a PictBridge compatible camera or device Card slot light SDIO SD MMC card behavior Light status Cause Action solution Light blinks green Slow blink the internal ...

Page 69: ...s in the camera or on the memory card None required To enable Transfer 1 Connect printer dock to computer page 24 2 Take pictures 3 Dock the camera or connect a compatible Kodak card reader page 14 If using a card reader make sure a memory card is inserted The camera is not docked a compatible Kodak card reader is not connected or a memory card is not inserted The printer dock is not connected to ...

Page 70: ...le NOTE The Slide Show feature is only available if a camera is docked Nonerequired Toruna Slide Show see page 44 Red Eye Reduction button light Light status Cause Action solution Light glows steady green Red eye reduction has been applied to pictures for the current print job None required To turn red eye reduction on or off press the Red Eye Reduction button Light is off Red eye reduction has no...

Page 71: ...memory card is inserted The camera is not docked or a compatible Kodak card reader is not connected The camera is not properly seated on the connector Reseat the camera on the printer dock page 8 The camera or card reader is transferring pictures to the computer or has established an active connection to the computer None required When transfer is complete press the blinking Transfer button A Pict...

Page 72: ...ton repeatedly All lights are off There are no pictures in the camera on the memory card or on the PictBridge compatible camera or device To enable the picture size option 1 Take pictures 2 Dock the camera or connect a compatible Kodak card reader page 14 or PictBridge compatible camera or device page 12 If using a card reader make sure a memory card is inserted The camera is not docked a compatib...

Page 73: ...torials www kodak com go howto Software Get information on EasyShare software www kodak com go easysharesw or click the Help button in the EasyShare software Get help with the Windows operating system and working with digital pictures www kodak com go pcbasics Other Get support for Kodak docks cameras software accessories more www kodak com go support Get information on the Kodak Wi Fi card and wi...

Page 74: ...441 40775 Singapore 800 6363 036 Austria 0179 567 357 Hong Kong 800 901 514 Spain 91 749 76 53 Belgium 02 713 14 45 India 91 22 617 5823 Sweden 08 587 704 21 Brazil 0800 150000 Italy 02 696 33452 Switzerland 01 838 53 51 Canada 1 800 465 6325 Japan 03 5540 9002 Taiwan 0800 096 868 China 800 820 6027 Korea 00798 631 0024 Thailand 001 800 631 0017 Denmark 3 848 71 30 Netherlands 020 346 9372 Turkey ...

Page 75: ...rinting 60 watts maximum Print speed Via computer 60 seconds Standalone 65 seconds NOTE First print may take an additional 25 seconds when printing from camera Print speed is dependent on picture size number of continuous prints and environmental conditions Size Without paper tray 5 28 x 7 40 x 3 27 in 13 4 x 18 8 x 8 3 cm With paper tray 12 17 x 7 40 x 3 27 in 30 9 x 18 8 x 8 3 cm Weight Without ...

Page 76: ...ne another resulting in lower network speed or connection loss CAUTION The Wi Fi card for this device transmits at 15 dBm In France the power level is limited to 10 dBm in outdoor environments per regulations When in France use the wireless functions of this product indoors only Communication with computer USB 2 0 full speed PIMA 15740 protocol via model U 5A USB cable catalog number 8650988 IEEE8...

Page 77: ...ceable parts inside Refer servicing to qualified service personnel Do not expose this product to liquid moisture or extreme temperatures Kodak AC adapters and battery chargers are intended for indoor use only The use of controls adjustments or procedures other than those specified herein may result in exposure to shock and or electrical or mechanical hazards Battery safety and handling CAUTION Whe...

Page 78: ...ikely event that battery fluid leaks onto your skin wash immediately with water and contact your local health provider For additional health related information contact your local Kodak Customer Service representative Dispose of batteries according to local and national regulations If the battery contacts touch metal objects the battery may short circuit discharge energy become hot or leak Do not ...

Page 79: ...versions of the software included on the Kodak EasyShare software CD and the printer dock firmware the software that runs on the printer dock Visit www kodak com go printerdockdownloads Additional care and maintenance Do not allow chemicals such as suntan lotion to come into contact with the painted surface of the printer dock If the printer dock has been subjected to inclement weather or you susp...

Page 80: ...e date of purchase Kodak warrants Kodak EasyShare printer dock plus series 3 accessories excluding batteries to be free from malfunctions and defects in both materials and workmanship for one year from the date of purchase Retain the original dated sales receipt Proof of the date of purchase will be required with any request for warranty repair Limited warranty coverage This limited warranty will ...

Page 81: ...e with incompatible accessories or attachments failure to follow Kodak s operation maintenance or repacking instructions failure to use items supplied by Kodak such as adapters and cables or claims made after the duration of this warranty Kodak makes no other express or implied warranty for this product In the event that the exclusion of any implied warranty is ineffective under the law the durati...

Page 82: ...arranty is communicated to the purchaser in writing by a Kodak company no warranty or liability exists beyond any minimum requirements imposed by law even though defect damage or loss may be by negligence or other act Regulatory compliance FCC compliance and advisory This equipment has been tested and found to comply with the limits for a Class B digital device pursuant to Part 15 of the FCC Rules...

Page 83: ... technician for additional suggestions Any changes or modifications not expressly approved by the party responsible for compliance could void the user s authority to operate the equipment Where shielded interface cables have been provided with the product or specified additional components or accessories elsewhere defined to be used with the installation of the product they must be used in order t...

Page 84: ...t occur but such findings have not been confirmed by additional research Kodak Wi Fi card 3F8508 has been tested and found to comply with FCC radiation exposure limits set forth for an uncontrolled equipment and meets the FCC radio frequency RF Exposure Guidelines in Supplement C to OET65 The maximum SAR levels tested for Kodak Wi Fi card 3F8508 have been shown to be 0 616 W kg at Body FCC and Ind...

Page 85: ...with the essential requirements and other relevant provisions of Directive 1999 5 EC Waste Electrical and Electronic Equipment labeling Class B ITE In the European Union do not discard the product as unsorted municipal waste Contact your local authorities or go to www kodak com go recycle for recycling program information ...

Page 86: ...4 18 19 43 44 red eye reduction i 20 refresh i 9 slide show i 44 transfer i 26 28 29 37 C cable AC power adapter cord 3 audio video A V 43 USB 14 15 24 29 camera connector ii docking and charging 8 insert for dock 2 preparing for printer dock 8 printing from 12 setting picture quality 10 tagging pictures for printing 11 transferring pictures from 26 Canadian DOC statement 77 cancel button i 13 14 ...

Page 87: ...tible camera device 15 power 3 to computer 24 to television 43 connector A V out i 43 camera ii power DC in ii 3 USB from device i 14 15 29 USB to computer ii 24 cooling vent ii 45 copies printing multiple 11 12 13 14 16 44 custom camera insert installing 2 customer support 67 D DC in power connector ii 3 display using TV as 43 disposal and recycling batteries 71 printer dock 73 docking and chargi...

Page 88: ...e wireless L layout See picture size light battery charging i 9 60 Bluetooth i 35 65 card slot i 13 28 61 color cartridge i 58 paper i 59 picture size i 16 65 print i 12 64 red eye reduction i 20 63 slide show i 44 63 transfer i 26 28 29 37 62 USB device connector i 14 15 29 61 M Macintosh OS installing software on 22 uninstalling software 34 maintenance color cartridge 3 general 45 72 paper 5 pap...

Page 89: ...slide show 44 power AC adapter cord 3 connecting 3 connector DC in ii 3 print button light i 12 13 14 18 19 43 44 64 print order bypassing 15 creating on camera tagging pictures 10 printing 15 printer driver installing 22 updating 66 72 printing canceling 13 14 20 33 different pictures on same sheet 18 duplicate pictures on same sheet 19 from Bluetooth technology enabled device 35 from computer 30...

Page 90: ...t 77 Waste Electrical and Electronic Equipment labeling 78 wireless channels 69 remote control 42 reviewing pictures 43 as slide show 44 on TV 43 S safety 70 SAR statement 77 SD card slot See card slot light SDIO card slot See card slot light sensor See IR sensor service and support 67 setup camera 8 printer dock 1 slide show 44 software 22 slide show 44 button light i 44 63 slot card i 13 28 cool...

Page 91: ...ransferring communication 56 wireless network connection 57 U uninstalling software 34 upgrading software firmware 66 72 URLs Kodak Web sites 66 USB cable 14 15 24 29 connector to computer ii 24 device connector i 14 15 29 device connector light i 14 15 29 61 external Kodak card reader 14 29 wireless adapter 35 V vent cooling ii 45 viewing pictures See reviewing pictures W warranty 73 Waste Electr...

Reviews: