background image

8

A-61789/ISIS  January  2016 

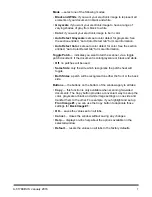
Main tab

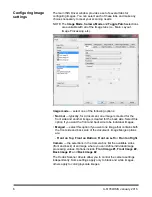
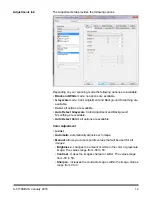
The Main tab provides the following options.

Dots per inch 

(dpi) or resolution 

 indicates the scanning resolution, 

which largely determines the quality of the scanned image. The greater 
the resolution, the better the reproduction. However, scanning at a 
higher resolution also increases scanning time and file size.

Select a resolution value from the drop-down list. The default is 200 dpi. 
Available resolutions are: 100, 150, 200, 240, 250, 300, 400, 500, 600 
and 1200 dpi.

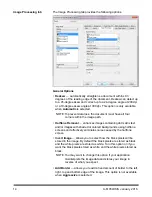
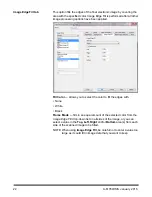
Cropping


 allows you to capture a portion of the document being 

scanned. All cropping options can be used with color/grayscale and 
black and white images. Front and Back cropping are independent, 
however, for dual stream scanning, color/grayscale and black and white 
cropping must be the same per side. Only one cropping option can be 
assigned per image. 

Automatic:

 dynamically adjusts the cropping window for different 

document sizes based on the edges of the image.

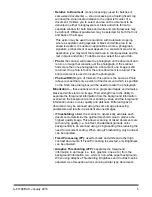
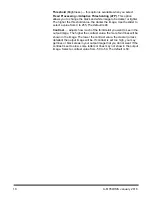
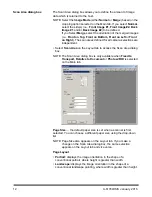
Aggressive:

 eliminates any residual black border on any image 

edges. In order to achieve this, there is a possibility that a small 
amount of image data from the edge of the document may be lost.


Fixed to Transport:

 (used for batches of same-sized documents) 

allows you to define the area to be imaged. Fixed to Transport 
cropping is used in conjunction with paper size and page layout and 
assumes you are center-feeding your documents. If you are not using 
center feeding, you must select the Layout tab to define your scan 
area. See the section entitled, “Layout tab” later in this guide.

Summary of Contents for i3000 Series

Page 1: ......

Page 2: ...e Kodak i3200 i3250 i3300 3400 and i3450 Scanners Any differences between the scanner models will be noted Image processing refers to features of the scanner that allow you to automatically adjust eac...

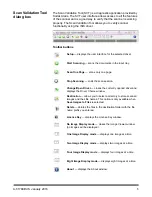
Page 3: ...s 2 Select ISIS for the Driver Type the Kodak Scanner i3000 as the Driver and click OK The Scan Validation Tool dialog box will be displayed NOTE For a description of the icons on the Scan Validation...

Page 4: ...t to the number of presets that can be created The Image and Scanner buttons in the Properties field display tabs associated with configuring the image and scanner settings See the sections entitled I...

Page 5: ...ription of the selected preset Properties Image displays the tabs and options associated with configuring the image settings Scanner displays the tabs and options associated with configuring scanner s...

Page 6: ...ning ends the scan session Change Open Driver closes the currently opened driver and displays the Driver Choice window Destination allows you to select a directory to store scanned images and their fi...

Page 7: ...age is created for the back side Select this option if you want the front and back side to be individual images Merged select this option if you want one image that contains both the front side and ba...

Page 8: ...if the document is color grayscale or black and white Off no patches will be used Same Side only the side which recognizes the patch sheet will toggle Both Sides a patch will be recognized on either t...

Page 9: ...ping are independent however for dual stream scanning color grayscale and black and white cropping must be the same per side Only one cropping option can be assigned per image Automatic dynamically ad...

Page 10: ...e as Photo above except that only a portion of the document which is specified on the Scan Area dialog box will be used to locate the photograph Binarization these options work on grayscale images and...

Page 11: ...to 255 The default is 90 Contrast adjusts how much of the faint detail you want to see in the output image The higher the contrast value the more faint lines will be shown in the image The lower the c...

Page 12: ...ndscape displays the image orientation in the shape of a conventional landscape painting where width is greater than height Automatic the scanner will analyze the content of each document to determine...

Page 13: ...ependent Select Scan Area on the Layout tab to access the Scan Area dialog box NOTE The Scan Area dialog box is only available when Fixed to Transport Relative to Document or Photo w ROI is selected o...

Page 14: ...ot available in Pixels mode X the distance from the left end of the scanner to the left edge of the scanning area Y the position from the top end of the document to the top end of the scanning area Wi...

Page 15: ...ing dot matrix text and or images with shaded or colored backgrounds using halftone screens and effectively eliminates noise caused by the halftone screen Invert Image allows you to select how the bla...

Page 16: ...maximum compression which produces the smallest image size Good a fair amount of compression but still produces acceptable image quality Better some compression which produces decent image quality Bes...

Page 17: ...with small logos or contain small amounts of highlighted text or small colorful photos Medium documents require more color as compared with the Low option before they are saved as color or grayscale i...

Page 18: ...document before it will be saved as either color or grayscale As the value of Color Amount increases more color pixels are required Valid values are 1 to 200 Color Threshold the color threshold or in...

Page 19: ...these settings effect the grayscale version of the document which the scanner analyzes to produce that electronic image Color Dropout None Multiple drops colors other than dark shades e g black or da...

Page 20: ...o Detect Grayscale Color Adjustment and Background Smoothing are available Auto Detect Color all options are available Color Adjustment none Automatic automatically adjusts each image Manual allows yo...

Page 21: ...images Red changes the amount of red in the color image The values range from 50 to 50 Green changes the amount of green in the color image The values range from 50 to 50 Blue changes the amount of bl...

Page 22: ...nt to further adjust the Automatic option Aggressiveness allows you to adjust the extent at which the background s are determined The values range from 10 to 10 Foreground Boldness using this option f...

Page 23: ...Color allows you to select the color to fill the edges with None White Black Frame Mode fills in an equal amount of the selected color from the Image Edge Fill drop down list on all sides of the image...

Page 24: ...considered blank based on the size of the image that would be given to the scanning application i e after all other settings have been applied Content images will be considered blank based on the doc...

Page 25: ...24 A 61789 ISIS January 2016 About tab The About tab displays information about your scanner and driver...

Page 26: ...Tool as described earlier in this guide and access the ISIS driver Click Scanner to configure settings associated with the scanner The following sections provide descriptions and procedures for confi...

Page 27: ...tray the scanner will scan from the flatbed 100 Sheets this selection is recommended when you are scanning between 25 and 100 sheets from the input elevator 250 Sheets this selection is recommended wh...

Page 28: ...orts documents through the scanner This affects how the documents are fed into the scanner how fast they move through the scanner and how they are placed in the output tray Normal Special for irregula...

Page 29: ...s i e resolution color grayscale etc To allow for greater flexibility with applications the scanner will not generate an error until it sees a document whose length is not supported The scanner s thro...

Page 30: ...u are scanning A4 8 5 x 11 inch documents in portrait mode enter a value of 28 57 cm 11 25 inches in the Max Length field The maximum value is 35 56 cm 13 99 inches Auto Set automatically sets the max...

Page 31: ...be waiting for additional images i e stops the feeder Scanning may be resumed by pressing the Start Resume button on the scanner Scanning may be stopped by pressing the Stop Pause button on the scann...

Page 32: ...al counter The capture software application controls static fields any information that the software allows you to enter can be sent to the printer Digital Stamp Mode to enable this option select Fron...

Page 33: ...d width of 3 and the counter at 4 Options are Display Leading Zeros default 004 Suppress Leading Zeros 4 Compress Leading Zeros 4 Top Margin allows you to define the distance from the lead edge before...

Page 34: ...listing of any errors that have been encountered You can view the Operator and Meter logs and save this information to a file by clicking the Save icon or copy the information to the clipboard by clic...

Page 35: ......

Reviews: