Operating Procedures
3-18
September 2000
(d) Turn the flange on the core support assembly
until you have wrapped enough paper around
the cardboard core to cinch it to the core.
(e) Check that the right edge of the paper is still
aligned with the flange and close to it.
(f) Close and lock both sides of the takeup
cassette.
NOTE: The closed takeup cassette should move
freely when you press down on the front
of it. If necessary, reposition the takeup
cassette to move freely.
(c) Turn the flange on the core support assembly
until you have wrapped enough digital printer
paper saver around the cardboard core to
cinch it to the core.
(d) Check that the right edge of the paper is still
aligned with the flange and close to it.
(e) Close and lock both sides of the takeup
cassette.
NOTE: The closed takeup cassette should move
freely when you press down the front of it.
If necessary, reposition the takeup
cassette to move freely.
Cinching Paper to the
Cardboard Core
Cinching the Digital Printer
Paper Saver to the
Cardboard Core
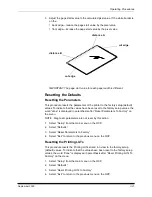
correct
incorrect
correct position
cassette is in
cassette moves
up and down
freely
cassette will
not move up
and down
cassette is not in
correct position and
needs to be reseated
in the support arms
Summary of Contents for LED II PRINTER 20R - OPERATOR'S GUIDE
Page 1: ...KODAK PROFESSIONAL LED II Printer 20R Operator s Guide Part No 6B6192 ...
Page 6: ......
Page 12: ......
Page 16: ......
Page 28: ......
Page 70: ......
Page 96: ......
Page 116: ...Additional Calibration Information C 12 September 2000 Value Graph ...
Page 117: ...Additional Calibration Information September 2000 C 13 Difference Graph ...
Page 138: ......
Page 160: ......
Page 165: ......


