background image

IT

 | 35

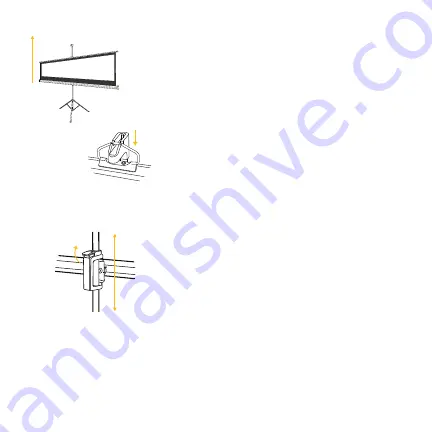
5. Tenere la maniglia dello schermo ed

estrarre lo schermo fino a quando non si 
vede il bordo nero. Quindi, appendere la 
maniglia dello schermo al gancio per 
appenderlo sopra la barra del treppiede.

NOTA: 

Per regolare l'altezza dello schermo 

dal basso, sbloccare la maniglia del treppiede 
regolabile e spostare la maniglia all'altezza 
desiderata. Per regolare l'altezza dello 
schermo dall'alto, allentare l'anello del 
manicotto di bloccaggio e spostare la barra 
superiore all'altezza desiderata.  

Summary of Contents for RODPJSTS100.16

Page 1: ...Quick Start Guide WITH TRIPOD STAND CARRYING BAG KODAK PROJECTION SCREEN...

Page 2: ...ION CONTENU DE L EMBALLAGE APER U DES PRODUITS INSTRUCTIONS D INSTALLATION POUR EMBALLER L CRAN APR S UTILISATION ENTRETIEN SERVICE CLIENT LE 3 4 4 5 6 7 8 8 9 10 11 11 12 13 14 15 15 16 DE EINLEITUNG...

Page 3: ...AR LA PANTALLA DESPU S DE SU USO CUIDADO MANTENIMIENTO SERVICIO DE ATENCI N AL CLIENTE IT INTRODUZIONE CONTENUTO DELLA CONFEZIONE PANORAMICA DEI PRODOTTI ISTRUZIONI PER L INSTALLAZIONE PER IMBALLARE L...

Page 4: ...the user Any use that does not conform to the guidelines described in this User Guide may void the limited warranty Please read all directions carefully before using the product and retain this guide...

Page 5: ...s www kodakphotoplus com pages kodak projection screen 80 with tripod stand carry bag support https www kodakphotoplus com pages kodak projection screen 100 with tripod stand carry bag support PACKAGE...

Page 6: ...le 2 Tripod Bar 3 Hanging Hook 4 Black Border 5 Screen 6 Screen Housing 7 Assembly Connector 8 Tripod 9 Locking Sleeve Ring 10 Assembly Nut 11 Adjustable Tripod Handle EN 5 6 PRODUCT OVERVIEW 1 3 2 4...

Page 7: ...ripod 3 Loosen the locking sleeve ring on the tripod bar to pull up the bar Then tighten the locking sleeve ring to lock the bar in place 4 Insert the assembly connector on the back of the screen hous...

Page 8: ...reen handle on the hanging hook on top of the tripod bar NOTE To adjust the screen height from the bottom unlock the adjustable tripod handle and move the handle to the desired height To adjust the sc...

Page 9: ...cause fabric to loosen When not using the screen for a long time store the screen in the carrying bag TO PACK UP THE SCREEN AFTER USE 1 Remove the screen handle from the hanging hook 2 Let the screen...

Page 10: ...akintl camarketing com www kodakphotoplus com The Kodak trademark logo and trade dress are used under license from Eastman Kodak Company All other products brand names company names and logos are trad...

Page 11: ...sation non conforme aux directives d crites dans ce guide de l utilisateur peut annuler la garantie limit e Lisez attentivement toutes les instructions avant d utiliser le produit et conservez ce guid...

Page 12: ...tps www kodakphotoplus com pages kodak projection screen 80 with tripod stand carry bag support https www kodakphotoplus com pages kodak projection screen 100 with tripod stand carry bag support CONTE...

Page 13: ...d 3 Crochet de Suspension 4 Fronti re Noire 5 cran 6 Logement de l cran 7 Connecteur d Assemblage 8 Tr pied 9 Bague de Verrouillage 10 crou d Assemblage 11 Poign e de Tr pied R glable 6 APER U DES PRO...

Page 14: ...bague de verrouillage de la barre du tr pied pour faire monter la barre Puis serrez la bague de verrouillage de la douille pour verrouiller la barre en place 4 Ins rez le connecteur d assemblage situ...

Page 15: ...e suspension en haut de la barre de tr pied REMARQUE Pour r gler la hauteur de l cran par le bas d verrouillez la poign e du tr pied r glable et d placez la poign e la hauteur souhait e Pour r gler la...

Page 16: ...toile Lorsque vous n utilisez pas l cran pendant une longue p riode rangez le dans le sac de transport POUR EMBALLER L CRAN APR S UTILISATION 1 Retirez la poign e de l cran du crochet de suspension 2...

Page 17: ...photoplus com La marque Kodak le logo et l habillage commercial sont utilis s sous licence de la soci t Eastman Kodak Tous les autres produits noms de marque noms de soci t et logos sont des marques c...

Page 18: ...den in diesem Benutzerhandbuch beschriebenen Richtlinien bereinstimmt kann zum Erl schen der beschr nkten Garantie f hren Lesen Sie alle Anweisungen sorgf ltig durch bevor Sie das Produkt verwenden un...

Page 19: ...UND HERUNTERLADEN https www kodakphotoplus com pages kodak projection screen 80 with tripod stand carry bag support https www kodakphotoplus com pages kodak projection screen 100 with tripod stand car...

Page 20: ...tivstange 3 H ngender Haken 4 Schwarzer Rand 5 Bildschirm 6 Das Bildschirm Geh use 7 Montage Verbinder 8 Stativ 9 Verriegelungsh lse Ring 10 Montage Mutter 11 Verstellbarer Stativgriff DE 19 6 PRODUKT...

Page 21: ...Sicherungsh lsenring an der Stativstange um die Stange nach oben zu ziehen Ziehen Sie dann den Verriegelung sh lsenring fest um die Stange an ihrem Platz zu arretieren 4 Stecken Sie den Montageverbind...

Page 22: ...griff an den Aufh ng haken oben an der Stativstange HINWEIS Um die Bildschirmh he von unten einzustellen entriegeln Sie den verstellbaren Stativgriff und bewegen Sie den Griff auf die gew nschte H he...

Page 23: ...s Gewebe l sen Wenn Sie den Bildschirm f r l ngere Zeit nicht benutzen bewahren Sie ihn in der Tragetasche auf UM DEN BILDSCHIRM NACH GEBRAUCH ZUSAMMENZUPACKEN 1 Entfernen Sie den Bildschirmgriff vom...

Page 24: ...ing com www kodakphotoplus com Die Kodak Marke das Kodak Logo und die Handelsaufmachung werden unter Lizenz der Eastman Kodak Company verwendet Alle anderen Produkte Markennamen Firmennamen und Logos...

Page 25: ...usuario Cualquier uso que no se ajuste a las directrices descritas en esta Gu a del usuario puede anular la garant a limitada Lea atentamente todas las instrucciones antes de utilizar el producto y c...

Page 26: ...plus com pages kodak projection screen 80 with tripod stand carry bag support https www kodakphotoplus com pages kodak projection screen 100 with tripod stand carry bag support CONTENIDO DEL PAQUETE P...

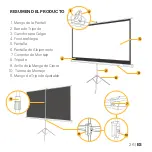
Page 27: ...3 Gancho para Colgar 4 Frontera Negra 5 Pantalla 6 Pantalla de Alojamiento 7 Conector de Montaje 8 Tr pode 9 Anillo de la Manga de Cierre 10 Tuerca de Montaje 11 Mango de Tr pode Ajustable 6 RESUMEN...

Page 28: ...a manga de cierre de la barra del tr pode para tirar de la barra Luego apriete el anillo de la manga de cierre para bloquear la barra en su lugar 4 Inserte el conector de montaje en la parte posterior...

Page 29: ...e colgar en la parte superior de la barra del tr pode NOTA Para ajustar la altura de la pantalla desde la parte inferior desbloquee la manija del tr pode ajustable y mueva la manija a la altura desead...

Page 30: ...que la tela se afloje Cuando no utilice la pantalla durante mucho tiempo guarde la pantalla en la bolsa de transporte PARA EMBALAR LA PANTALLA DESPU S DE SU USO 1 Quita el mango de la pantalla del ga...

Page 31: ...ing com www kodakphotoplus com La marca Kodak el logo y la imagen comercial de Kodak se usan bajo licencia de la Compa a Eastman Kodak Todos los dem s productos nombres de marca nombres de compa as y...

Page 32: ...ualsiasi uso non conforme alle linee guida descritte in questo Manuale d uso pu invalidare la garanzia limitata Leggere attentamente tutte le istruzioni prima di utilizzare il prodotto e conservare qu...

Page 33: ...w kodakphotoplus com pages kodak projection screen 80 with tripod stand carry bag support https www kodakphotoplus com pages kodak projection screen 100 with tripod stand carry bag support CONTENUTO D...

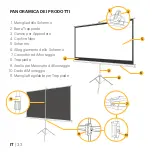
Page 34: ...r Appendere 4 Confine Nero 5 Schermo 6 Alloggiamento dello Schermo 7 Connettore di Montaggio 8 Treppiede 9 Anello per Manicotto di Bloccaggio 10 Dado di Montaggio 11 Maniglia Regolabile per Treppiede...

Page 35: ...el manicotto di bloccaggio sulla barra del treppiede per tirare verso l alto la barra Poi stringere l anello del manicotto di bloccaggio per bloccare la barra in posizione 4 Inserire il connettore di...

Page 36: ...al gancio per appenderlo sopra la barra del treppiede NOTA Per regolare l altezza dello schermo dal basso sbloccare la maniglia del treppiede regolabile e spostare la maniglia all altezza desiderata...

Page 37: ...on si utilizza lo schermo per un lungo periodo di tempo riporre lo schermo nella borsa per il trasporto PER IMBALLARE LO SCHERMO DOPO L USO 1 Rimuovere la maniglia dello schermo dal gancio di sospensi...

Page 38: ...kodakphotoplus com Il marchio Kodak il logo e il trade dress Kodak sono utilizzati su licenza della Eastman Kodak Company Tutti gli altri prodotti nomi di marchi nomi di societ e loghi sono marchi de...

Page 39: ......

Reviews: