background image

Operator’s Guide 


Print Configurations ............................................................................................. 4-40


Creating, Editing, and Deleting Configurations............................................... 4-42


Creating a New Configuration.................................................................... 4-42


Creating a New Configuration Based on an Existing One......................... 4-42


Editing a Configuration............................................................................... 4-43


Deleting a Configuration ............................................................................ 4-43


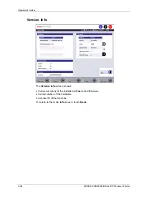
Paper Configurations ...................................................................................... 4-44


Creating a Paper Configuration ................................................................. 4-44


Backprint Configurations................................................................................. 4-46


Correction Configurations ............................................................................... 4-49


Autosave Configurations................................................................................. 4-51


Front Print Configurations ............................................................................... 4-55


Order Configurations....................................................................................... 4-57


Creating a Single Configuration ................................................................. 4-59


Creating a Package Configuration............................................................. 4-60


Reproduction.............................................................................................. 4-61


Configuration Types in the Order Configuration List.................................. 4-62


Black-and-White and Sepia Prints .................................................................. 4-62


Defining a Configuration as the Standard Configuration ................................ 4-63


Saving and Loading Settings and Configurations ............................................ 4-64


When to Save Settings ................................................................................... 4-64


Procedure........................................................................................................ 4-64


Load Settings .................................................................................................. 4-65


4-2 


KODAK PROFESSIONAL RP 30 Laser Printer 


Summary of Contents for RP 30

Page 1: ...RP30 LASERPRINTER OPERATOR S GUIDE ...

Page 2: ...Operator s Guide KODAK PROFESSIONAL RP 30 Laser Printer P N 6B7444 December 2002 ...

Page 3: ... Eastman Kodak Company 2002 All rights reserved Contents of this publication may not be reproduced in any form without permission from Eastman Kodak Company ...

Page 4: ...the Equipment 2 10 End of Work 2 14 Operating Controls 2 18 Screen Structure 2 20 Menu Overview 2 28 Info 2 34 Help 2 40 Chapter 3 Chemicals 3 1 Preparation of Chemicals 3 3 Other Operations to be Performed Prior to Production Start 3 8 Chapter 4 Settings 4 1 From the Order Receipt to the Finished Print 4 3 Preparation of the Print Configuration 4 5 Settings 4 11 Machine Settings 4 14 Print Config...

Page 5: ... 25 Finishing Print Orders 6 26 Chapter 7 Correcting System Conditions 7 1 System Errors 7 3 Error Handling 7 5 Removing Paper Jams 7 8 Chapter 8 Maintenance 8 1 Maintenance Schedule and Maintenance Intervals 8 3 Daily Maintenance 8 4 Weekly Maintenance 8 6 Monthly Maintenance 8 22 Maintenance When Required 8 37 Consumables 8 39 ii KODAK PROFESSIONAL RP 30 Laser Printer ...

Page 6: ...iii Legal Notice viii General Precautions viii When Operating the Equipment viii When Disposing of the Equipment viii Handling of Processing Chemicals ix Disposal of Chemicals and Containers ix Effluent Management ix Chemical Concentrates ix Chemical Filters ix Container Recycling and Disposal ix Assistance from Kodak ix Safety Precautions for the Handling of Chemicals x General Guidelines x Skin ...

Page 7: ...tion manual may cause harmful interference to radio communications Operation of this equipment in a residential area is likely to cause harmful interference in which case the user will be required to correct the interference at his or her own expense CE Compliance This is a Class A product In a domestic environment this product may cause radio interference in which case the user may be required to...

Page 8: ...vice This product complies with 21 CFR Chapter I Subchapter J This is a Class 1 laser product The laser beam cannot strike the operator when the machine is operated under normal conditions even when the machine doors are open Never remove or open covers to the laser modules A laser beam of class 3B may be accessible after the removal of covers There are no user serviceable parts in the laser modul...

Page 9: ...Operator s Guide Certification Labels A B Non interlocked Panel Label Aperture Label C D E vi KODAK PROFESSIONAL RP 30 Laser Printer ...

Page 10: ...Regulatory and Safety Information Laser Source Label F Locations of Laser Safety Labels B C side A F E D KODAK PROFESSIONAL RP 30 Laser Printer vii ...

Page 11: ...thout the covers and panels Persons who open or remove covers expose themselves to dangerous voltages and other risks of injury Do not cover or block the vent openings in the housing This may lead to overheating of components Do not allow objects or liquids to enter the equipment through the vent openings This may cause fire or electrical shock Do not allow the power cable to be squeezed or crimpe...

Page 12: ...dered hazardous waste and require special attention If you must dispose of chemical concentrates as waste material contact your local solid waste or hazardous waste authorities to obtain disposal information Chemical Filters When you clean the chemical filters for the silver bearing working solutions collect the rinse water and direct it to a silver recovery unit for treatment or collect it for tr...

Page 13: ...solutions may splash for example preparing and filling in chemical solutions or cleaning processing racks follow these guidelines Avoid skin contact especially with developer solutions Wear protective gloves and change them every day if possible It may be necessary to also wear a rubber apron during some maintenance operations Rinse all solutions that get on the skin with plenty of running water W...

Page 14: ...aser of the equipment as well as anyone else who owns it during the warranty period Warranty Repair Coverage If this equipment does not function properly during the warranty period a Service and Support Field Engineer from Kodak will repair the equipment without charge during Kodak s normal working hours usually 8 00 a m to 5 00 p m Monday through Friday Such repair service will include any adjust...

Page 15: ...tability for this equipment Repair or replacement without charge is Kodak s only obligation under this warranty Kodak will not be responsible for any consequential or incidental damages resulting from the sale use or improper functioning of this equipment even if loss or damage is caused by the negligence or the fault of Kodak Such damages for which Kodak is not responsible include but are not lim...

Page 16: ...Chapter 1 Introduction Contents Using the Documentation 1 3 Structure 1 3 Text Styles 1 3 Notices 1 3 Safety Precautions 1 4 Storage of Chemicals and Paper 1 4 KODAK PROFESSIONAL RP 30 Laser Printer 1 1 ...

Page 17: ...Operator s Guide 1 2 KODAK PROFESSIONAL RP 30 Laser Printer ...

Page 18: ...rences Example Also see the paragraphs under Safety Precautions on the following page Notices The following notices are used in this manual and on equipment labels NOTE Contains parenthetical information only material This is the least urgent type of notice IMPORTANT Contains information essential to correct operation of the equipment CAUTION Indicates the potential for damage to or from the equip...

Page 19: ...els and in the guide Storage of Chemicals and Paper Consumable Storage Requirements Chemicals Store and prepare chemicals according to the manufacturer s specifications Store all color paper in a cool and dry location Storage Temperature 2 10ºC 35 50ºF Photographic Paper Relative Humidity for open packages 50 60 IMPORTANT NOTE To avoid visible changes in the photographic paper do not store the pap...

Page 20: ...een 2 13 End of Work 2 14 Changing Users 2 14 Shutting Down 2 15 Automatic Shutdown 2 15 Manual Shutdown 2 16 Emergency Reset 2 17 Switching Off the Machine Partially Sleep Mode 2 17 Operating Controls 2 18 Button and Lamp on the Main Computer 2 18 Touch screen Monitor 2 19 Keyboard and Mouse 2 19 Screen Structure 2 20 Information Area 2 21 Touch sensitive Buttons 2 23 Drop down Menus 2 23 Pop up ...

Page 21: ...ith Machine Settings 2 31 Test Menu 2 32 End of Work Menu 2 33 Status Information Help Menus 2 33 Additional Screens 2 34 Info 2 34 Info Printer 2 35 Info Paper Processor 2 36 Info Order 2 37 Version Info 2 38 Error List 2 39 Help 2 40 2 2 KODAK PROFESSIONAL RP 30 Laser Printer ...

Page 22: ...mplete program and generates print data A touch screen monitor is connected to the main computer 2 Printer prepares and transports the paper size to be printed and uses a laser to print the digital image on paper 3 Paper processor includes a connected sorter and a deposit tray for the prints KODAK PROFESSIONAL RP 30 Laser Printer 2 3 ...

Page 23: ...ection with racks crossovers and chemical filters 5 Paper outlet with integrated densitometer 6 Dryer 7 Order sorter 8 Main switch ground fault indicator GFI switch 9 Drain valves for the chemical overflow 10 Right hand paper magazine 11 Lane distributor 12 Transport unit 13 Left hand paper magazine 2 4 KODAK PROFESSIONAL RP 30 Laser Printer ...

Page 24: ...E It is the customer s responsibility to provide for a network and or a workstation and to provide for its connection Image Editing The RP 30 Laser Printer offers a variety of image editing options Color and density corrections Cropping Image enhancement area and detail contrast sharpness saturation Special features colored text borders These modifications are calculated on the image processing bo...

Page 25: ...aper to the appropriate lane to the processor Processes the images Deposits the prints in the sorter These functions are described in the following Printing Sequence section Printing Sequence Main Computer The main computer by way of the integrated image processing board processes image data corrections and the operator entered image manipulations into a printable image and sends the image to the ...

Page 26: ... lane distributor 4 The back print 5 is applied in the lane distributor The lane distributor transports the print to the paper processor 1 2 3 4 5 Paper Processor The exposed paper advances through the processing solutions 1 which include the developer bleach fix and stabilizer The paper then advances through the dryer 2 1 2 KODAK PROFESSIONAL RP 30 Laser Printer 2 7 ...

Page 27: ...ceeds the capacity of one tray a maximum 43 prints the sorter automatically switches to the next tray without terminating the print order Splices in the paper rolls are cut separately and the respective pieces of paper are deposited in the print order stack Large prints are deposited on the large print deposit tray 3 1 2 3 2 8 KODAK PROFESSIONAL RP 30 Laser Printer ...

Page 28: ...Overview Densitometer The built in densitometer 1 above the dryer automatically measures the test print KODAK PROFESSIONAL RP 30 Laser Printer 2 9 ...

Page 29: ...rocedure The conditions for switching on the equipment are The equipment was not previously switched off by way of the main circuit breaker The supply voltages have not been interrupted such as by fuses or circuit breakers or by a power failure Automatic Switch On To prepare the equipment to start automatically by way of the timer set the timer to workdays starting times and off days according to ...

Page 30: ...itch On 1 Switch on the main circuit breaker 1 2 Press the ON button 2 if necessary The ground fault interrupter GFI switch below the main circuit breaker always remains on 1 2 KODAK PROFESSIONAL RP 30 Laser Printer 2 11 ...

Page 31: ...olutions and the dryer have reached nominal temperatures Readiness for Operation User Login After the equipment has been switched on and heated up the Login screen appears where you enter your user name and password four numbers The user name is preset if you have been defined as the first user who must enter a password After you enter the user name if required and password the Start screen appear...

Page 32: ...r 5 End of work lets you shut down the machine completely or partially Sleep mode A different user can also log in from this menu Pricing is not available In the Start screen and in all screens that follow only the functions that correspond to the user profile are displayed Functions that are not available appear in gray If a function is not available either The logged in user does not have permis...

Page 33: ...Operator s Guide End of Work Changing Users To change users you must first log out 1 Select End of work in the menu bar 2 Touch Change user 3 Touch Logout 2 14 KODAK PROFESSIONAL RP 30 Laser Printer ...

Page 34: ...uage Shutting Down The two methods of shutting down the RP 30 Laser Printer are Automatically by way of the integrated timer the preferred procedure Manually by selecting End of work on the menu bar the alternate procedure Automatic Shutdown The equipment switches off automatically if you enter no input within a preset time period after system start To define the preset time period see Machine Set...

Page 35: ...play if necessary Change Timer Change the date time for the next start in the opening screen Next Login Select the user for the next switch on NOTE Changes to the start time and user are only valid for the next start Permanent changes are only possible by way of the equipment settings 2 16 KODAK PROFESSIONAL RP 30 Laser Printer ...

Page 36: ...d you can use the main circuit breaker to switch off the printer 1 Switch off the main circuit breaker 2 Wait 10 seconds 3 Switch on the main circuit breaker Switching Off the Machine Partially Sleep Mode It is possible to switch off parts of the general system so that only the main computer is running This Sleep mode allows for statistical checks locally or by remote control before the equipment ...

Page 37: ...tic startup If you must switch on the system before the next automatic startup time press the ON button The system will then start up Additionally you can press the ON button to initiate a reset The timer lamp 2 lights if the system is in the timer mode after Shutdown 1 2 For more information see Automatic Switch On on Page 2 10 Reset with the ON Button or Stop Button on the Screen in Chapter 7 2 ...

Page 38: ...VGA resolution 1024 x 768 pixels Screen refresh frequency 75 Hz For more information see Screen Structure on Page 2 20 Touch sensitive Buttons on Page 2 23 and Menu Overview on Page 2 27 Keyboard and Mouse You can connect a standard keyboard and mouse on the left panel and use them as an alternative to the touch screen monitor to select and activate the buttons in the menus KODAK PROFESSIONAL RP 3...

Page 39: ...s 1 Information area 2 Fixed buttons i and 3 Stop 4 Status line 5 Active screen 6 Buttons Pop up window if available not shown in the above example 7 Menu bar with five main menus The areas 1 2 3 and 7 are always displayed However the menu bar 7 cannot always be used When certain errors occur it is disabled until the errors are removed 2 20 KODAK PROFESSIONAL RP 30 Laser Printer ...

Page 40: ...tries you can use this button to initiate a software reset The entire RP 30 Laser Printer is stopped orders are interrupted and all major assemblies are reset For more information see Resetting the Equipment if an Error Occurs in Chapter 7 The display in the status line includes Information warnings and requests Error messages The messages in the status line require different actions Some messages...

Page 41: ...messages are saved You can view a list of the messages by touching i then Error list Below is an example of an error list For more information see Correcting System Conditions Chapter 7 2 22 KODAK PROFESSIONAL RP 30 Laser Printer ...

Page 42: ...es and text in displayed selection windows Perform tests by way of the keyboard shown on the screen All screens and associated buttons are explained in detail in this guide Additionally the online help feature which you initiate when you press provides a detailed explanation for each screen Drop down Menus When you touch a button that lets you make a selection a drop down menu opens If there are m...

Page 43: ... confirmation or perform an action A Reset pop up appears when you must execute a reset to resolve an error An Error pop up appears when either incorrect or inconsistent entries or system errors occur You must remove these errors before work can continue A Warning pop up appears if a risk of data loss occurs 2 24 KODAK PROFESSIONAL RP 30 Laser Printer ...

Page 44: ...Overview An Info pop up appears to provide additional status information A Query pop up appears to let you avoid potential problems KODAK PROFESSIONAL RP 30 Laser Printer 2 25 ...

Page 45: ...e keyboard allocation see User Interface in Chapter 4 Touch a button to select the corresponding character Typed characters appear in the blue field and in the button above the image of the keyboard to let you see how much of the text you enter will appear in the button when you select it from a drop down menu The OK button is the means for you to terminate your entry and return to the previous me...

Page 46: ...rm Menu Bar The main menus are always accessible except when either a pop up window is open or the Help screen is open Menu buttons that appear gray indicate that the function is not available The structure of the menus is described in the next subsection Menu Overview KODAK PROFESSIONAL RP 30 Laser Printer 2 27 ...

Page 47: ... menus from the menu bar Print mode Settings Test End of work NOTE Pricing is not available Other screens are available by pressing i and Status information Help All menus and associated screens are outlined on the following pages 2 28 KODAK PROFESSIONAL RP 30 Laser Printer ...

Page 48: ...Overview Print Mode Menu KODAK PROFESSIONAL RP 30 Laser Printer 2 29 ...

Page 49: ...Operator s Guide Settings Menu without Machine Settings 2 30 KODAK PROFESSIONAL RP 30 Laser Printer ...

Page 50: ...Overview Settings Menu with Machine Settings ar KODAK PROFESSIONAL RP 30 Laser Printer 2 31 ...

Page 51: ...Operator s Guide Test Menu 2 32 KODAK PROFESSIONAL RP 30 Laser Printer ...

Page 52: ...Overview End of Work Menu Status Information Help Menus KODAK PROFESSIONAL RP 30 Laser Printer 2 33 ...

Page 53: ...ure on Page 2 20 The Info screen displays the operating hours of the scanner lamp and the laser You can reset the counter for the operating hours of the scanner lamp in the Test Maintenance menu For all other information a separate screen opens To open the Info Printer and Info Paper Processor screens touch the black circle on the touch screen for either the printer left side of illustration or th...

Page 54: ... prints at the individual stations in the printer This screen also contains the width surface and residual length for each of the two paper magazines When an error occurs the corresponding component of the printer is displayed in red To return to the main Info screen touch Back KODAK PROFESSIONAL RP 30 Laser Printer 2 35 ...

Page 55: ... in the processor This screen displays Order numbers for the orders in the paper processor Time remaining until the last print is exited Nominal and actual temperatures of the solutions and the dryer When an error occurs the corresponding component of the paper processor is shown in red To return to the main Info screen touch Back 2 36 KODAK PROFESSIONAL RP 30 Laser Printer ...

Page 56: ...The Info Order screen displays the number of orders not yet printed including network orders and orders stored for file prints backup To return to the main Info screen touch Back KODAK PROFESSIONAL RP 30 Laser Printer 2 37 ...

Page 57: ... The Version Info screen shows Current versions of the installed software and firmware Serial number of the hardware License ID of the machine To return to the main Info screen touch Back 2 38 KODAK PROFESSIONAL RP 30 Laser Printer ...

Page 58: ...y shows the errors encountered since the last start or reset If the complete error message is not displayed in the error list touch the message to display the complete text below the error list To delete the message from the list mark the message and touch Remove selection Touch Back to return to the Info screen The error list and error removal are described in Chapter 7 Correcting System Conditio...

Page 59: ... texts To go to the relevant section in the Help text touch the area concerned such as the button field or list Touch Ï to go back Other buttons are provided on the right side of the Help window Help Index Touch a key word in the alphabetic listing to see the associated Help text Error Help Index This index is an alphabetic listing of the error messages Documentation Touch this button to view the ...

Page 60: ...e Tank Solutions 3 5 Stabilizer 3 5 Bleach Fix 3 6 Developer 3 6 Inserting the Chemical Filters 3 6 Installing the Racks and Bringing the Tank Solutions to Temperature 3 7 Preparing Replenisher 3 7 Other Operations to be Performed Prior to Production Start 3 8 KODAK PROFESSIONAL RP 30 Laser Printer 3 1 ...

Page 61: ...Operator s Guide 3 2 KODAK PROFESSIONAL RP 30 Laser Printer ...

Page 62: ...ked PUSH is pressed unintentionally The lock engages only in the vertical position To open the cover Carefully lift the cover until the lock engages To close the cover 1 Support the cover with one hand 2 Press the unlocking lever PUSH and carefully close the cover KODAK PROFESSIONAL RP 30 Laser Printer 3 3 ...

Page 63: ...SB2 SB3 SB4 Rinsing the Tanks 1 Open the paper processor cover 2 Fill the replenisher tank with water until the lower level sensors are covered to avoid the request for the connection of an EKTACOLOR Processing Cartridge 3 Fill all machine tanks with hot water 4 Let the equipment run for a short while to rinse the circulation system and remove any chemical residues 5 Switch off the equipment and c...

Page 64: ...rchMSDS jhtml IMPORTANT To make sure that no chemistry splashes on the equipment fasten the plastic covers from the accessory pack on the equipment Open two KODAK EKTACOLOR Processing Cartridge 75 cartons and remove the four bottles from each carton When you remove the cap of a bottle the label printed on the seal identifies the bottle as either the developer bottle CD one of the two bleach fix bo...

Page 65: ...volume in the tank is 18 0 L Developer To obtain good performance it is important to take special care in mixing the developer tank 1 Add 15 9 L water to the tank 2 Slowly add the entire contents of two bottles of developer concentrate labeled CD 3 Add 900 mL EKTACOLOR RA Developer Starter CAT No 102 6681 The total volume in the tank is 18 5 L Inserting the Chemical Filters 1 Take the chemical fil...

Page 66: ... tanks are filled with solution 3 Restore power to the equipment 4 Starting the recirculation pumps will complete the mixing of the solutions 5 Let the processor come up to operating temperature Tank Temperature ºC Developer 40 0 0 3 Bleach Fix 38 2 Stabilizer 37 3 Preparing Replenisher 1 Fill 7 L 1 8 gal of water in the Astor tank 1 2 Fill the water tank until the upper one of the two float senso...

Page 67: ...tridge may remain in the machine until you get a message to insert a new cartridge The replenishers are mixed automatically by the integrated electrically driven mixers A preparation is sufficient for about 75 m 807 ft of color negative paper equivalent to approximately 1400 8 x 10 in 20 x 25 cm prints Other Operations to be Performed Prior to Production Start 1 Set the reference values See Paper ...

Page 68: ...4 21 User Administrator Defining Users and User Rights 4 22 Startup Defining the Start Time Standard User Timer 4 25 Calendar Defining Off Days 4 26 Installing the Software 4 27 Printer Settings 4 28 Paper Processor Settings 4 29 Setting the Replenishment Rates 4 29 Replenishment Rates 4 30 Production Balance Digital 4 30 Impact 4 32 Sharpness of Edges 4 33 Saturation 4 33 Sharpness of Grain 4 34 ...

Page 69: ...ons 4 46 Correction Configurations 4 49 Autosave Configurations 4 51 Front Print Configurations 4 55 Order Configurations 4 57 Creating a Single Configuration 4 59 Creating a Package Configuration 4 60 Reproduction 4 61 Configuration Types in the Order Configuration List 4 62 Black and White and Sepia Prints 4 62 Defining a Configuration as the Standard Configuration 4 63 Saving and Loading Settin...

Page 70: ...ne settings Surface Paper settings Cut lengths Machine Country specific settings machine settings production balance communication with other equipment remote orders Settings Machine settings User interface Printer MBL retries Paper Processor replenishment rates Productions balance digital Network orders Creating a user with password language user rights Settings Machine settings User manager Crea...

Page 71: ... Password Touch Login Preparing the RP 30 Laser Printer for an order Prepare paper magazines insert paper code magazine and insert them Testing the paper and the equipment IMPORTANT Use MBL paper for the 1st PBL Test PBL MBL Order handling with preview or with preview and image edition only for File print Print modes Network order File print 4 4 KODAK PROFESSIONAL RP 30 Laser Printer ...

Page 72: ...ttings Paper surfaces Paper settings Settings of cut lengths Test Perform MBL PBL with laser point Settings Settings Define user Import indexprint layouts Import combiprint layouts Print settings Order Machine Machine KODAK PROFESSIONAL RP 30 Laser Printer 4 5 ...

Page 73: ...witch e g fine grained e g fine grained new edit new Change PFDF surface OK Save Return Set switch for cassette coding Select PFDF surface OK Save as Paper settings Enter name OK Return e g Switch 5 Switch 6 Machine 4 6 KODAK PROFESSIONAL RP 30 Laser Printer ...

Page 74: ...ave Return Set switch for cassette coding Enter paper width in mm OK Save as Settings of cut lengths Select paper width in mm OK Return e g Switch 1 Switch 2 Switch 3 Switch 4 edit new Edit OK Save Test Perform MBL PBL with laser point Enter paper width in mm Save KODAK PROFESSIONAL RP 30 Laser Printer 4 7 ...

Page 75: ...g File print e g Flie print edit new Select film mask OK Select film type OK Select type of config Select film mask OK Select film type OK Select type of config OK Select PpF OK Select film mask OK Select PpF OK e g Single OK Select Index print off e g Index_152_ 102 neutr OK Select back print off e g 1 e g off OK ...

Page 76: ... off OK Select border new off OK Select exposure off Select auto save off Select exposure off OK e g 10 OK Select FF Paper configuration off OK Select FF Paper length off e g Front print 1 OK Select border new off OK Select FF Paper configuration off OK e g off By File print from here other config menus e g Prestige d 152 e g 200 OK Select FF adjust to Fit image to paper OK ...

Page 77: ...OK Select P Paper configuration off OK Select P Paper length off Select P Paper configuration off OK Select P Paper length off OK Select P adjust to OK Save as Enter name OK Adjust longer side Enter name OK OK Select P adjust to OK OK Adjust shorter side OK save as save Save OK OK Select FF Paper length off ...

Page 78: ...ion The Settings menu will then be available To open the Setting screen touch Settings on the menu bar The following options are available Print configurations For creating print configurations for production with all associated sub configurations Machine settings For adjusting the equipment to user needs and lab requirements Save settings For saving all machine settings and print configurations R...

Page 79: ... possible with the exception of quotation marks Characters that are typed appear in the blue field and in the button above the image of the keyboard This lets you see immediately how much of the entered text will appear in the button when you select it from a list or drop down menu Press OK to enter the displayed text for the active screen 4 12 KODAK PROFESSIONAL RP 30 Laser Printer ...

Page 80: ...tings Entering Numbers If entry of numbers is required the numeric user password for example the numeric keypad opens automatically Enter the value and press OK KODAK PROFESSIONAL RP 30 Laser Printer 4 13 ...

Page 81: ...nto two sections Configuration and Machine The configuration settings are saved and loaded together with the print configurations Configuration Surface and Paper settings Set the switches according to the paper magazine coding for the surfaces 5 6 and the paper widths 1 4 Cut length 4 14 KODAK PROFESSIONAL RP 30 Laser Printer ...

Page 82: ... and paper processor Production balance Impact sharpness edges saturation sharpness grain detail contrast color density corrections Network orders Settings to receive and send remote orders file print Autosave and network orders Install Software Updating of system software Set date time Other settings Lab name ID for the backprint settings for the automatic end of order and the automatic order num...

Page 83: ...mportant for network orders such as Glossy F Matte N or Lustre E 3 Activate Switch The switches 5 and 6 define the name of the paper surface See Coding the Paper Magazine on Page 4 19 4 Select Save as Enter the name of the new surface configuration Save is only displayed if the screen was opened using Edit 4 16 KODAK PROFESSIONAL RP 30 Laser Printer ...

Page 84: ...Defining Paper Settings 1 Touch Settings Machine settings Paper settings 2 Touch New to create a new paper width 3 Select a configuration from the list and click Edit KODAK PROFESSIONAL RP 30 Laser Printer 4 17 ...

Page 85: ... on the next page 5 Select Save as Enter the name of the new paper setting Save is only displayed when the screen was opened using Edit The total number of paper widths usable without modification is 16 A maximum of four different surfaces can be used in the same way for all widths 4 18 KODAK PROFESSIONAL RP 30 Laser Printer ...

Page 86: ... CUSTOM1 6 50 inch 165 mm CUSTOM2 7 00 inch 178 mm 8 00 inch 203 mm 8 25 inch 210 mm 8 50 inch 216 mm 10 0 inch 254 mm 11 0 inch 279 mm 12 0 inch 305 mm NOTE The table shows the Kodak standard If required a different allocation of the switches to paper widths and surfaces can be defined Each switch combination can only be used once See Paper Configurations on Page 4 44 When the magazine is in plac...

Page 87: ...s Cut length 2 Select New cut length Delete cut length to update the list of created cut lengths The range is 82 to 305 mm 3 Select Save The cut lengths defined here are offered in the selection boxes of the order configurations 4 20 KODAK PROFESSIONAL RP 30 Laser Printer ...

Page 88: ...ble frequency is preset 3 seconds Measuring system Temperature Decimal sign and Separator Time and Date format After selection of the language the national standards are preset automatically Changes are possible Date and time appear in the indicated format in the timer settings and in the backprint a m p m If a 24 hour format is selected for the time display the buttons for the entry and selection...

Page 89: ...user specific settings Any number of users can be defined but the following two are required Administrator with user rights for all functions except service Service with unlimited rights for all functions including service 1 Touch Settings Machine settings User manager 2 Touch New The next screen opens 4 22 KODAK PROFESSIONAL RP 30 Laser Printer ...

Page 90: ...ing user can be changed in the same way Language Keyboard Preview frequency Beep touch The entries made in the User interface are displayed see the previous page These general settings can be adjusted for each individual user NOTE The passwords entered for the system cannot be read or reset anywhere outside this menu If you forget your password the corresponding settings cannot be changed KODAK PR...

Page 91: ...e print with preview Print modes Network orders Network orders from a Workstation Configurations Create modify order configurations including sub configurations Settings Machine settings Change the settings Test Test MBL PBL Remote Save Only shown when the screen is opened using Edit Save as User name maximum 20 characters special characters not allowed NOTE Modifications become effective only aft...

Page 92: ... It is then switched off automatically at the indicated time Entering this switch off time activates the Sleep mode Standard Login Select a user in the user list to be logged in at the beginning of work Automatic Login Specify whether the user should be logged in automatically after switch on or whether he must identify himself by a password No operator actions Shutdown when no operator action If ...

Page 93: ... Days 1 Touch Settings Machine settings Startup Edit calendar 2 Select year month with the arrow keys 3 Define off days for example company holidays Black for workdays Blue for off days 4 Touch OK 4 26 KODAK PROFESSIONAL RP 30 Laser Printer ...

Page 94: ...ernal data carrier If No the operation is stopped If Yes the input screen opens Enter the serial number The software is installed and enabled Then a new start is enforced 4 Update the system software If the system does not function correctly afterwards restore the status before the update with the previous version KODAK PROFESSIONAL RP 30 Laser Printer 4 27 ...

Page 95: ...per used most frequently as master paper The MBL is performed on this paper Activate deactivate Auto MBL MBL maximum repetitions If Auto MBL has been activated enter how often the MBL test should be repeated automatically if the result is not within tolerance The range is 1 to 10 PBL maximum repetitions Enter how often the PBL test should be repeated automatically if the result is not within toler...

Page 96: ...ed information The replenishment rates chemicals water for the normal replenishment are indicated in the top part of the screen More chemicals water is replenished to keep up the production stability in case of below average throughput This means that the normal replenishment rates are increased by the entered factor for the increased or the maximum replenishment The replenishment rates to be used...

Page 97: ...0 ml m 2 Bleach fix 33 100 ml m 2 Stabilizer 69 60 ml m 2 140 ml m 2 water Production Balance Digital 1 Touch Settings Machine settings Productions Balance Digital 2 Enter the required information for general machine settings such as detail contrast sharpness edges and saturation NOTE Changes in the production balance should only be made if after a longer observation period and sufficient producti...

Page 98: ... 0 value Correction values entered later for example by way of correction configurations or for image improvement are added to this 0 value up to 9 maximum and can be included in the backprint For color and density corrections the weighing depends on the entered correction impact see Impact IMPORTANT Always leave all parameters in the production balance on 0 Define necessary corrections only by wa...

Page 99: ...tem to modify the colors density for the whole production It is effective for all color density corrections i e in all screens with regulators for yellow magenta cyan and density These corrections do not show in the backprint IMPORTANT The correction effect should only be changed once in order to adjust the fine grading or the extent of the correction to personal requirements Seasonal changes colo...

Page 100: ...sed too far the result may be artifacts for example thin white lines on dark branches appear artificial digital Blurred and unsharp exposures are not improved Soft focus effect For portrait pictures it may be beneficial to set up a correction configuration with reduced sharpness 2 to 4 for example to improve skin blemishes Saturation This regulator is used for color prints to change the color satu...

Page 101: ...as show noise effects Unsharpness When this value is reduced the noise is reduced and the grain structure disappears but details are less sharp and highlights are eliminated Grain reduction only with values 0 for example 4 Detail Contrast This parameter influences the sharpness in medium structures mm to cm such as faces Shifting towards Structures appear sharper Shifting towards Structures appear...

Page 102: ...Access by way of When File print Remote orders is started the system automatically connects to the specified computer drive Computer name Enter the name or the IP address of a workstation in the network Resource name A shared folder on the specific computer The folder must be shared on the PC where the folder is located Password protection must not be activated Enter the enable name as Resource na...

Page 103: ...rk orders in print breaks no activity by the operator within a certain adjustable time The RP 30 Laser Printer automatically switches to the print mode Network orders and prints the orders waiting there Automatic printing On Off Time span without operator action after which the pop up for digital orders is to be displayed 5 minutes is the default value Duration of the pop up display after which th...

Page 104: ... The PDM PFDF Data Manager manages the order files It saves digital orders images and PFDF information until a receiving station such as the RP 30 Laser Printer calls them In network connections with several input devices the D Bridge should be installed on a PC that is only responsible for this task prerequisites 32 Bit WINDOWS PC WINDOWS 2000 operating system at least 700 MHz at least 128 MB RAM...

Page 105: ...a laboratory Can be included in the backprint Permissible range 160 to 169 Lab name Free name Can be included in the backprint Order no Manual The order number displayed for the operator can change the printing of an order in File print mode Automatic The order number in the File print mode is assigned by the system and cannot be changed by the operator 4 38 KODAK PROFESSIONAL RP 30 Laser Printer ...

Page 106: ...rning display Backprint Activation of the backprint for the File print mode If this parameter is inactive no backprint can be selected for the order The backprint in the print mode Network order is always controlled by the order data created at an external Workstation independent of the status of the Backprint parameter in this menu dTFS Preselection Presetting of the use of dTFS in the File print...

Page 107: ...Operator s Guide Print Configurations 1 Touch Settings Print configurations 2 Enter the required information 4 40 KODAK PROFESSIONAL RP 30 Laser Printer ...

Page 108: ...s the following configurations are defined Paper Backprint Correction AutoSave Front print Order Single Package Reproduction Order configurations are combined on the basis of the other configuration types For this reason these sub configurations must be created first A sub configuration can be used in any number of order configurations KODAK PROFESSIONAL RP 30 Laser Printer 4 41 ...

Page 109: ...er Printer only one image source can be set up which is File print This parameter has a fixed allocation and cannot be changed 2 Enter the settings 3 Touch Save as and enter a meaningful name in the input screen Maximum of 30 characters Permissible special characters _ and blanks Creating a New Configuration Based on an Existing One 1 Touch a similar configuration in the list 2 Touch Edit and ente...

Page 110: ...ouch Delete 2 If the configuration is used in a main configuration you do not have to delete the main configuration Instead select another configuration to replace the deleted one Sub configuration used in the order configuration Order configuration Single used in the order configuration Package 3 To exit the screen without modifications touch Cancel KODAK PROFESSIONAL RP 30 Laser Printer 4 43 ...

Page 111: ...ch width and a surface The cut length of the paper is kept independent of the paper configuration and it can be assigned to an order configuration in the Order menu Creating a Paper Configuration 1 Touch Settings Print configurations Paper New or Edit 4 44 KODAK PROFESSIONAL RP 30 Laser Printer ...

Page 112: ...e paper magazine change Switches 1 to 4 define the paper width Switches 5 and 6 define the surface The switch positions are defined under Settings Machine settings Surfaces and Paper settings They cannot be modified here IMPORTANT Each switch combination of the magazine switches may only be used ONCE 3 Touch Save or Save as KODAK PROFESSIONAL RP 30 Laser Printer 4 45 ...

Page 113: ...r Network orders the backprint is part of the image individual order data The print field is 2 x 40 characters Positions not used are filled with points 1 Touch Settings Print configurations Backprint New or Edit 2 Select File print from Filmmask 4 46 KODAK PROFESSIONAL RP 30 Laser Printer ...

Page 114: ...comments a Add or Remove parameters b If Free text was selected touch the field of the same name and enter the text The preview of the backprint text and the indication about still available blanks are constantly updated 4 Sort the selection list with the arrow keys This determines the order in the backprint text 5 Select Save or Save as If the total length of 80 characters is exceeded a message i...

Page 115: ...ode Since these corrections have no effect on individual prints of the order they are not included in the backprint Because there are only five positions available in the backprint for corrections abbreviations are necessary for the values from 9 to 9 Correction 9 8 7 6 5 4 3 2 1 0 1 2 3 4 5 6 7 8 9 Backprint I H G F E D C B A N 1 2 3 4 5 6 7 8 9 The corrections are shown in sequence for Color den...

Page 116: ... subject groups snow shots or certain customers Correction configurations are only effective in the File print mode 1 Touch Settings Print configurations Corrections New or Edit 2 Enter the Corrections 9 to 9 for Sharpness edges Saturation Sharpness grain Detail contrast Yellow Magenta Cyan Density color density corrections KODAK PROFESSIONAL RP 30 Laser Printer 4 49 ...

Page 117: ... the function of these corrections see Production Balance Digital on Page 4 30 These corrections appear in the backprint if backprint text was selected See Backprint Configurations on Page 4 46 4 50 KODAK PROFESSIONAL RP 30 Laser Printer ...

Page 118: ...e time for example 001_0208051130 The files copied into this folder are named as follows File name_internal image number format for example Testprint_0001 bmp 1 Touch Settings Print configurations Autosave New or Edit 2 Select the type of Autosave configuration The three types exclude each other As a result only the selection box belonging to the selected type is active KODAK PROFESSIONAL RP 30 La...

Page 119: ...isk Quantity Enter the number of image files that are to be saved on the selected medium As the storage capacity of the selected medium cannot be changed the resolution of the image is automatically adapted to fit the desired number on the medium High number low resolution Low number high resolution 4 52 KODAK PROFESSIONAL RP 30 Laser Printer ...

Page 120: ...factors Drive Selection of a local drive floppy or external drive The folder defined and shared in the menu Settings Machine settings Network orders Remote orders Autosave is offered Resolution Four different resolutions are offered KODAK PROFESSIONAL RP 30 Laser Printer 4 53 ...

Page 121: ...See Network Orders on Page 4 36 CD Internet Upload Normal If one or more of these fields is selected the stored image files in the corresponding order file are marked This marking allows an automatic further processing of the files by way of the programs connected with the PDM such as writing to a CD 3 Select Save or Save as 4 54 KODAK PROFESSIONAL RP 30 Laser Printer ...

Page 122: ...int configurations let you expose free text on the front of the print 1 Touch Settings Print configurations Front print New or Edit 2 Select Font Size and Position 3 Touch Font color or Background color KODAK PROFESSIONAL RP 30 Laser Printer 4 55 ...

Page 123: ...he color and press OK or Select the color and press New Modify the red green blue color parts in the next screen to create the desired color and press OK twice 5 Select Save or Save as 4 56 KODAK PROFESSIONAL RP 30 Laser Printer ...

Page 124: ... can be used in any number of order configurations 1 Touch Settings Print configurations Order New or Edit 2 Select Film mask The software is used for configuration with and without a scanner The term Film mask in the RP 30 Laser Printer stands for Filter The associated configurations previously created are listed KODAK PROFESSIONAL RP 30 Laser Printer 4 57 ...

Page 125: ...a package can be created See Creating a Package Configuration on Page 4 60 Reproduction This order configuration switches off all functions of the image enhancement so that the prints correspond exactly to the original This also refers to the computing of the print size The printed image corresponds precisely to the original For deviating sizes there is a border or loss of image information Applic...

Page 126: ...rderless 6 Specify Paper configuration and Cut length 7 Select a crop a Fit image to paper standard The image remains unchanged and the border is added b Fill print size Center cropping some image information is lost c Adjust shorter side longer side The image is kept the cut length is variable One side of the digital image is adjusted to the paper width either the shorter side or the longer side ...

Page 127: ...prints per frame The default value is 1 5 Select either Off or On for Index Backprint and Autosave The settings made here are applied The settings in the single configurations on which they are based are ignored 6 Select Configurations Only order configurations are offered that match the selected image source film mask and are not packages themselves the latter cannot be packed any further and in ...

Page 128: ...anged The image is printed in the middle of a large size 400 dpi e g for CD Inlays 1 Set Film mask and Film type on File print 2 Set Configuration type to Reproduction 3 Select Backprint or set to OFF 4 Select PpF number of prints per frame The default value is 1 5 Specify Paper configuration and Cut length 6 Select Save or Save as KODAK PROFESSIONAL RP 30 Laser Printer 4 61 ...

Page 129: ...standard configuration is always shown in the first line in all configuration lists Black and White and Sepia Prints Automatic conversion of color information in the original to black and white or sepia is not possible The original file must be converted outside the RP 30 Laser Printer using Photoshop or a comparable program 4 62 KODAK PROFESSIONAL RP 30 Laser Printer ...

Page 130: ...figurations can be defined as the Standard configuration This standard configuration is shown at the top of the configuration list and is used automatically After the start After changing the print mode Activate Standard in the desired configuration near the bottom of the screen KODAK PROFESSIONAL RP 30 Laser Printer 4 63 ...

Page 131: ...nly possible with the same software version Otherwise the database might be destroyed If you are not sure of the software version use Info to check When you want to copy configurations to other systems Procedure 1 Touch Settings Save settings 2 Select the drive symbol directory arrow A Zip disk is recommended if many data base entries are modified All files of the drive directory a listed on the l...

Page 132: ...oad Settings 1 Touch Settings Load settings 2 Mark the desired information by checking the box 3 Select a medium if necessary a directory and a file name 4 Select Load KODAK PROFESSIONAL RP 30 Laser Printer 4 65 ...

Page 133: ...cedure for the First Machine Operation or After New Software Installation 5 7 Daily Calibration With the MBL 5 8 Daily Calibration Without the MBL 5 8 Calibration of New Paper Emulsion Changes or Correction of a Paper Channel Not Master Paper 5 9 Calibration of New Paper Emulsion Changes Master Paper 5 9 Completion of the New Calibration 5 9 Testing the Paper Processor 5 10 KODAK PROFESSIONAL RP 3...

Page 134: ...Operator s Guide 5 2 KODAK PROFESSIONAL RP 30 Laser Printer ...

Page 135: ...er which is the paper that is used most frequently in the lab The MBL then calibrates the master paper directly Based on the changes determined on the master paper between the last and the current MBL all other paper styles are adapted Therefore any change in the MBL influences all paper configurations PBL The Paper Balance PBL test compensates for the differences among the various paper types and...

Page 136: ... m 40 in 4 Check that the chemical solutions are at nominal temperature Printing a PBL Test When it is necessary to print a PBL test follow these instructions 1 Touch Test Start PBL 2 Select the paper configuration for which the PBL test is to be printed 3 Touch PBL to print the test 4 Enter in the next screen Emulsion no only for information not assessed Tolerance Step width 0 1 mm Possible input...

Page 137: ...Alt F1 to set the D max for a paper The PapersData dialog box appears Select the desired paper from the drop down list and adjust the Max Density and Color Balance as needed Click Save and then Close The values shown above are for KODAK PROFESSIONAL Digital III Papers Different values will be required for new paper types as they are introduced Activate the box with Laser point Upon first calibrati...

Page 138: ...the test If the master paper is not inserted when an MBL is started you are prompted to insert the master paper You can use the Settings menu see Chapter 4 to set up how often the automatic MBL should be repeated if the values continue to be out of tolerance after retries The number of retries can be from 1 to 10 5 6 KODAK PROFESSIONAL RP 30 Laser Printer ...

Page 139: ...the most frequently used paper in the lab It is used for the MBL Activate with Laser point 4 Print an MBL if this was not done automatically as described above 5 Print a PBL for all other paper styles to be used This should be printed immediately after the MBL is printed because the conditions for printer and paper processor during these tests should be the same The PBL is automatically printed wi...

Page 140: ...mple because of a new emulsion perform an MBL on the master paper In other words only print a PBL in a calibrated system Perform an MBL with the old emulsion if the emulsion is still available If there were changes in the master paper emulsion run a PBL without laser point Daily Calibration Without the MBL NOTE Daily calibration without the MBL is the exception For the respective paper that is nee...

Page 141: ...ted the calibration of the new paper can only be started with a PBL calibration However in this case be sure that the equipment is calibrated Otherwise there may be a deviation between the master paper and all other papers If this is the case perform a complete new calibration Completion of the New Calibration If there is too much deviation in the paper styles a new calibration is recommended 1 Pr...

Page 142: ...s have been reached 2 Unlatch and remove the control strip box 1 from the lane distributor 3 In the darkroom insert a chemical control strip into the control strip box 1 2 1 Control strip box 2 Emulsion side photographic layer With the handle of the control strip box to the right and the emulsion side 2 down first insert the trailing end of the control strip end that comes out last goes in first T...

Page 143: ...Place the control strip box in the holder provided for this in the lower area of the lane distributor 6 Close the printer door 7 Touch Continue to transport the control strip into the paper processor or Cancel to terminate the operation 8 Evaluate the process control strips KODAK PROFESSIONAL RP 30 Laser Printer 5 11 ...

Page 144: ...Operator s Guide 5 12 KODAK PROFESSIONAL RP 30 Laser Printer ...

Page 145: ...ave to Save Processed Images without Printing 6 15 Black and White or Sepia Prints 6 15 Changing the Configuration and the Order Number 6 16 Displaying the Current Configuration 6 16 Changing the Current Configuration 6 16 Selecting a Different Configuration 6 17 Changing the Order Number 6 17 Loading Image Files from Data Carriers 6 18 Saving Digital Orders 6 19 Loading Saved Digital Orders 6 19 ...

Page 146: ...Operator s Guide Network Orders 6 25 Operator Controlled Start 6 25 Automatic Start 6 26 Printing Network Orders 6 26 Finishing Print Orders 6 26 6 2 KODAK PROFESSIONAL RP 30 Laser Printer ...

Page 147: ... correct paper transport in the paper magazine 1 Open the empty magazine and remove the core 2 Remove the screw for the paper guide holder with a Phillips screwdriver 3 Insert the four fingers of the paper guides in the notches corresponding to the paper width Check that all four fingers are in the correct notch NOTE The structure of the notches helps to find the correct position KODAK PROFESSIONA...

Page 148: ... exit 5 Move the guides to the correct width 6 Adjust the guides in the other section of the magazine in the same way NOTE If several paper types are used we recommend preparing several magazines for each paper width 6 4 KODAK PROFESSIONAL RP 30 Laser Printer ...

Page 149: ...core through the roll 3 Put the paper in the magazine and observe the winding direction see the figure below 4 Pull the leading paper edge through the two brackets on the magazine outlet 5 Pull the paper slightly out of the magazine Hold the paper with one hand and close the magazine with the other hand IMPORTANT Avoid fogging of the leading paper edge 6 Rewind the paper after closing the magazine...

Page 150: ... mm NOTE The table shows the Kodak standard If necessary change the switch allocation for the paper widths and surfaces See Paper Widths Not Yet Coded on the following page A maximum of four different surfaces can be used equally for all widths This concerns only the surface names and the coding Chemically the surfaces need not be equal for the different paper widths because the PBLs are created a...

Page 151: ...width we recommend using 82 mm To change the code 1 Delete the width in configurations with width 82 select Settings Machine Settings Paper Settings 2 Use New to store the old code of the 82 mm paper for the new paper width Create configurations with the new paper width for example with a cut length of 171 mm KODAK PROFESSIONAL RP 30 Laser Printer 6 7 ...

Page 152: ...uide rails and push it in until it locks audibly In order to avoid paper transport problems due to an incorrectly cut paper tip confirm the prompt in the next step when You have inserted a new paper roll or There is a paper jam 3 If necessary confirm the prompt for a paper cut If the cut is confirmed the equipment cuts the paper tip 4 75 in and transports it through the paper processor IMPORTANT W...

Page 153: ...as the Change button is shown under the order number Until Start print with without preview is pressed load image data from data carrier Enter a number If the number already exists you receive an inquiry as to whether to overwrite the order The number you enter is incremented for each order that follows Automatic Order Number The first order always starts with 1 The entered number is automatically...

Page 154: ...tomatically or manually Exceptions The sorter moves on without an end of order if an order exceeds the capacity of one bucket Splices in the paper rolls are cut separately and the respective pieces of paper are deposited in the print order stack An automatic end of order occurs When you change to another print mode When the film Stop key on the screen is touched Touch the End of order button to in...

Page 155: ...he main computer Diskette DVD CD ROM Zip and PCMCIA card Network orders Digital orders completely prepared on a workstation are sent by way of a network to the RP 30 Laser Printer to be printed The start is either automatic during times when there is no operator action or operator initiated NOTE Only one print mode can be used at a time It is not possible to open several windows concurrently for d...

Page 156: ...t ratio of the image indicated by x pixels For extreme deviations which the program can no longer process the system displays the error message File print parameter range violated Types of image paper adjustment Fit image to paper Fill print size The quality of the prints depends on the relationship between resolution and print size The minimum acceptable resolution is approximately 100 pixels per...

Page 157: ...e files have an absolute color allocation 0 0 0 black 100 100 100 gray 255 255 255 white 255 0 0 extreme blue etc Deactivate dTFS the respective information should be recorded at order input for Manipulated artificially modified digital exposures Images created with graphic programs Images with unknown type of creation Images taken with different cameras Images with real white areas for example bu...

Page 158: ...ction Single or Package To print an order as single or package select the order configuration of the respective type In the list of order configurations those types are marked as S or P Single All prints of the order are printed in the same format Package A package has several single order configurations combined so that different formats are printed of every image file of an order 6 14 KODAK PROF...

Page 159: ... be changed The image is printed in the middle of a large size 400 dpi for applications such as CD inlays Using Autosave to Save Processed Images without Printing To save image files without printing use the order configuration including autosave configurations All image files of a file print order are stored on the defined local or external drive or sent to the server PC for further processing 1 ...

Page 160: ...ctive only after you leave the screen that was opened with Change Config 1 Touch Change Config or select a different configuration in the selection box see the next title Selecting a Different Configuration 2 Change the settings as desired and confirm with OK They are not saved but only apply to the current order image There are different options depending on how the screen Change configuration is...

Page 161: ...g a Different Configuration 1 Touch the indicated configuration The order configurations printable on the inserted paper are marked in the list by an A P marks the package configurations 2 Select the desired configuration from the list 3 Touch OK Changing the Order Number You can change the order number only if Manual order number has been selected under Machine settings Other settings 1 Touch the...

Page 162: ...directory to the previous screen with OK 4 The files available on the selected drive directory are displayed Select the files a Add all double arrow or mark single frames and add arrow All files or individual files can be removed again from the selection list b To enter all image files of an order in the selection list select other media directories one after the other and add the desired files if...

Page 163: ...are no longer needed Loading Saved Digital Orders 1 Touch Saved orders in the File print screen 2 Check the orders that are not needed any more in the next screen Mark them and Delete 3 Select the order to be edited and Load Return to the File print screen All files belonging to the loaded order are listed in the selection list 4 Add all files to transfer the complete order to the selection list 5...

Page 164: ...igital order is printed automatically During this time the next order can be prepared 2 Touch Finish order Manual end of order is only required if the function Automatic order end is deactivated see Machine Settings Other settings in Chapter 4 3 Touch Prepare order The screen to load image files from data media or stored orders is displayed again NOTE It is not possible to switch to file print wit...

Page 165: ...tion it is printed with the preset configuration 2 If necessary stop the automatic cycle by touching Stop and edit the active image 3 Touch Enlarged view on The current frame is shown twice for comparison Original small Edited version enlarged If there are modifications the display is refreshed with the function Image editing or Special 4 Touch Rotate display To show an enlarged picture upright al...

Page 166: ... with four images and in the enlarged view The opposite screen is displayed The current image is shown twice for comparison Original small Edited version enlarged The display is automatically refreshed if modifications are made Color Density Corrections 1 Set Corrections The magnified view is refreshed after changing to another slide for example from Yellow to density and 0 2 seconds after a slide...

Page 167: ...reen opens 5 Select text color and font 6 Select the font style a Touch B for bold I for italic and or U for underline b Touch the symbol for left justified centered or right justified 7 Select the font size by touching the symbol for reducing or enlarging 8 Touch OK to return to the Position text screen 9 Define the Text position by touching the direction arrows 10 Touch Place text to rotate the ...

Page 168: ... resolution 3 The File names are allocated automatically for example image3 jpg Changes to the file names are possible 4 Touch OK Images in the Network Image data is sent to an external computer or workstation by way of the RP 30 Laser Printer s Ethernet interface and from there by way of a data network such as the Internet Conversely image data from customers can be received from the external wor...

Page 169: ...station can send orders at any time The time when the order is to be printed is specified in the Machine settings The RP 30 Laser Printer uses idle times If you do not perform any operations during a preset time span the waiting orders are processed in the order of their arrival Orders requiring a different paper width are skipped You can start the printing of network orders NOTE A file print conf...

Page 170: ...per width would have to be inserted are skipped Printing Network Orders Each order is printed with the settings in the order description file without operator action At the same time a pop up with the Stop button is displayed Printing can be stopped at any time while the running order is still finished The order just being processed is marked in the order list As soon as all associated images have...

Page 171: ...7 Removing Paper Jams 7 8 Paper Jam in the Printer Section 7 9 Paper Jam in the Transport Unit 7 10 Paper Transport at the Bottom 7 11 Paper Transport at the Top 7 12 Sheet Bridge to Transport Unit 7 13 Transfer Takeover Sections between Transport Unit and Print Engine 7 14 Paper Jam in the Print Engine 7 16 Paper Jam between the Transport Unit and the Lane Distributor 7 18 Paper Jam in the Lane D...

Page 172: ...Operator s Guide 7 2 KODAK PROFESSIONAL RP 30 Laser Printer ...

Page 173: ...d to be reinstalled Cause paper jams if not all prints have exited the paper processor Error Messages Error messages can appear in two ways 1 In the Status line These are information or warning messages that do not need to be confirmed Work can continue in some cases but the required operations should be performed without delay for example refilling chemicals or emptying the effluent tank 2 In an ...

Page 174: ...s empty and all prints are in the paper processor Otherwise there will be a risk of a paper jam 4 Touch Yes to initiate the reset The system initializes the main assemblies and deletes information concerning previous orders for example reorder lists Press the ON button to reset the system when The whole system must be initialized for example when touching the Stop button has no effect The selected...

Page 175: ... an error in the paper processor has not been removed mark the error message and touch Cancel selection 3 Messages of the printer mainly refer to paper that must be removed Remove the paper 4 Deactivate Show all errors so that only active errors are displayed Remove and delete all active errors from the list with Cancel selection 5 If the system still does not perform a reset automatically exit th...

Page 176: ...spond to that of the print size If there are larger differences the error message Parameter range violation appears The image can then only be printed with Fit image to paper Paper Processor Errors Some errors cause the printer to stop If paper is still in the transport area of the printer it must be removed before the work can be continued If an error occurs during a reset a message appears indic...

Page 177: ...e lever check the paper for correct position in the magazine and push in the magazine again 2 Touch Clear Other Error Situations The system stops without displaying a message or the menus cannot be exited 1 Touch the Stop button on the screen 2 Wait until there is no paper in the printer 3 Press reset Help in Case of Error Messages Help texts for the error messages can be displayed as follows Touc...

Page 178: ...the transport unit lift the guide plate if required and turn the drive roller by hand to check if there is still a cut paper in the switching gear c In the upper transport unit lift the guide plate and check if paper is underneath d Check the entrance and exit of the print engine e Check the lane distributor and transfer from the lane distributor to the sheet transfer f Check if the paper jam is s...

Page 179: ...aper jam occurs in the printer section any sheets in front of the print engine will not be transported any further Behind the jam position all sheets in or behind the print engine are automatically transported into the paper processor Remove sheets that are jammed in the printer The location and the number of sheets can be opened on the screen touch i and touch the respective module in the graphic...

Page 180: ...ransport unit Pull out the print engine 1 Open the left hand side door 2 Actuate the two levers 1 and open the locking mechanism 3 Pull out the complete print engine 2 Paper jams may occur in three positions in the transport unit Paper transport at the bottom Paper transport at the top Sheet bridge 7 10 KODAK PROFESSIONAL RP 30 Laser Printer ...

Page 181: ...out the transfer unit towards you 3 Open the levers 2 and hold against the unit as the bottom part of the transport releases 4 Pull the flap 3 up and slowly lower the bottom part CAUTION When you return the flap 3 to the operating position it must be flush to the side of the transport before you close the lever 2 KODAK PROFESSIONAL RP 30 Laser Printer 7 11 ...

Page 182: ...ransport at the Top With the print engine pulled out the locking mechanism opened and transport unit pulled out 1 Lift the top guide plate on the shafts marked red and fold it up 2 Remove the jammed paper from the top paper transport 7 12 KODAK PROFESSIONAL RP 30 Laser Printer ...

Page 183: ...he print engine pulled out the locking mechanism opened and transport unit pulled out 1 Open the guide plate for the sheet transport and remove the paper 2 Turn the button see arrow on the sheet turnover and remove the paper KODAK PROFESSIONAL RP 30 Laser Printer 7 13 ...

Page 184: ...he left hand side door 2 Actuate the two levers 1 and open the locking mechanism 3 Pull out the print engine 2 completely For paper jammed in the print engine 1 Remove the guide plate at the top 1 and or the bottom 2 pressing the toggle of the guide plate down 1 or up 2 2 Remove the paper 7 14 KODAK PROFESSIONAL RP 30 Laser Printer ...

Page 185: ...Correcting System Conditions For paper jammed in the transport unit 1 Leave the transport unit in the printer Do not pull it out 2 Remove the paper KODAK PROFESSIONAL RP 30 Laser Printer 7 15 ...

Page 186: ...r Jam in the Print Engine 1 Pull out the print engine a Open the left hand side door b Open the locking mechanism using the two 2 levers 1 c Pull out the print engine 2 completely 7 16 KODAK PROFESSIONAL RP 30 Laser Printer ...

Page 187: ...f the stepper motor for the print drum 3 Unlock 2 the bottom belt assembly 1 and fold it down 4 Remove the paper from the print roller 3 5 Verify that all belts of the lower belt assembly and the print drum sit correctly KODAK PROFESSIONAL RP 30 Laser Printer 7 17 ...

Page 188: ...door 2 Open the locking mechanism fastening screw and pull the lane distributor out towards you 3 Turn the hand wheel 1 at least 10 turns to advance the sheet into the lane distributor 4 Remove the guide plate 1 Pull the 2 push buttons to open them 5 Remove the paper 7 18 KODAK PROFESSIONAL RP 30 Laser Printer ...

Page 189: ...utor 1 Open the right hand printer door 2 Open the locking fastening screw and pull the lane distributor out towards you 3 Pull each of the two push buttons 1 to open them 4 Remove the guide plates 5 Remove the paper KODAK PROFESSIONAL RP 30 Laser Printer 7 19 ...

Page 190: ...the handle 3 Lift and remove the sheet transfer 4 Remove the paper 5 Verify that all belts are positioned correctly 6 Mount the unit again Be careful of the two locking bolts 4 on the right hand side wall 2 1 3 4 CAUTION If the paper is damaged torn squeezed when it is pulled out mechanical damage cannot be ruled out 7 20 KODAK PROFESSIONAL RP 30 Laser Printer ...

Page 191: ...e cover Check that the cover lock fully engages in vertical position When closing the cover Support the cover with one hand Press the unlocking lever PUSH and close the cover Wear protective gloves and goggles when removing jams in the paper processor Pull out the racks to remove the jammed paper 1 Open the cover 2 Open the rack locking lever KODAK PROFESSIONAL RP 30 Laser Printer 7 21 ...

Page 192: ... unit 4 The CD solution must not be contaminated by bleach fix Therefore put the splash guard 2 on the CD rack 1 2 5 Open the rack locks Lift the racks SB1 to SB4 and let the chemical solution drip from the racks 6 Lift the BX bleach fix rack far enough so that the hinged holding plate can rest on the metal bracket to let the chemical solution drip from the rack 7 22 KODAK PROFESSIONAL RP 30 Laser...

Page 193: ...e CD Color Developer Feed Unit 8 14 Removing the Tank Crossovers 8 15 Removing the V Wiper and Squeegee Unit 8 16 Cleaning 8 16 Cleaning the Chemical Filters 8 18 Cleaning the Filters in ASTOR and Water Inlets 8 19 Cleaning the Densitometer Calibration Plate 8 20 Cleaning the Transport Belt of the Print Chute 8 21 Monthly Maintenance 8 22 Below the Cutter Unit 8 23 Door to Print Engine 8 23 Right ...

Page 194: ...perator s Guide Maintenance When Required 8 37 Consumables 8 39 Chemicals 8 39 Air Filters 8 39 Other Consumables 8 39 KODAK PROFESSIONAL Digital III Paper 8 40 8 2 KODAK PROFESSIONAL RP 30 Laser Printer ...

Page 195: ...OR and water inlets Clean densitometer calibration plate Print chute Clean transport belt Check solution temperatures Clean air filters Below cutter units Door to print engine Paper processor right hand side wall dryer and AC supply Replace the chemical filters Clean processing racks Clean dryer rack Clean paper outlet Clean replace air filter Clean slide plate with feed chute Clean rubber transpo...

Page 196: ...on side photographic layer With the handle of the control strip box to the right and the emulsion side 2 down first insert the trailing end of the control strip end that comes out of the control strip bag last goes in first The end of the control strip should be flush to the end of the box If the control strip was accidentally inserted upside down the emulsion is on top the processed control strip...

Page 197: ...Close the printer door and touch Continue to transport the control strip into the paper processor or Cancel to terminate the operation 4 Evaluate the process control strips KODAK PROFESSIONAL RP 30 Laser Printer 8 5 ...

Page 198: ...hands with soap and water after you perform maintenance procedures Refer to the manufacturer s material safety data sheet MSDS for additional safe handling and first aid information Transport Unit 1 Unlock the transport unit and pull it out on the telescopic rails 2 Open the transport unit 3 Remove the paper dust with a vacuum cleaner 4 Clean the sensors with a brush 5 Clean the transport rollers ...

Page 199: ... the sheet bridge on the left side and fold it open to the right 4 Remove the paper dust with a vacuum cleaner 5 Set the sheet bridge back to its initial position 3 and snap it into the locked position 6 Push the cover plate of the single sheet buffer SR into the holding brackets 2 at the back and fasten it at the front by snapping in the quick action lock 7 Push in the transport unit and lock it ...

Page 200: ...ine 2 Pull out the print engine 2 on the telescopic rails 3 Press down the toggle on guide plate 1 press up on guide plate 2 and remove the two guide plates 4 Remove the paper dust with a vacuum cleaner 5 Insert both guide plates again 8 8 KODAK PROFESSIONAL RP 30 Laser Printer ...

Page 201: ...lean the light barriers with a brush or compressed air spray Beginning of Line BOL 1 Start of exposure accessible from outside Beginning of Page BOP 2 Paper tip detection 1 2 KODAK PROFESSIONAL RP 30 Laser Printer 8 9 ...

Page 202: ...Guide 7 Open the belt assembly 8 Remove the paper dust with a vacuum cleaner 9 Close the belt assembly again IMPORTANT Make sure that the transport belts are not shifted 8 10 KODAK PROFESSIONAL RP 30 Laser Printer ...

Page 203: ...lescopic rails 3 Remove the paper dust with a vacuum cleaner 4 Remove the guide plates after opening the quick action locks 2 and the knurled screws 3 5 Clean all guide plates with a damp cloth 6 Put back the guide plates Check that they sit correctly in the holders and that the quick action locks are locked 7 Clean the transport rollers 8 Push in the unit and tighten the locking screw 9 Vacuum th...

Page 204: ...he sheet transfer down 4 Remove the paper dust with a vacuum cleaner 5 Clean the rollers and transport belts with a lint free cloth 6 Mount the unit again Note the two locking bolts 4 on the right hand side wall 7 Mount the cover by holding the latch in the open position and lowering the cover 2 1 3 4 NOTE Make sure that the transport belts are not shifted 8 12 KODAK PROFESSIONAL RP 30 Laser Print...

Page 205: ...ning the cover Check that the cover lock fully engages in vertical position When closing the cover Support the cover with one hand Press the unlocking lever PUSH and close the cover IMPORTANT CAUTION To prepare for cleaning put the crossovers in a lab basin filled with water over the weekend To avoid damage to the rollers and paper guide surfaces do not stack the crossovers KODAK PROFESSIONAL RP 3...

Page 206: ...pen the paper processor cover and let it lock in the vertical position 2 Fasten the splash guard at the front to protect the tank area from chemical splashes 3 Release the tabs and grasp the CD feed unit remove it and put it in the lab basin 8 14 KODAK PROFESSIONAL RP 30 Laser Printer ...

Page 207: ...Crossovers Working from left to right put each of the 5 tank crossovers in the lab basin 1 Grasp the tank crossovers by the tabs 2 Remove the crossover 3 Set the crossover in the lab basin KODAK PROFESSIONAL RP 30 Laser Printer 8 15 ...

Page 208: ...er for the V wiper on both sides and lift it out of the squeegee unit 3 Put both parts in the lab basin 4 Close the paper processor cover Cleaning Clean the CD feed unit tank crossovers and the squeegee unit and V wipers before starting to work after the weekend 1 Clean the CD feed unit and tank crossovers a Clean the rollers in the lab basin with a soft brush b Clean the paper slide surfaces with...

Page 209: ...aces of the squeegee unit and the holder with a lint free cloth 3 Reinstall the holder of the V wiper and let it snap in 4 Rinse the crossovers again in running water before mounting them Observe the attached color markings numbering when reinstalling the tank crossovers and the squeegee unit Check that the latches of the units snap in and are flat against the housing KODAK PROFESSIONAL RP 30 Lase...

Page 210: ...tive level switches service technician 3 Search for leaks service technician WARNING The risk of fire exists if the level switches become defective Have defective level switches replaced immediately Do NOT attempt to repair them Cleaning the Chemical Filters Purpose To ensure uniform circulation of the processing solutions by regular cleaning of the filters Clean chemical filters 1 Remove the chem...

Page 211: ...the drain valves on the top of the 3 inlets 2 Unscrew the cap nuts 1 and 2 and carefully remove them The cap nuts are full of liquid 3 Remove the filters and rinse them in running water 4 Reinstall the filters Do not mix up the ASTOR filters with the water filters 5 Open the drain valves again 1 ASTOR 2 Water KODAK PROFESSIONAL RP 30 Laser Printer 8 19 ...

Page 212: ... right and left side on the guide plate of the densitometer unit 3 Turn the densitometer unit 2 over and clean the calibration plate with a damp cloth 4 Clean the guide plates with a damp lint free cloth 5 Fasten the densitometer unit again with the knurled screws 6 Fasten the cover of the paper outlet CAUTION Have a service technician replace any damaged calibration plates 8 20 KODAK PROFESSIONAL...

Page 213: ...ce Cleaning the Transport Belt of the Print Chute Use a cloth and warm water 1 Clean the transport belt 1 with a damp cloth 2 Wipe the print chute 2 with a damp cloth KODAK PROFESSIONAL RP 30 Laser Printer 8 21 ...

Page 214: ...ypad opens The temperature of the selected solution is indicated in the first line of the input field b Remove the chemical filter Using a calibrated thermometer measure the current temperature of the processing solution through the free opening of the filter holder c Enter the current temperature value via the numeric keypad The sensor will be calibrated after pressing OK NOTE The Reset reference...

Page 215: ...nt to the grid 4 Mount the cover Door to Print Engine NOTE CAUTION The filter is mounted on the housing of the exposure gap fan on the inside of the print engine door The filter holder is fastened to the housing by 2 black locking screws 1 1 Loosen the locking screws 1 and remove the filter holder 2 2 If the filter mat is not excessively dirty wash it in warm water Do not bend or wring the filter ...

Page 216: ...Operator s Guide 8 24 KODAK PROFESSIONAL RP 30 Laser Printer ...

Page 217: ... To remove the holder lift it by the handle and pull it out to the front 1 Blow out the air filters from the inside with compressed air or wash them in warm water if they are very dirty 2 Replace very dirty air filters together with the holder 3 Put the air filter in the holder and insert the holder again 1 2 KODAK PROFESSIONAL RP 30 Laser Printer 8 25 ...

Page 218: ...ctive gloves and goggles when performing this procedure 1 Open the paper processor cover and let it lock in the vertical position 2 Remove the chemical filters and put them in a lab tray 3 Pull the used filter cartridges off the shaft and install the new filter cartridges 4 Rinse the filters to remove loose fibers 5 Reinstall the chemical filters in the color marked order 8 26 KODAK PROFESSIONAL R...

Page 219: ...tain the covers Use the splash guard 1 or remove splashes immediately with water 1 Remove the CD Color Developer feed unit the tank crossovers and the squeegee unit 2 Put the splash guard 2 on the CD rack to prevent the CD solution from being contaminated by BX 1 2 3 Open the rack locks Lift the racks SB1 to SB4 and let the excess chemical solution drip from the racks KODAK PROFESSIONAL RP 30 Lase...

Page 220: ...llers For this press together the bearings clipped into the side parts at the catches and take them out On the CD and BX racks dismount in addition the four styrodur displacers mounted in holders on both sides 10 Clean the rollers with a soft brush Clean the guide elements with a lint free cloth and warm water 11 Let the racks drip dry Mount the guide elements clip the bearings of the guide elemen...

Page 221: ...nce 16 Before mounting the squeegee unit put back the protective plate underneath 17 Close the processor cover Arrow white Hinged holding plate on the CD and BX racks KODAK PROFESSIONAL RP 30 Laser Printer 8 29 ...

Page 222: ...he knurled screw 2 and put it in water over the weekend CAUTION If the rollers are not mounted prior to the automatic start after the weekend be sure to deactivate the automatic MBL Master Balance in order to prevent a paper jam On Monday before starting to work wipe off all deposits on the feed rollers and the feed plate with a damp cloth 4 Clean the guide roller behind the feed rollers with a da...

Page 223: ...uide grids 8 Finally mount the bracket with the feed roller set on the rack 9 Check the smooth movement of the rack by turning the handle 4 see previous Figure 10 Push the dryer rack in the dryer cabinet and fasten it with the knurled screw 11 Put back the covers Turn the locks through 90 push them in up to the locking point KODAK PROFESSIONAL RP 30 Laser Printer 8 31 ...

Page 224: ...meter Access after opening the flap on the paper outlet 1 Remove the front cover of the paper outlet 1 Loosen the screw 2 1 2 2 Remove the holder 1 from the fan housing 3 Wash the filter mat if it is not very dirty 4 Replace very dirty air filters 5 Put the filter in the holder and insert the holder again 8 32 KODAK PROFESSIONAL RP 30 Laser Printer ...

Page 225: ...e plate 2 and lift it with the feed chute out of the supporting brackets 2 Wipe the rear guide plate and the removed plate with a damp lint free cloth 3 Put the guide plate in the supporting brackets push it down and fasten it 1 KODAK PROFESSIONAL RP 30 Laser Printer 8 33 ...

Page 226: ...t unit while the transport is switched off Necessary tools are Lint free cloth and warm water Vacuum cleaner Soft brush Purpose To ensure reliable paper transport Rubber transport belts for poster sizes 1 above the densitometer Clean the visible part of the transport belts with a damp cloth 8 34 KODAK PROFESSIONAL RP 30 Laser Printer ...

Page 227: ...loth 1 3 Unlock the quick action locks on the guide plate 1 in front of the output rubber rollers Remove the guide plate 4 Clean the dust in the output area with a vacuum cleaner 5 Clean the four light barriers in front of the output rubber rollers with a brush 6 Put back the guide plate and fasten it safely with the quick action locks KODAK PROFESSIONAL RP 30 Laser Printer 8 35 ...

Page 228: ...Operator s Guide Transport belt of the print chute Clean the transport belt 1 with a damp cloth 8 36 KODAK PROFESSIONAL RP 30 Laser Printer ...

Page 229: ...er of the back printer 4 Remove the ink ribbon cartridge by slightly pushing in both sides 3 5 Prepare the new ink ribbon cartridge If present remove the foil strip on the ink ribbon The ink ribbon must be tight in the cartridge if necessary tighten by the knob 4 note the direction indicated by the arrow 6 Insert the ink ribbon cartridge 7 Slightly turn the knob 4 on the cartridge until the cartri...

Page 230: ...e drain valves to be opened to empty the effluent tanks 2 Put a bucket under the respective drain valve Open the valve and empty the tank Close the valve Perform the same procedure with the adjacent second valve CAUTION IMPORTANT Do not open both valves at the same time The volume of both tanks is 20 L Do not open the drain valves in the vertical position on the right side They are used to empty t...

Page 231: ... KODAK EKTACOLOR RA Developer Starter 102 6681 Air Filters Air Filter CAT No Annual Air Filter Kit 849 3678 Other Consumables Consumable CAT No Chemical Filters 113 3453 Backprinter Cartridges 826 0739 KODAK PROFESSIONAL Pro Strips for Process RA 4 129 8587 KODAK PROFESSIONAL RP 30 Laser Printer 8 39 ...

Page 232: ...5041 F 802 9134 8 x 262 20 3 x 88 N 860 6014 E 886 1064 F 889 7290 8 x 577 20 3 x 176 N 804 3499 F 894 0223 8 x 262 21 x 80 N 895 8019 E 835 6297 81 2 x 577 21 6 x 176 F 883 5910 E 898 7034 F 107 0523 10 x 288 25 4 x 88 N 191 6816 E 831 0930 F 838 3432 10 x 577 25 4 x 176 N 866 7743 E 846 6740 F 864 9865 11 x 288 27 9 x 88 N 109 2105 E 870 5204 F 823 1730 11 x 577 27 9 x 176 N 832 1770 E 171 5127 ...

Page 233: ......

Page 234: ...EASTMAN KODAK COMPANY Rochester New York 14653 U S A Kodak and Kodak Professional are trademarks of Eastman Kodak Company Eastman Kodak Company 2002 Printed in U S A ...

Page 235: ...EASTMAN KODAK COMPANY Kodak Professional Division Rochester New York 14650 www kodak com go professional Eastman Kodak Company 2002 TM Kodak Kodak Professional P N 6B7444 ...

Reviews: