English
8
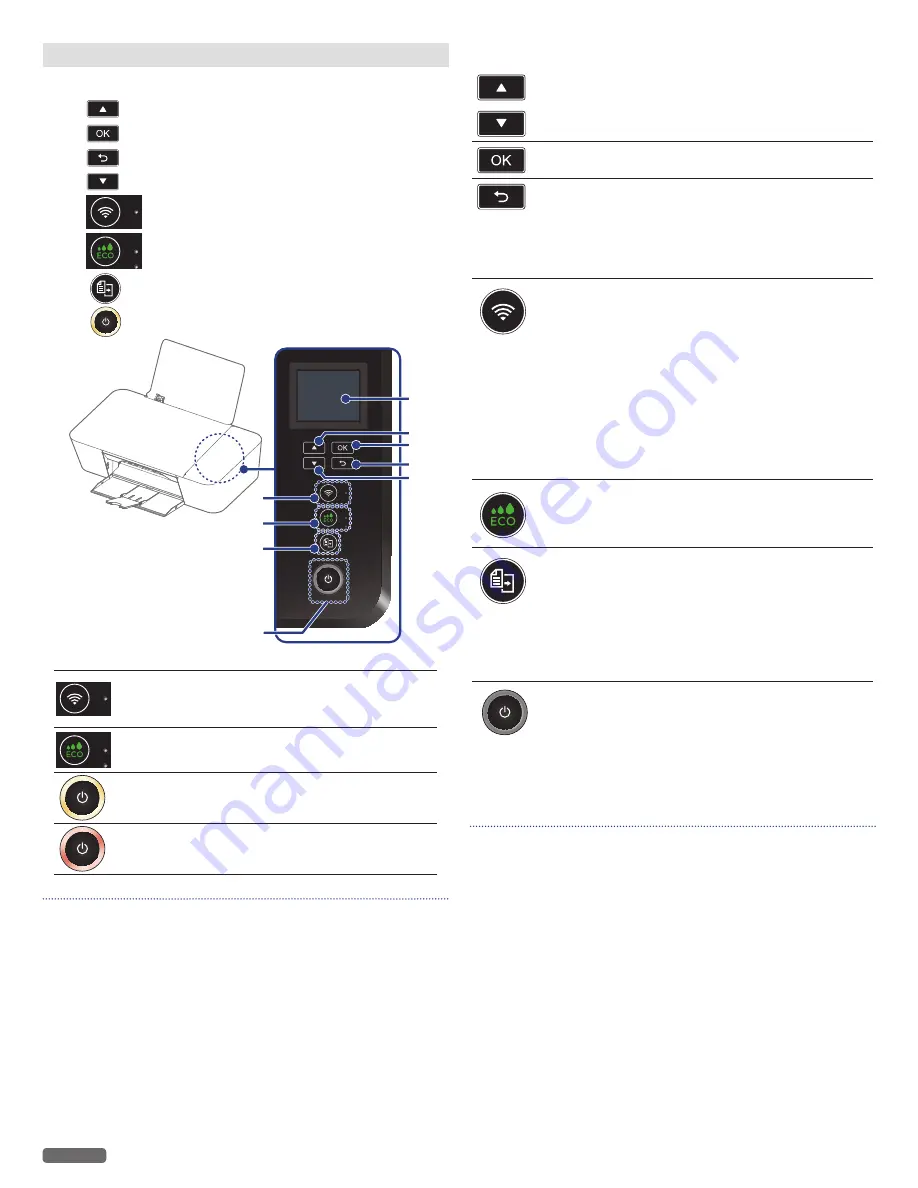
Control panel & Menu display
1
Menu
display
2
(up) button
3
button
4
(back) button
5
(down) button
6
(Wireless) LED and button
7
(ECO) LED and button
8
(Copy) button
9
(Power) LED and button
1
2
3
4
5
8
9
6
7
•
LEDs
(Wireless)
— Indicates the connection status of the
wireless network and Easy Simple
Print.
(ECO)
— Indicates ECO mode
(Power Yellow) — Indicates the present unit's status.
e.g.) power supplied, working
(Power Red)
— Indicates the error status
Note(s)
❏
• You can find the meaning of status and error lights in “Meaning
of LED behavior and error lights” on the next page. Please also
note the messages displayed in the web interface, or in the
Status Messenger (for Windows® only) on your PC.
•
Buttons
(up)
— Use to select an item, set number of
copies, or to select a letter on the Menu
display.
(down)
— Use to confirm the current selection.
(back)
— Use to
·
return to the previous screen
·
cancel a current job
·
delete the letters when inputting
·
change the password
·
cancel a WPS process
(Wireless)
— Use to connect to the wireless network.
Wireless feature:
On
·
Press and hold (less than 3
seconds): establishes Wireless
Connection to the mobile device
using 'Easy Simple Print'.
·
Press and hold (until the screen
of the Menu display switches):
establishes Wireless Connection
screen. Follow Step 2-4 in “Wi-Fi
Protected Setup” (left column) on
page 41.
(ECO)
— Use to shift ECO mode.
(Copy)
— Use to
·
start a print job with the current
selection
·
change deleted letters when
inputting
Unit status:
ready
·
Press and hold (less than 3
seconds): starts copying.
(Power)
— Press to change the power state.
Press and hold (3 seconds or less):
enters
sleep mode or wake On.
Press and hold (3 seconds or more):
turns
the power Off. Make sure that you need
to turn the unit back On once if the unit is
in sleep mode.
Note(s)
❏
• The function carried out will vary, depending on the unit’s status
when you press the button.
Continued on next page.


