background image

16

www.kodak.com/go/support

Taking pictures/videos

Using exposure compensation to adjust brightness

In P, A, S, and Panorama modes, you can adjust exposure compensation before you 
take a picture to make your pictures darker or lighter. Only the first picture in 
Panorama mode can be adjusted—that adjustment is applied to the remaining 
pictures.

Press 

to access the exposure compensation setting.

Press 

to decrease or 

to increase exposure compensation.

An exposure compensation level is shown on the LCD and the image gets darker or lighter.

Take the picture when you are satisfied with the exposure compensation level.

Using exposure compensation with exposure bracketing

In P and A modes, you can use exposure compensation in conjunction with exposure 
bracketing to get the best exposure. 

If the exposure 
compensation is set to:

And if the exposure bracketing 
interval is set to 0.3 steps:

Then the exposures
taken are:

0.0
+1.0
–1.0

Set the Exposure Bracketing Interval 
in the menu (

see page 35

).

–0.3, 0.0, +0.3
+0.7, +1.0, +1.3
–1.3, –1.0, –0.7

Summary of Contents for ZD15 - Easyshare Zoom Digital Camera

Page 1: ...KODAK EASYSHARE ZD15 Digital Camera Extended user guide www kodak com For interactive tutorials visit www kodak com go howto For help with your camera visit www kodak com go zd15support...

Page 2: ...Eastman Kodak Company Rochester NY 14650 Kodak 2009 All screen images are simulated Kodak EasyShare and Perfect Touch are trademarks of Eastman Kodak Company P N 4H6738_en...

Page 3: ...e dial 9 3V DC In USB AV out 3 On Off button 10 Strap post 4 Zoom Wide Angle Telephoto lever 11 Share button 5 Shutter button 12 OK 6 Flash button 13 Delete Menu Info Review buttons 7 Focus Macro Infi...

Page 4: ...ii www kodak com go support Product features Front view 1 Flash 2 Self timer Video AF Assist light 3 Lens Cover 4 Microphone 4 2 1 3...

Page 5: ...ng the flash 9 Using the Focus button 10 Using the self timer 11 Using burst 11 Taking panoramic pictures 12 Getting help from your camera 13 P A S and M modes 14 Using exposure compensation to adjust...

Page 6: ...Using the menu button 32 Using the Setup menu 35 5 Transferring printing and sharing pictures 38 Installing the software 38 Transferring pictures with the USB cable 39 Printing pictures 40 Marking you...

Page 7: ...o support 1 1 Setting up your camera Attaching the strap Loading the batteries Other battery types see page 57 Purchase accessories such as batteries battery chargers SDHC cards etc www kodak com go z...

Page 8: ...ng on the camera Setting the language date time NOTE To change language or date time in the future use the Setup menu see page 37 to change current field for previous next field OK to accept At the pr...

Page 9: ...tore more pictures and videos Maximum supported card size is 32 GB CAUTION A card can only be inserted one way forcing it may cause damage Inserting or removing a card when the camera is on may damage...

Page 10: ...e Shutter button halfway If the camera is not focusing on the desired subject release the Shutter button and recompose the scene 2 Press the Shutter button completely down to take the picture NOTE Fra...

Page 11: ...a quickview for several seconds To dismiss the quickview sooner press the Shutter button halfway The picture video is saved unless you press the Delete button To review pictures videos anytime see pag...

Page 12: ...aspect ratio for your needs just press the Menu button and choose Picture Size 3 2 the best choice when making 4 x 6 prints 16 9 wide screen 4 3 the default setting Sport Subjects that are in motion...

Page 13: ...lose ups of yourself Assures proper focus and minimizes red eye Night Portrait Reducing red eye of people in night scenes or low light conditions Place the camera on a flat steady surface or use a tri...

Page 14: ...he framing marks page 4 As you zoom in move away from your subject Use digital zoom to get up to 5X beyond optical zoom while taking pictures Turn digital zoom on off using the Setup menu see page 35...

Page 15: ...ns Use when the subject is in shadow or is backlit when the light is behind the subject In low light hold the camera steady or use a tripod NOTE Not available in Smart Capture mode Red eye Reduction C...

Page 16: ...he Shutter button halfway to focus and set exposure then completely down to take the picture Mode Icon For Auto Focus AF No icon Normal picture taking Infinity Distant scenery or for taking pictures t...

Page 17: ...Shutter button halfway then completely down The camera takes the picture pictures after the delay Use the same procedure to take a 2 or 10 second self timer video but press the Shutter button complete...

Page 18: ...elf timer 2 and 10 second delays while taking panoramic pictures See page 11 1 Turn the Mode dial to Panorama 2 Press to highlight Panorama Left Right or Panorama Right Left depending on the direction...

Page 19: ...pictures and videos Great news Your camera offers a built in Help system It describes every setting for every menu choice If you learn nothing else about your camera learn how to use on camera Help B...

Page 20: ...mera automatically sets the shutter speed and aperture f stop based on the scene lighting Exposure compensation how much light enters the camera flash compensation and ISO speed Aperture Priority mode...

Page 21: ...djust flash brightness Exposure Compensation adjust the exposure If the scene is too light decrease the setting if it s too dark increase the setting Shutter speed control how long the shutter stays o...

Page 22: ...o increase exposure compensation An exposure compensation level is shown on the LCD and the image gets darker or lighter Take the picture when you are satisfied with the exposure compensation level Us...

Page 23: ...chieved when the peak is in the middle of the histogram The flash may affect a picture s light and shadow To turn on the histogram in Capture mode or in Review press the Info button until the histogra...

Page 24: ...pictures videos Press Review again to exit 1 Press the Review button 2 Press for previous next picture video Press the Review button to return to Capture mode To view pictures videos as thumbnails se...

Page 25: ...Press during 4X to jump to a bookmark See page 26 Press during playback to reverse at 2X speed press again for 4X Deleting pictures videos 1 Press the Review button 2 Press to find a picture video 3 P...

Page 26: ...o highlight Protect then press OK The Protect icon appears with the protected picture video Press the Menu button to exit the menu CAUTION Formatting internal memory or an SD or SDHC Card deletes all...

Page 27: ...o hide the shortcuts again press Using the menu button in Review 1 Press the Review button then the Menu button 2 Press to choose a tab Review to view pictures videos Edit to edit pictures videos Setu...

Page 28: ...d a picture 2 Press the Menu button then to highlight the Edit tab 3 Press to highlight Sound Tag then press OK 4 Follow the screen prompts The sound tag is applied to your picture Press the Menu butt...

Page 29: ...ropped 1 Press the Review button then to find a picture 2 Press the Menu button then to highlight the Edit tab 3 Press to highlight Crop then press OK 4 Press the Zoom lever T W to zoom in out Press t...

Page 30: ...res or pictures that are already enhanced 1 Press the Review button then to find a picture 2 Press the Menu button then to highlight the Edit tab 3 Press to highlight Perfect Touch tech then press OK...

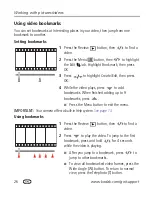
Page 31: ...frames 5 During play or pause press to make a picture A picture is created The original video is saved Press the Menu button to exit the menu IMPORTANT Your camera offers a built in Help system See p...

Page 32: ...en press OK 4 While the video plays press to add bookmarks When finished adding up to 9 bookmarks press Press the Menu button to exit the menu IMPORTANT Your camera offers a built in Help system See p...

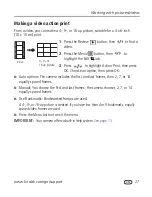
Page 33: ...en press OK Choose an option then press OK Auto options The camera includes the first and last frames then 2 7 or 14 equally spaced frames Manual You choose the first and last frames the camera choose...

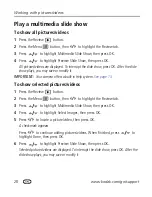
Page 34: ...IMPORTANT Your camera offers a built in Help system See page 13 To show selected pictures videos 1 Press the Review button 2 Press the Menu button then to highlight the Review tab 3 Press to highligh...

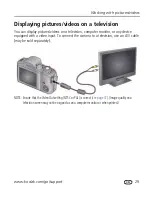
Page 35: ...eos on a television computer monitor or any device equipped with a video input To connect the camera to a television use an A V cable may be sold separately NOTE Ensure that the Video Out setting NTSC...

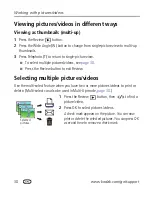
Page 36: ...t multiple pictures videos see page 30 Press the Review button to exit Review Selecting multiple pictures videos Use the multi select feature when you have two or more pictures videos to print or dele...

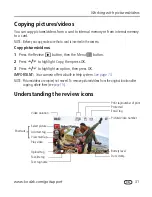
Page 37: ...ess to highlight Copy then press OK 3 Press to highlight an option then press OK IMPORTANT Your camera offers a built in Help system See page 13 NOTE Pictures videos are copied not moved To remove pic...

Page 38: ...ess OK Some options let you use IMPORTANT Your camera offers a built in Help system See page 13 NOTE Some modes offer limited settings Some settings remain until you change them others until you chang...

Page 39: ...uses TTL AF through the lens auto focus when the Shutter button is pressed halfway down White Balance Choose your lighting condition Available only in P A S M and Panorama modes Auto automatically co...

Page 40: ...ubject centered in the LCD AF Zone Select a large or concentrated area of focus Available only in P A S M and Panorama modes Multi zone evaluates 5 zones to give an even picture focus Ideal for genera...

Page 41: ...r computer or network Favorite pictures videos are tagged as Favorites 5 star in EASYSHARE Software on your computer Upload pictures videos are uploaded to your preferred online service when you conne...

Page 42: ...tabilization occurs only when the Shutter button is pressed halfway down Off Quickview Show a picture video as soon as it is taken Off 5 Seconds 10 Seconds Advanced Digital Zoom Zoom using optical the...

Page 43: ...d in North America and Japan PAL used in Europe and China Language See page 2 Reset Camera Reset all camera settings to their defaults After using the Reset Camera feature turn the camera off and then...

Page 44: ...OS if the install window does not appear choose Run from the Start menu and type d setup exe where d is the drive letter that contains the CD MAC OS X double click the CD icon on the desktop then cli...

Page 45: ...lso use a KODAK Card Reader to transfer your pictures videos Purchase accessories www kodak com go zd15accessories Learn more about connecting www kodak com go howto Turn on the camera 3 Connect the K...

Page 46: ...PICTBRIDGE logo is displayed followed by the current picture and menu If no pictures are found a message is displayed If the menu turns off press any button to redisplay it 3 Highlight a printing opt...

Page 47: ...lery www kodakgallery com is one of the many online print services offered in EASYSHARE Software You can easily Upload your pictures Edit enhance and add borders to your pictures Store pictures and sh...

Page 48: ...the number of copies Optional You can apply a print quantity to other pictures Press for previous next Keep the print quantity as is or press to change it Repeat this step until the desired print quan...

Page 49: ...ctures videos to more than one address repeat step 3 To remove a selection highlight a checked address and press OK To remove all email selections highlight Clear All then press OK Press the Review bu...

Page 50: ...ways see page 35 Assigning other tags to pictures videos First create a new tag name See Add a new email address or name on page 43 1 Press the Review button then locate a picture video 2 Press the M...

Page 51: ...on page 43 1 Press the Menu button 2 Highlight the Setup tab 3 Highlight Set Tag then press OK 4 Highlight a tag name then press OK 5 Press the Menu button to exit the menu The selected tag is displa...

Page 52: ...go zd15support and select Interactive Troubleshooting Repairs Pictures remaining number does not decrease after taking a picture The camera is operating normally Continue taking pictures Stored pictu...

Page 53: ...ternal device s user s guide Picture is too light Move so there is at least 2 ft 0 6 m between the camera and the subject Decrease Exposure Compensation page 16 Picture is not clear Clean the lens pag...

Page 54: ...et Camera feature did not take effect After using the Reset Camera feature see page 37 turn the camera off and then on again Pictures taken on a tripod are blurry Occasionally a tripod interferes with...

Page 55: ...or set to On Transfer are not correctly rotated when transferred to the computer In the Setup menu change the Orientation Sensor setting to On page 36 Then take new pictures and transfer them to the c...

Page 56: ...d is locked Insert new memory card Insert a new card page 3 move the switch on the card to unlock the card or change the image storage location to internal memory see page 35 Memory card is unusable I...

Page 57: ...d the latest camera firmware and software www kodak com go zd15downloads See online demonstrations of your camera www kodak com go howto Get information on EASYSHARE Software www kodak com go easyshar...

Page 58: ...56325000 Russia 8 495 929 9166 Denmark 3 848 71 30 Singapore 800 6363 036 Finland 0800 1 17056 Slovakia 00 800 56325000 France 01 55 1740 77 Spain 91 749 76 53 Germany 069 5007 0035 Sweden 08 587 704...

Page 59: ...ombined zoom 50X Shutter speed Smart Capture mode 1 8 1 1250 sec speed is automatically set by the camera Shutter Priority and Manual modes 16 1 1000 sec speed is selectable External storage Optional...

Page 60: ...Smart Capture Sport SCN Modes Program Aperture Priority Shutter Priority Manual Panorama Video Drive modes Single shot burst self timer 10 second 2 shot and 2 second File format Still JPEG EXIF 2 21 V...

Page 61: ...l U 8 PICTBRIDGE compatibility Yes Auto power off Selectable 1 3 5 10 minutes Sound tag Yes Date stamp Yes Tripod mount 1 4 inch Size 107 x 72 4 x 35 7 mm 4 2 x 2 9 x 1 4 in power off Weight 220 g 7 8...

Page 62: ...if you have questions If using this product in an airplane observe all instructions of the airline When removing the battery allow it to cool it may be hot Follow all warnings and instructions suppli...

Page 63: ...Battery life per CIPA testing method using 128 MB SD Card Approximate number of pictures in Smart Capture mode Actual life may vary based on usage Extending battery life Use power saving features Exam...

Page 64: ...both materials and workmanship for the warranty period specified on your Kodak Product packaging Retain the original dated sales receipt Proof of purchase date is required with any request for warrant...

Page 65: ...ion of the implied warranty will be the length of the express warranty period specified on your Kodak product packaging The option of repair replacement or refund is Kodak s only obligation Kodak will...

Page 66: ...mful interference to radio communications However there is no guarantee that interference will not occur in a particular installation If this equipment does cause harmful interference to radio or tele...

Page 67: ...cal and Electronic Equipment labeling battery disposal Australian C Tick Korean Class B ITE VCCI Class B ITE In Europe For human environmental protection it is your responsibility to dispose of this e...

Page 68: ...62 www kodak com go support Appendix China RoHS Russian GOST R Eastman Kodak Company Rochester NY 14650 AIO 40...

Page 69: ...delete 1 2 flash 7 review 1 shutter 1 telephoto 1 wide angle 1 zoom 5 C cable audio video 11 USB 2 camera sounds 5 candle light 4 capture frame grid 4 caring for your camera 6 clock setting 2 color m...

Page 70: ...3 focus framing marks 1 format card or internal memory 6 G guidelines battery 5 H HDTV format 1 help 1 web links 1 high ISO 3 histogram 15 I icons mode dial 3 image stabilizer 5 image storage 4 insta...

Page 71: ...portrait 4 O online prints ordering 4 optical zoom 5 orientation sensor 5 P panoramic pictures 10 PASM mode 11 Perfect Touch technology 6 PICTBRIDGE enabled printer 3 picture size 1 pictures copying...

Page 72: ...4 night portrait 4 panorama 10 portrait 4 self portrait 5 snow 4 stage 5 sunset 4 text 4 SCN scene 3 SD SDHC card inserting 3 printing from 4 storage capacities 4 select multiple pictures videos 12 se...

Page 73: ...e 5 status camera ready light 4 storage capacity 4 strap 1 sunset 4 support technical 1 2 T tag set 4 tagging creating tags 7 favorites 7 for email 6 for print 5 pre tagging 8 telephone support 2 tele...

Page 74: ...14 reviewing 1 size 1 storage capacities 4 transfer 1 viewing 1 video bookmarks 8 viewing by multi up 12 viewing picture video after taking 2 1 volume adjusting 5 W warranty 6 WEEE 10 white balance 2...

Reviews: