background image

 1

Table of contents

Getting started with your camera 2

Opening the USB/charging door 2
Charging the non-removable battery 3
Using an accessory SD/SDHC Card 4
Turning on the camera 5
Setting the language, date/time 6
Taking a picture or video 7
Reviewing pictures/videos 8
Deleting videos/pictures 9
Transferring, sharing online, editing 10
Attaching the strap 11
Keep learning about your camera 12

Product overview, features 13

Front view 13
Back view 14
Side view 15

Doing more with your camera 16

Using the camera under water 16
Viewing videos/pictures on a TV 17
Using the settings menu 18
Trimming a video 19
Making a picture from a video 19
Zooming and panning a picture 20

Solving camera problems 21

Resetting the camera 21

Appendix 24

urg_01305.book  Page 1  Friday, September 23, 2011  1:03 PM

Summary of Contents for ZE2

Page 1: ... 8 Deleting videos pictures 9 Transferring sharing online editing 10 Attaching the strap 11 Keep learning about your camera 12 Product overview features 13 Front view 13 Back view 14 Side view 15 Doing more with your camera 16 Using the camera under water 16 Viewing videos pictures on a TV 17 Using the settings menu 18 Trimming a video 19 Making a picture from a video 19 Zooming and panning a pict...

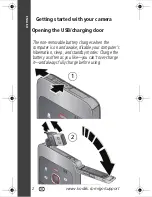
Page 2: ...era Opening the USB charging door 1 2 The non removable battery charges when the computer is on and awake disable your computer s hibernation sleep and standby modes Charge the battery as often as you like you can t over charge it and always fully charge before using ...

Page 3: ...ENGLISH 3 Charging the non removable battery Charging takes less than 4 hours 3 When the camera is plugged in the USB symbol appears ...

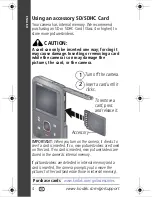
Page 4: ... card or the camera IMPORTANT When you turn on the camera it checks to see if a card is inserted If so new pictures videos are stored on the card If no card is inserted new pictures videos are stored in the camera s internal memory If pictures videos are detected in internal memory and a card is inserted the camera prompts you to move the pictures to the card and erase those in internal memory Pur...

Page 5: ...ENGLISH 5 Turning on the camera ...

Page 6: ...go support Setting the language date time See the Extended user guide www kodak com go Ze2manuals to change current field for previous next field OK to accept At the prompt press OK Date Time Language to change OK to accept OK ...

Page 7: ... a TV or computer and for sharing for conserving memory card space for 1 MP pictures Zoom in out Turn on the Glare Shield if enabled in the Settings menu to improve LCD viewability Change between picture and video recording modes In Review or in a menu return to Liveview Start stop recording ...

Page 8: ...ENGLISH 8 www kodak com go support Reviewing pictures videos Review 1 2 3 Adjust volume Fast forward rewind While playing a video Previous next video picture Play Pause Press and hold to Stop OK OK ...

Page 9: ...ENGLISH 9 Deleting videos pictures 4 Highlight Delete or OK then press OK Review 1 2 Previous next video picture OK Delete 3 Delete ...

Page 10: ...com go HDsysreq 1 Connect the camera to the computer USB port It turns on automatically NOTE It may be convenient to use a USB extension cable to connect the camera to the computer For MAC OS use the APPLE ILIFE suite of software to watch and edit videos If this is the first time you ve connected to this computer follow the prompts to install the KODAK Share Button App and for WINDOWS OS based com...

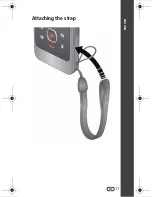
Page 11: ...ENGLISH 11 Attaching the strap ...

Page 12: ...port for the Extended user guide camera firmware updates answers to your frequently asked questions Congratulations You have set up your camera taken videos and pictures transferred them to your computer Keep learning Finish reading this book so you can take and share your best videos and pictures ...

Page 13: ...13 2 Product overview features Front view SeetheExtended user guide www kodak com go Ze2manuals Lens Microphone ...

Page 14: ...Product overview features 14 www kodak com go support Back view See the Extended user guide www kodak com go Ze2manuals Review On bottom USB Arm AV Out Record mode Settings Delete Record OK Share ...

Page 15: ...Product overview features 15 Side view Use the Reset button See page 21 See the Extended user guide www kodak com go Ze2manuals Camera Reset button Slot for accessory SD SDHC Card HDMI Out Power button ...

Page 16: ...ce under water 1 Press the Settings button then to choose Underwater Correction 2 Press OK then to choose Scene mode Water then press OK 3 Press the Mode button to take videos pictures IMPORTANT Verify that all doors are tightly closed This camera is waterproof to a depth of 3 metres 9 8 feet After using the camera in water When finished using under water go to Step 1 and turn off Underwater Corre...

Page 17: ...If you have an HD television use an HDMI cable and get the richest playback experience Cables are sold separately NOTE Set your TV s input setting to HDMI or AV Set Video Output NTSC PAL page 18 Purchase accessories www kodak com go accessories HDMI Cable AV Cable ...

Page 18: ...HD720P WVGA Microphone Gain Adjust sensitivity of the internal microphone Sounds Turn on off sounds Date Time Set the date time Share Settings Choose which sites and email addresses are offered when you share Video Output Choose the setting NTSC PAL for your region Language Choose your language Reset Settings Return all settings to their factory default Format Card Erase format the card About View...

Page 19: ...tion then press OK NOTE If you need to make adjustments press to highlight the Start or End marker then press to move it When finished press OK 5 When prompted preview your edit or save the edit without previewing Save the video or choose Save As if you want to keep the existing video as well Making a picture from a video You can choose a single frame from a video then make it into a picture Size ...

Page 20: ... with your camera 20 www kodak com go support Zooming and panning a picture 1 Press the Review button 2 Press to choose a picture 3 Press OK repeatedly to choose 2x 4x 8x then back to 1x 4 Use to pan the picture ...

Page 21: ...o gently but firmly press the button for about 1 second The camera turns off When you turn on the camera again you may need to reset the Date and Time Go to www kodak com go Ze2support for the Extended user guide firmware updates and answers to your questions Status Solution Low battery Charge the battery page 3 Camera Reset button ...

Page 22: ...sable card Unrecognized file Transfer videos pictures to your computer page 10 LCD is hard to see Turn on the LCD Glare Shield in the Settings menu page 18 then enable it in Liveview page 7 Camera will not turn on Ensure that the battery is charged page 3 Ensure the camera is clean and dry If it s wet inside open all doors Remove the card Do not turn on the camera Let it dry for at least 24 hours ...

Page 23: ...sysreq For the best experience we strongly suggest purchasing a Class 4 or higher SDHC Card Videos do not play on a TV Verify that an HDMI or AV Cable is properly connected directly to the TV input page 17 Ensure that your TV settings are correct for an HDMI or AV connection Ensure that the Video Output is set correctly page 18 Solve problems with ARCSOFT Software Go to www arcsoft com support For...

Page 24: ...g and other cosmetic damage to the camera FCC compliance and advisory This equipment has been tested and found to comply with the limits for a Class B digital device pursuant to Part 15 of the FCC Rules These limits are designed to provide reasonable protection against harmful interference in a residential installation The KODAK High Performance USB AC Adapter K20 AM complies with part 15 of the F...

Reviews: