background image

!

5

Never work on the attached device when the engine is running; switch the engine off in or-
der to carry out such work. 

Observe the generally applicable regulations for safety and the prevention of accidents in 
addition to the instructions in this operating manual. 

The mating surfaces of the rapid-change flange on the basic device and on the attached de-
vice must be clean; they must be cleaned if necessary. 

The mating surfaces must be greased with special long-life grease (see appendix). 

Secure the 

 2-wheel tractor and the attached devices against rolling away (parking 

brake, wheel chocks). Attach the transport lock and safety device and place them in the pro-
tective position. 

There are crushing and cutting zones on externally powered parts (e.g. hydraulics). 

Only work if the light and visibility conditions are good. 

The 

 2-wheel tractor may not be driven (operated) in 4th gear if a sulky is in use! 

14. 

Brakes 

Check the function of the brakes – if they exist – each time before driving! 

The brake system must be subjected to regular thorough checks. 

Adjustments and repairs to the brake system may be carried out only by specialist work-
shops or recognised brake service companies. 

15. 

Engine 

Do not leave the engine running in a closed room – danger of poisoning! 

Always switch the ignition off when turning the engine off! 

Never transport the engine with the fuel tank or the fuel tap open. 

Refer also to the motor 

manufacturer’s operating manual!

16. 

Tyres, screwed connections 

When working on the wheels, ensure that the tractor is parked safely and secured against 
rolling away! 

Repairs to the tyres may be carried out by specialists using suitable mounting tools! 

There is a risk of explosion if the tyres are over-inflated! 

Check the tyre pressures regularly! 

Summary of Contents for Frastalent FT

Page 1: ...ou read understand and follow this operating manual and that for the attachments as well as the engine manufacturer s operat ing manual You may not commence with the operation before having done so It is forbidden to start work without observing this manual Edition Rev date 01 2011 28 4 2011 Retain for future reference TypeFT FTS ...

Page 2: ...Table of contents 0 1 0 2 3 4 5 4 3 0 6 2 7 0 0 0 8 9 2 6 6 5 0 ...

Page 3: ...ollowing points distinguish our product The appliance is very well balanced you can work without effort It is equipped with an outstanding engine Maintenance costs are hence very low The shifter is easy to operate The supply of spare parts is guaranteed and takes place promptly Optimum customer service is at your disposal at all times The 2 wheel tractor is the result of decades of experience and ...

Page 4: ...tained and repaired by persons who are familiar with this work and who have been instruct ed about the hazards The 2 wheel tractor may not be used on steep slopes There are conversion kits for these special types of operation twin wheels iron slope wheels gauge extensions etc Unauthorised conversions and alterations to the 2 wheel tractor are forbidden for safety reasons Relevant regulations gover...

Page 5: ...erating manual Warning This symbol indicates important safety information in this operating manual If you see this symbol beware of the possible risks of injury Read the following instructions carefully and also inform other operating personnel Caution This symbol indicates a possibly dangerous situation Slight injuries may result from failing to follow the instructions Information This symbol den...

Page 6: ...It is to be expected that the sound pressure level will increase by up to 4 5 dB A depending on the attached tool wear ear protectors Measurement took place on a lawn in the open air based on EN ISO 3744 sound power level and EN ISO 11201 sound pressure level The measuring instrument used Norsonic type 116 complies with the DIN IEC 651 class 1 DIN IEC 804 class 1 and DIN 45657 class 1 standards En...

Page 7: ...table pouring aid In order to avoid the risk of fire keep the tractor clean Be careful when handling brake fluids and battery acid they are toxic and caustic Turn off the engine and pull off the spark plug cap before performing maintenance and cleaning work Observe permissible axle loads overall weights and transport dimensions Particular caution is necessary when coupling or uncoupling attached t...

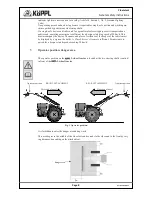
Page 8: ...idence of the keeper of the vehicle must be displayed by a sign on the trailer A Class L driver s licence is sufficient Permission is re quired for a design related speed exceeding 20 km h 7 Operator position danger area The operator position on the 2 wheel tractor is located at the two steering shafts controls in front of the 2 wheel tractor It is forbidden to enter the danger area during work Th...

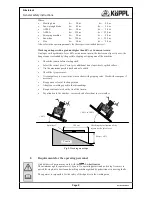
Page 9: ...mum possible track and axle width Check the tyre pressures It is compulsory to wear sturdy closed shoes with gripping soles Work with crampons if necessary Keep persons clear of the danger area Adapt your working speed to the surroundings Keep a constant watch on the lie of the terrain Pay attention to the weather increased risk of accident in wet weather 8 Requirements for the operating personnel...

Page 10: ...own or across a slope Never disengage the clutch and or shift gear on slopes Couple trailers and attached devices according to the regulations The driving steering braking capability and tipping behaviour will be affected by attached devices Therefore make sure that steering and braking capabilities are sufficient and adapt your working speed to the respective environmental conditions Driving down...

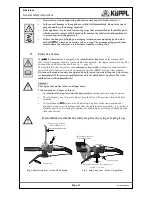
Page 11: ...quired It swivels automatically into the STOP position when released It is locked there and can only be actuated when the catch is pressed Stop the 2 wheel trac tor immediately if there are any malfunctions with the clutch safety stop lever Have the malfunction rectified immediately Caution The engine runs on due to the centrifugal mass Tools running on danger of injury The clutch safety stop leve...

Page 12: ...lling away by means of wheel chocks Connect the attached devices according to regulations and fasten them only to the pre scribed fittings It is not permitted to ride on the attached device of the 2 wheel tractor during work or transport Observe permissible axle loads overall weights and transport dimensions Check and attach transport equipment lighting warning devices protective devices In the ca...

Page 13: ...he light and visibility conditions are good The 2 wheel tractor may not be driven operated in 4th gear if a sulky is in use 14 Brakes Check the function of the brakes if they exist each time before driving The brake system must be subjected to regular thorough checks Adjustments and repairs to the brake system may be carried out only by specialist work shops or recognised brake service companies 1...

Page 14: ...machine dimensions Tyres a mm c mm d mm h mm l mm 4 00 x 8 377 220 210 1 191 1 415 4 00 x 12 377 280 270 1 241 1 415 5 00 x 10 377 270 260 1 241 1 415 18 x 9 5 x 8 377 230 220 1 211 1 415 21 x 11 00 x 008 377 270 260 1 241 1 415 ...

Page 15: ... 4 5 Gearbox oil filling quantity approx 1 8 litres approx 1 8 litres Type Engine Variant 1 Engine Variant 2 Approx weight kg FT 8H Diesel Hatz 1B 30 5 6 kW from 86 FT 12H Diesel Hatz 1B 40 7 8 kW from 93 FT 6 Petrol Robin EH 172D 4 4 kW from 106 FT 10 Petrol Robin EX 27 6 6 kW from 82 FT 12 Petrol Robin EH36 8 5 kW from 92 FT 14 Petrol Robin EH41 9 9 kW from 115 Tyres Tyre type Tyre size Pressure...

Page 16: ...ential to secure the machine against slipping and rolling away Use suitable ramps for loading and unloading Follow the national road traffic regulations when driving on public roads Ensure that all protective devices are properly attached Ensure that no protective devices have been damaged or rendered inoperable during transport Check the transport equipment lighting warning devices protective dev...

Page 17: ...fety devices Check whether there is sufficient fuel in the fuel tank Check that all screws and controls on the basic unit and attached devices are tight Remove all tools and foreign parts from the machine Adjust the steering shaft to the operator s body size and in accordance with the pur pose of use 2 Starting Warning If the traction and device drive is engaged you could be run over causing serio...

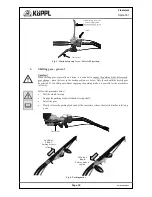
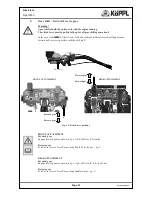
Page 18: ...for the machine to roll away Follow the procedure below Pull the clutch lever up Engage the parking brake left hand steering shaft Select the gear Slowly release the parking brake and at the same time release the clutch similar to driving a car LEVER AT FRONT Parking brake is released LEVER AT REAR Parking brake is applied Fig 6 Parking brake Fig 5 Clutch safety stop lever Drive OFF position Arret...

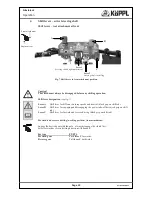
Page 19: ...rive red grip on shift rod Lever C Shift lever for forward and reverse driving black grip on shift rod Forward and reverse driving working position front attachment Engage the desired gear with lever A always disengage the clutch first Select forward or reverse driving direction with lever C For type FT FTS Forward gear Push lever C forwards Reverse gear Pull lever C backwards B Fig 7 Shift levers...

Page 20: ...orward and reverse driving working position rear attachment Engage the desired gear with lever A always disengage the clutch first Select forward or reverse driving direction with lever C For type FT FTS Forward gear Pull lever C backwards Reverse gear Push lever C forwards Caution 4th gear Frästalent Spezial must not be selected for reverse driving Do not remove the safety device attached for thi...

Page 21: ...th the shift rod C FRONT ATTACHMENT Forward gear Engage forward gear as shown in fig 9 left Push lever C forwards Reverse gear To drive in reverse lever C must be pulled fully to the rear fig 9 REAR ATTACHMENT Forward gear Engage forward gear as shown in fig 9 right Pull lever C fully to the rear Reverse gear To drive in reverse lever C must be pushed forwards fig 9 Fig 9 F R shift lever positions...

Page 22: ...e that the clutch is completely disengaged the clutch must be adjusted so that there is not too much play Depending on the application the adjusting screw must be screwed in or out in order to obtain the correct clutch play Secure the adjusting screw again afterwards by means of the lock nut It is forbidden by to leave the safety stop lever in the start up position safety stop lever depressed clut...

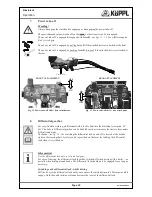
Page 23: ...nder difficult conditions The lever see fig 14 for switching the differential lock on and off is located at the bottom right on the steering shaft A safety catch is provided on the lever for latching the differential lock when it is switched on Information Use the differential lock only in 1st and 2nd gear For ease of steering the differential lock should be switched off when driving with a traile...

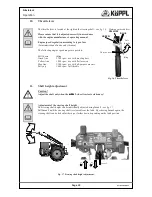
Page 24: ...petrol or four stroke diesel engines which may be operated only with pure diesel oil During the first 20 hours of operation the running in period the engines should not be oper ated up to their performance limits As a matter of principle even after the running in period the throttle should never be applied more than is absolutely necessary for carrying out the respective work Work in an environmen...

Page 25: ...h flail mowers Blue line 3 300 rpm use with all purpose mowers Fully up 3 600 rpm full throttle 11 Shaft height adjustment Caution Adjust the shaft only when the 2 wheel tractor is stationary Adjustment of the steering shaft height The steering shaft height can be individually adjusted using lever 1 see fig 17 Pull lever 1 until the steering shaft is released from the latch By releasing lever 1 ag...

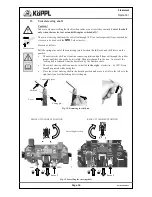
Page 26: ...the connecting joints and pull them out through the rubber mount until they can easily be swivelled Then press lever 2 to the stop As a result the locking bolt is released from the base block by the Bowden cable The swivel steering shaft can now be swivelled to the right clockwise by 180 Keep lever 2 depressed while doing this Place the swivel steering shaft in the desired position and move it a l...

Page 27: ...he shaft and feed it into the rubber mount at the bottom right of the shaft Then connect it to the connecting joint for the shift lever on the gearbox and secure it with a spring pin Warning The gearshift lever on the 2 wheel tractor type Frästalent Spezial is fitted with a safety device This is to ensure that 4th gear cannot be engaged in the case of rear attachment Swivel steering shaft lateral ...

Page 28: ...right if a forward gear is en gaged To turn to the left the left hand brake lever must be pulled This applies the brake to the left hand wheel and the 2 wheel tractor turns to the left if a forward gear is engaged When mowing on a slope it is advantageous to leave the differential lock switched on in order to prevent the mower slipping sideways The single wheel brake nevertheless still functions a...

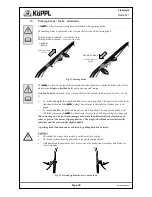
Page 29: ... The mating surfaces on the 2 wheel tractor and the attached device must be clean they must be cleaned if necessary The rapid change flange must be greased with special long life grease Molyduval see appendix before assembly Rapid change device flange see fig 23 Rapid coupling and decoupling of the attached devices is achieved without tools using a rapid change flange Locking pin engaged Fig 24 Ra...

Page 30: ...line Clean adjust or replace the spark plug Dry and clean the spark plug and start with FULL THROTTLE Check cable and plug connectors replace if necessary Have the machine checked and repaired in the workshop Engine stutters Engine is running in the CHOKE range Ignition cable is loose Fuel line is blocked or fuel is of a poor quality Ventilation aperture in the fuel tank cap is blocked There is wa...

Page 31: ...sted by a work shop Clean the air filter Engine works irregular ly Regulator linkage is dirty or sticks Clean the regulator linkage Engine doesn t switch off in the stop position Engine stop cable is defective no earth Check and renew cable and plug connect or Engine has too little power Cylinder head is loose or head gasket is damaged too little compression Have the engine checked in the workshop...

Page 32: ... C Page Safety stop lever Function check O Lubricate the rapid change flange 1 O O O Check and lubricate shift rods 2 O O O O Check adjust and lubricate Bowden cables 3 O O O O Change the oil Gearbox For the first time Then every 4 W W W Check the oil level Gearbox O O O Check screws and operating parts O O O Tyre pressures O O Wheel nuts O O O Engine maintenance refer to the respective engine man...

Page 33: ...h a clean rag and screw it in again Then unscrew it again and read off the oil level top up with gearbox oil if necessary Always exchange the drive gearbox oil in good time The oil filling aperture the drain plug see figs 27 and 28 and the surrounding areas must be kept meticulously clean in order to avoid the ingress of dirt into the gearbox interior The gear box oil must be exchanged after the f...

Page 34: ...e hand levers Clutch The clutch lever must be pulled with the engine running and traction drive 1st gear engaged The clutch is correctly adjusted if the clutch disengages only in the last third of the clutch travel see fig 27 The clutch adjustment must be checked and re adjusted if necessary after the first hour of opera tion It is adjusted by means of the adjusting screw on the clutch lever see f...

Page 35: ...s or adjacent rooms as this will lead to severe corrosion If the tractor is not to be used for a longer period of time clean it thoroughly repair any paint damage and spray bare parts with anti corrosion oil Conserve the engine change the oil when doing this remove the spark plug and pour 1 to 2 teaspoons of motor oil into the spark plug aperture Turn the engine over slowly sever al times Screw in...

Page 36: ... number Lubricants Size EP2 LS 2 SP GE SP MO Special long life grease lead free lithium saponified long life grease with EP properties for rapid change flange Lubricating grease Gearbox oil SAE 80W90 API GL 4 5 Engine oil 15W 40 400 g cartridge 400 g cartridge 1 litre bottle 1 litre bottle Order number Anti corrosion agent Size 170 05 J Fluid D 75 ml tube 2 Accessories Swivel steering shaft Road w...

Page 37: ... EU Conformity Declaration 2 34 5 3 6 2 7 8 5 9 9 9 2 2 5 6 5 2 2 2 2 2 2 2 35 3 5 44 5 5 5 6 5 4 6 2 3 6 3 4 2 5 5 4 5 7 2 5 8 6 6 5 4 5 4 2 7 6 2 9 6 ...

Reviews: