background image

13

14

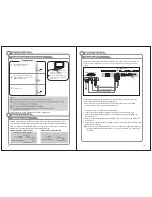
External Connection

Connecting 


DVD Player/Set-Top Box


via HDMI

This connection can only be made if there is a HDMI Output connector on the external
device.

What is HDMI? 
  HDMI, or high-definition multimedia interface, is a next-generation interface that enables 
    the transmission of digital audio and video signals using a single cable without 
    compression.
  Multimedia interface is a more accurate name for it especially because it allows multiple 
    channels of digital audio (5.1 channels). 
    The difference between HDMI and DVI is that the HDMI device is smaller in size, has the 
    HDCP(High Bandwidth Digital Copy Protection) coding feature installed, and supports  
    multi-channel digital audio.
  Each DVD player/STB has a different back panel configuration.
  We recommend the use of cables with a Ferrite Core.

TV Rear Panel

 HDMI Cable (Not supplied)

DVD Player/Set-Top Box

    AUDIO OUT jacks on the DVD player.

External Connection

Connecting 


DVD Player/Set-Top Box

The rear panel jacks on your TV make it easy to connect a DVD to your TV. 

  Component video separates the video into Y (Luminance (brightness)), Pb (Blue) and Pr 
    (Red) for enhanced video quality.   
    Be sure to match the component video and audio connections. 
    For example, if connecting the video cable to COMPONENT  IN, connect the audio 
    cable to COMPONENT  IN also. 
  Each DVD player/STB has a different back panel configuration. 
  When connecting a DVD player/STB, match the color of the connection terminal to the 
    cable.
  We recommend the use of cables with a Ferrite Core.

1. Connect a Component Cable to  the COMPONENT  IN 

  COMPONENT [Y, PB, PR] jacks on the DVD player.

2. Connect Audio Cables  to COMPONENT  IN [R-AUDIO-L]

TV Rear Panel

Audio Cable (Not supplied)

2

Component Cable (Not supplied)

1

DVD Player/Set-Top Box

  [Y, PB, PR] jacks on the  TV and

 the

 jacks on the TV and the 

Summary of Contents for 1080p26

Page 1: ...1080p26 LCD TV Full High Definition LCD TV 1080p26 USER MANUAL...

Page 2: ...ally tune all the available analogue and digital channels for you If the start up wizard doesn t come up and if you just get Please scan channels message the follow the steps below 1 Press the Menu bu...

Page 3: ...ury Caution To reduce the risk of electric shock do not remove cover or back No user serviceable parts inside Refer servicing to qualified service personnel Important Safety Precautions 2 12 Use only...

Page 4: ......

Page 5: ...720p 1080i 1080p l Advanced Chroma Processing l HDMI inputs l Support SPDIF ouput W arnings Features Introduction 6 Fine digital control AC 110 240v 50 60Hz 75W Unbalance 2X10W 120W 1920X1080 1080P26...

Page 6: ...Connect to the HDMI jack of a device with an HDMI output VGA PC IN Connect to the video output jack on your PC PC AUDIO IN Audio input for external devices COMPONENT Connect Component video COMPOSITE...

Page 7: ...atedly to choose one of the modes among 16 9 and 4 3 etc P MODE Selects picture mode Press the key repeatedly to choose one of the modes among Standard Dynamic etc S MODE Selects audio mode Press the...

Page 8: ...not supplied to hook up to the right and left audio input jacks of the TV If your VCR is stereo you must connect two cables TV Rear Panel Installing Batteries in the Remote Control Installing Batterie...

Page 9: ...Core TV Rear Panel HDMI Cable Not supplied DVD Player Set Top Box AUDIO OUT jacks on the DVD player External Connection Connecting DVD Player Set Top Box The rear panel jacks on your TV make it easy t...

Page 10: ...with a Ferrite Core 1 SPDIF jacks on the TV and the Digital Audio Input jacks on the Digital Audio System When a Digital Audio System is connected to the SPDIF terminal Decrease the gain volume of th...

Page 11: ...ly switch off the power for this unit unplug the power cord plug for this unit 6 After switching off the unit you should turn on the TV again at least 5 seconds later Status indication lamp Green In p...

Page 12: ...19 20...

Page 13: ......

Page 14: ...n 1 Press the button to move the cursor to the item to be selected q 2 Press the button to make adjustments t u 3 When you are satisfied with your adjustments press the MENU or EXIT button to exit the...

Page 15: ...25 26...

Page 16: ...28 27...

Page 17: ...30 29...

Page 18: ...Press SOURCE USB source button to select the Press button to select the USB SD MMC MS SETTINGS press OK button to enter 1 SETTINGS MULTIMEDIA OPERATION MULTIMEDIA OPERATION 31 32...

Page 19: ...o select the MUSIC press OK EXIT button to return back to the previous menu button to enter Press Press button to select the music that you want to listen press OK button to play the music 3 MOVIE Pre...

Page 20: ...revious menu Press button to select the text you want to view Press OK button to view press EXIT button to return back to the previous menu 5 FILE Press button to select the FILE press OK button to en...

Page 21: ...37 8 Troubleshooting MUTE 38...

Reviews: