background image

Exhaust pipe 

 
Periodically inspect the spark arrester of the engine, which is a metal grid located in the 

outlet of the muffler. A contaminated spark arrestor can adversely affect engine 

performance and mowing quality. If contamination is detected, clean the spark arrester with 

a brush. 
 

Gearbox 

 
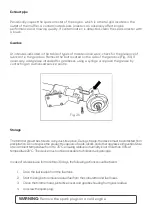
At intervals indicated in the table of types of maintenance work, check for the presence of 

lubricant in the gearbox. Remove the bolt located on the side of the gearbox (Fig. 30). If 

necessary, add grease intended for gearboxes using a syringe or replace the grease by 

contacting an authorised service centre. 


Storage 
 

The trimmer should be stored in a dry, dust-free place. During storage, the device must be protected from 

precipitation. Do not expose the product to vapours of acids, alkalis, and other aggressive impurities. Store 

at an ambient temperature from 1 to 35°C, ensuring relative air humidity is not more than 80% at 

temperature 20°C. The device must not be accessible to children during storage.  
 
In case of a break in use for more than 30 days, the following actions should be taken:  
 

1.


Drain the fuel residue from the fuel tank. 

2.


Start the engine to remove residual fuel from the carburettor and fuel hoses. 

3.


Clean the trimmer head, protective cover, and gearbox housing from grass residue. 

4.


Unscrew the spark plug.  

Fig. 30


WARNING:


Remove the spark plugs on a cold engine.


Summary of Contents for Certa CT529IN1GCKA

Page 1: ...52CC 9 IN 1 LINE TRIMMER HEDGE TRIMMER CHAINSAW AND CUTTER CT529IN1GCKA...

Page 2: ......

Page 3: ...es Check the trimmer before operating to ensure that all the handles mounts and guards are in place and good condition Work in tight and durable clothing that can protect any solid objects in the case...

Page 4: ...ne if a malfunction of the ignition system causes breakdown and sparking Before starting the engine make sure that the working bodies of the trimmer are not in contact with foreign objects Keep your h...

Page 5: ...trimmer on a belt holding the handles Avoid contact with the muffler there is a risk of burns and combustible substances risk of fire Usage The petrol trimmer is used for cutting grass and small shru...

Page 6: ...connection 5 Fuel tank 18 Coil with nylon thread 6 Exhaust pipe 19 Lower gearbox 7 Grip 20 Protective cover 8 Engine casing 21 3T blade 9 Chainsaw 22 Double shoulder belt 10 Lower handle attachment 23...

Page 7: ...Chainsaw 1 Tire 5 Gear housing 2 Chain 6 Bar cover 3 Oil tank 7 Rod 4 Oil cap...

Page 8: ...Hedge cutter 1 Blade covers 4 Handle 2 Blades 5 Latch lock 3 Gear housing 6 Rod...

Page 9: ...llar using a wrench Place the handle over the bar and secure it with the mounting clamp Fig 2 Tighten the screws 2 Install the shoulder strap by inserting the hook into the clip Fig 3 Adjust the strap...

Page 10: ...ttom so that the bottom spring button fits into the hole in the top bar If necessary turn the coil shaft so that the drive shaft located at the bottom of the rod engages with the counterpart at the to...

Page 11: ...hole of the flange washer with the hole of the gear cup Fig 7 Insert the metal locking rod into the hole of the gear cup and the hole of the flange washer 2 Unscrew the fastening nut from the trimmer...

Page 12: ...sting lever on the cutting unit Fig 8 2 Press the release button after pressing the latch lock button Fig 9 3 While holding the latch rotate the cutting unit with the adjustment lever 1 until it strai...

Page 13: ...n 12 positions from 120 to 270 Fig 11 Always check the latch lock after each adjustment 1 Gear case rotated to the storage transportation position Fig 10 270 120 Fig 11 Fig 12 WARNING Do not touch the...

Page 14: ...e the gear housing cover nut Turn the key counter clockwise to remove and remove the gear Fig 13 2 Place the tire over the adjustment studs on the assembled cutting head Fig 14 3 Install a chain loop...

Page 15: ...2 Gear housing nut Gear housing 1 2 3 4 5 6 Tire adjustment stud Chain tension screw Chain tensioner Tire Chain tensioner hole Tire adjustment stud 1 2 3 Top Top loop Bottom loop Fig 15 Fig 13 Fig 14...

Page 16: ...hose tension you need to adjust C Loosen the nuts securing the tire protective cover together with the brake flap turn the adjusting screw 1 clockwise to tighten the chain To decrease the chain tensio...

Page 17: ...o overheating This trimmer is equipped with an automatic lubrication system that provides the necessary amount of lubricant to the tire and chain With increasing engine speed the oil supply to the tir...

Page 18: ...mounted on the cutting inserts 2 Connect the upper and lower part of the rod by turning it so that the spring button of the lower part fits into the hole of the coupling in the upper part of the rod...

Page 19: ...ed for operation into the container 2 Add the required amount of engine oil 3 Close the tank lid tightly 4 Stir the fuel mixture thoroughly in the container 5 Slowly open the tank lid to release air a...

Page 20: ...e trim head or blade properly installed and secured The protective cover is properly installed and securely fastened The working handles are adjusted and securely fastened The shoulder strap is proper...

Page 21: ...to fill the carburettor with the fuel mixture Fig 8 In this case the pumped fuel mixture should be seen through the transparent button cap If the fuel mixture does not fill the cap press the primer se...

Page 22: ...re the first flash of fuel in the engine In this case the engine should not start 7 Move the choke lever Fig 9 to the middle position 8 Gently pull the starter handle until it snaps into the mechanism...

Page 23: ...e ignition using the switch located on the control handle Fig 10 2 Pressing the safety lever push the throttle lever and lock it in the depressed state with the latch Fig 10 3 Gently pull the starter...

Page 24: ...nd driveshaft Maintypesofwork The main types of trimmer work are cutting mowing removing vegetation cover and treating the lawn border Note Use the cyclic mode when mowing 1 minute in full gas mode th...

Page 25: ...do not make sudden movements Tilt the head in such a way that the discarded waste is directed away from you as the trimmer moves Move trimmer in an arc parallel to the ground to mow grass and then re...

Page 26: ...esult in injury When working around trees the trimmer should be moved slowly and carefully so that the cord does not touch the tree trunks and does not damage them Trees when mowing grass go around fr...

Page 27: ...a separating rib in the spool wind each stream in its channel Fix the ends of the cord leaving 15 20cm free in special slots of the spool which will allow you to assemble the reel without unwinding t...

Page 28: ...therwise this may cause the trimmer to break After work clean the trimmer from the remnants of the mowed grass especially carefully clean the wound grass from the blade axis When cleaning the axle in...

Page 29: ...ne operation Remove the air filter cover Remove the air filter and wash it thoroughly first in a soapy water solution then in clean warm water Dry the filter at room temperature soak it with 2 3 drops...

Page 30: ...ilter Cleaning X X Replacement X X Cylindercoolingfins Cleaning X X Coolingholesengine Cleaning X X Sparkplug Checkthestatusof theelectrodes X X Replacement X 100 work hours Fasteningscrews nuts Check...

Page 31: ...r replace the grease by contacting an authorised service centre Storage Thetrimmershouldbestoredinadry dust freeplace Duringstorage thedevicemustbeprotectedfrom precipitation Donotexposetheproducttova...

Page 32: ...parkplug 2 Turnthetrimmerupsidedownandvigorouslypullthestartercordseveraltimestoremove excessoilfromthecombustionchamber Donotallowanyoiltoremaininthesparkplugcap 3 Ifnecessary clean rinseincleanpetro...

Page 33: ...255 Fuel tank capacity 1 1 2 Noise level dB 110 Trimmer weight without fuel kg 110 Chainsaw guide bar length mm 250 Hedge cutter length mm 400 Chainsaw Chainsaw mm 350 Bar length mm 300 Cutting lengt...

Page 34: ...dry it Old or improperly prepared fuel mixture Drain the fuel mixture from the fuel tank Pour in fresh fuel mixture Spark plug dirty or defective Clean or replace the spark plug Dirty air filter Clean...

Page 35: ...assembly with rod Grip Protective cover assembly with apron Coil with nylon thread 3T Blade Double shoulder belt Fuel tank Fastener kit and tool kit User guide Chainsaw Hedge cutter Trimmer spool IN T...

Page 36: ...ion We hope that this user guide has given you the assistance needed for a simple set up For the most up to date guide for your product as well as any additional assistance you may require head online...

Reviews: