background image

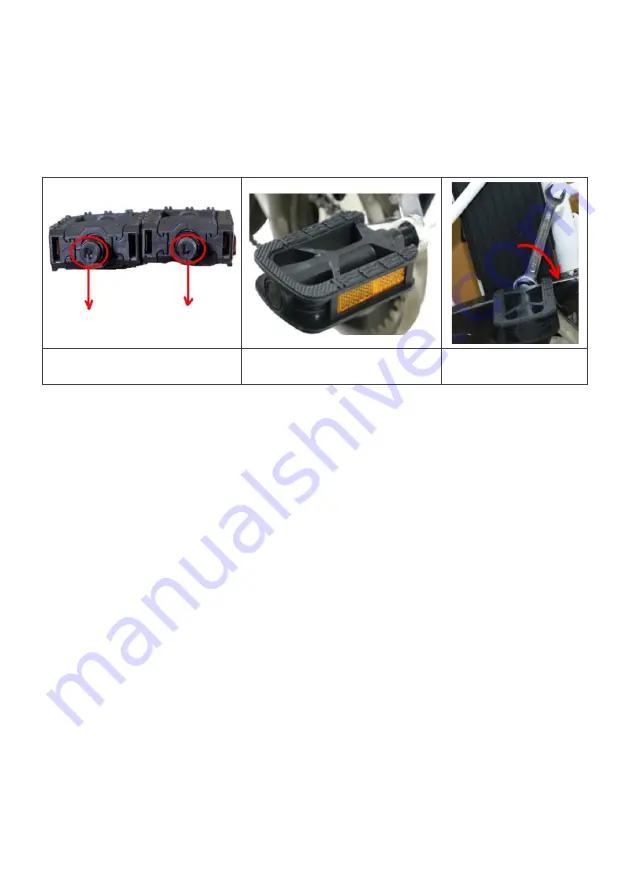
Pedal installation 


A.


The pedals are a pair marked with “R” & “L”; “R” for right, “L” for left. 

B.


Screw the pedals into the relevant pedal arm. 

C.


Tighten by wrench. 


Left pedal and right pedal 

Rotate the pedal into pedal 

arm 

Rotate to front to 

fasten the pedal 


Summary of Contents for FORTIS FS26LDYEBKA

Page 1: ...26 INCH 36V 10AH CITY BREEZE WOMEN S ELECTRIC ROAD BIKE FS26LDYEBKA...

Page 2: ......

Page 3: ...usly been commonly built into bicycles Read this Quick Start guide thoroughly to ensure your familiarity with these features and how they affect usage of the bike Ride defensively Always be aware of o...

Page 4: ...ic rules Additionally some communities regulate the use of motorised bicycles regarding minimum age requirements and necessary equipment Check with your local police department for specific details Co...

Page 5: ...ion batteries do not have a memory Partial discharge charge cycles will not harm the batteries capacity or performance The rated output capacity of the battery is measured at 25 C Any variation in thi...

Page 6: ...devices It is the user s responsibility to familiarise themselves with the laws of the state where the product is used and to comply with all applicable laws including properly equipping the rider an...

Page 7: ...decreasing assist level D Mileage for recording the distance which Electric Bike covers when it is full of one mile the displayer showing the figure OVERVIEW Reflector Rear carrier Magnesium alloy Re...

Page 8: ...the handlebar stem into the frame B Lift the quick release then close to lock the stem in place A B Saddle installation A Insert the seat post into the seat post tube B Rotate the quick release latch...

Page 9: ...he pedals are a pair marked with R L R for right L for left B Screw the pedals into the relevant pedal arm C Tighten by wrench Left pedal and right pedal Rotate the pedal into pedal arm Rotate to fron...

Page 10: ...plug Connect the adaptor to the power plug then connect the battery connection to the battery Plug in the power cable and the light will turn red to indicate charging is in process The battery is ful...

Page 11: ...ockwise to ON to power up the battery B Press and hold the middle button of the display to switch on power to the bike C Pedal forward one and a half rotations to power on the motor D Ensure to pay ca...

Page 12: ...250W brushless Battery 36V 10Ah lithium Ion battery Brake Front and rear disc brakes Derailleur Shimano 6 speed Range 45km Charging time 5 6 hours Maximum loading 110kg Weight without with battery 28...

Page 13: ...Seat Saddle pedals Charger Assembly tools Electric bike IN THE BOX...

Page 14: ...NOTES...

Page 15: ......

Page 16: ...ion We hope that this user guide has given you the assistance needed for a simple set up For the most up to date guide for your product as well as any additional assistance you may require head online...

Reviews: