background image

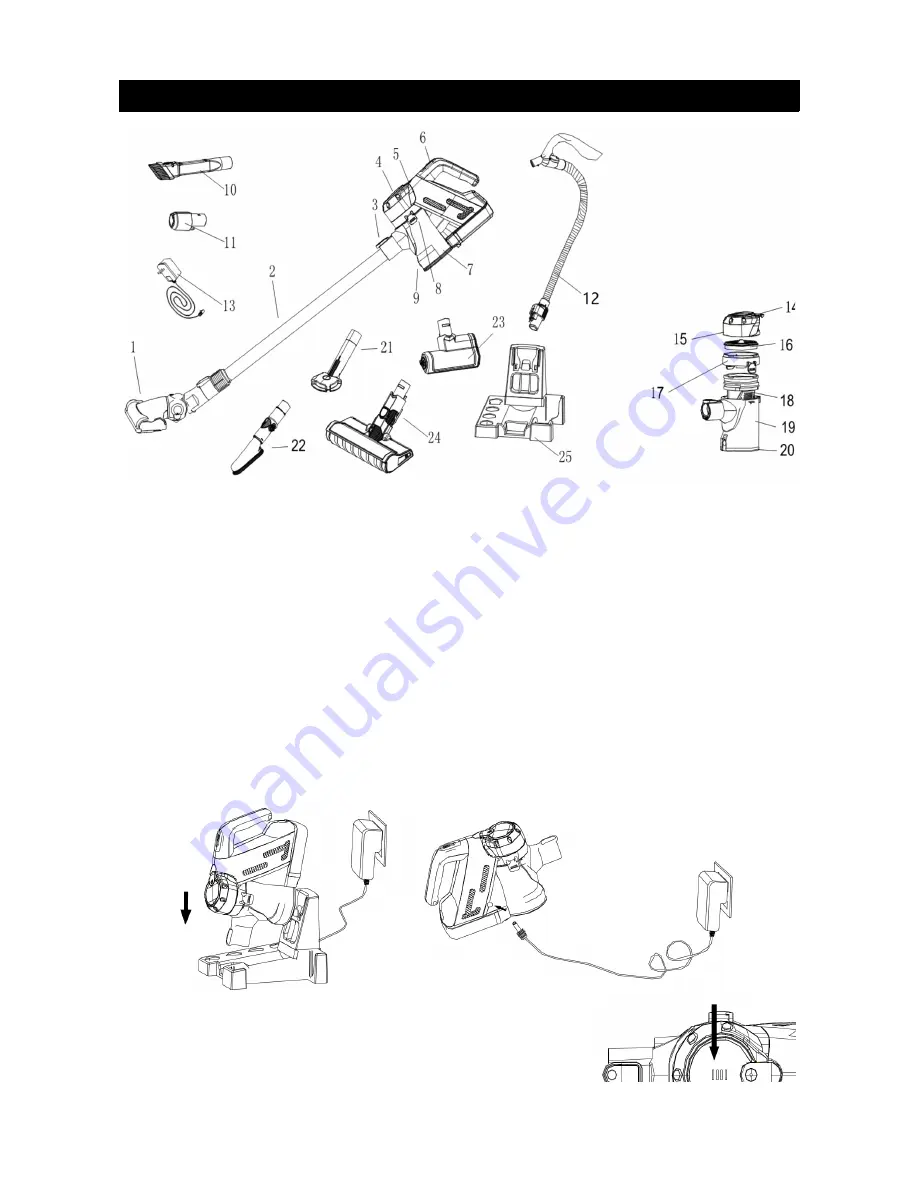
Parts

1

Brush head

11

Connector

2

Aluminium tube

12

Hose attachment

3

Tube release button

13

Charger

4

Body release button

14-20

Dust tank assembly

( HV cotton filters)

5

LED indicator

6

Power switch

21

Pet brush

7

Dust cap

22

Multi brush

8

Dust cap upper section release button

23

Motorised brush head

9

Dust cap lower section release button

24

Mop brush

10

Multi-crevice nozzle

25

Ch storage stand

Charger

The appliance can be charged from connecting it to the charging base (below left) or by 
plugging in the power supply to the socket directly on the vacuum unit (below right).

The top of the device has a battery indicator which indicates
current level and charging.

3

Summary of Contents for KA22BLDSVCA

Page 1: ...y damage caused by improper or misuse of the appliance Connect the adaptor only to the voltage stated on the characteristics plate Never leave the vacuum cleaner unattended while it is running This appliance can be used by children aged from 8 years and above and persons with reduced physical sensory or mental capabilities or lack of experience and knowledge if they have been given supervision or ...

Page 2: ...ork other than that stated in Cleaning Maintenance must be done by a Kogan com service technician or an authorised repair center This product includes rechargeable Li ion batteries Do not incinerate batteries as they will explode Do not disassemble short circuit heat drop or strike the batteries use in other equipment or charge in an adaptor not supplied with this product because all of these cond...

Page 3: ...rush 8 Dust cap upper section release button 23 Motorised brush head 9 Dust cap lower section release button 24 Mop brush 10 Multi crevice nozzle 25 Charging storage stand Charger The appliance can be charged from connecting it to the charging base below left or by plugging in the power supply to the socket directly on the vacuum unit below right The top of the device has a battery indicator which...

Page 4: ...ease button fig A To reinstall align and push it will click into place fig B Battery Pack To remove push the release button and slide the battery back out fig A To reinstall slide and it will click into place fig B Roller Disassembly Installation Rotate the knob on the side clip fig A and remove fig B Then slide the roller out fig C Follow steps in reverse to re install 4 ...

Page 5: ... IMPORTANT If you are experiencing any issue with the appliance whatsoever first inspect the filters and all parts of the brush head carefully and ensure there is no buildup of dust or dirt This is the most common cause of vacuum cleaner faults and problems including powering on and suction strength If you experience any issues contact Kogan Support Issue Possible Cause Steps to Resolve Not turnin...

Reviews: