background image


Before First Use 


Remove all packaging and transport material from the appliance. 


Wash the lid and the inside of the pot with hot water and a little dishwashing liquid 

and dry the parts thoroughly. 


Place the appliance on a flat surface.  


Put the stirrer into the middle of tank (middle of rut), then cover with the filter cap 

and ensure it is seated firmly in place. 


Fill the pot with lukewarm or hot water, observing the min and max level indicators. 

Note it must cover the food and not exceed the max indicator once food is added. 


Use the sous vide rack if required. 


Place the lid on the appliance. 


Seasoning 


Marinate or add spices, herbs, butter, oil, etc. before sealing the vacuum bag. 


Vacuum sealing 


The food must be vacuum sealed to remove air and moisture. This ensures the 

foods retain their natural flavour and nutritional content. Vacuum sealing also helps 

open the pores of meat, poultry, fish and shellfish, so that the marinade and spices 

are absorbed better and the food is more flavourful. 


Oxygen and moisture in the ambient air reduces the flavour, nutritional content 

and structure of food and it is therefore important to use a high-quality vacuum 

sealer to remove air and moisture before the bag is sealed. 


Cooking 


Once the water has reached the required temperature, the vacuum bags 

containing the food should be placed gently in the water. Make sure the bags are 

completely covered and the water can circulate, so the food cooks evenly. 


Browning 


Some food, especially meat, may need to be browned in order to enhance their 

appearance and flavour after being cooked in a sous vide. Remove from the bag 

and brown it quickly on a very hot frying pan or grill rack. This causes the fat and 

proteins to caramelise and enhances the flavour. 


           OPERATION 

Summary of Contents for KA9SOUSVIDA

Page 1: ...9L SOUS VIDE PRECISION COOKER KA9SOUSVIDA...

Page 2: ......

Page 3: ...e remote control system Turn off the appliance and remove the plug from the socket before cleaning Do not pull the cord when removing the plug from the socket Always grasp the plug Keep the cord and a...

Page 4: ...ator 2 Base 8 Min level indicator 14 Start Stop 3 Pot 9 Stirrer 1pc included 15 Time Temperature 4 Control panel 10 Increase 16 Memory program indicator 5 Sous vide rack 11 Decrease 17 FAV button 6 Me...

Page 5: ...s retain their natural flavour and nutritional content Vacuum sealing also helps open the pores of meat poultry fish and shellfish so that the marinade and spices are absorbed better and the food is m...

Page 6: ...eef veal lamb pork and game Chicken turkey and duck Lean and oily fish lobster tails and scallops Root vegetables such as potatoes carrots parsnips beetroot and turnips Crisp vegetables such as peas a...

Page 7: ...and it will enter standby mode Another programme can be started Note Press and hold TEMP TIME for 3 seconds to change from Celsius to Fahrenheit Temperature and time can be adjusted during operation P...

Page 8: ...Poultry Chicken breast with bone 3 5cm 82 2 hours Up to 3 hours Boneless chicken breast 3 5cm 64 1 hour Up to 2 hours Chicken thigh with bone 3 5cm 82 1 5 hours Up to 3 hours Boneless chicken thigh 3...

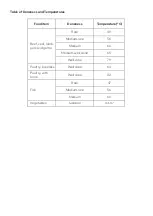
Page 9: ...m Doneness Temperature C Beef veal lamb pork and game Rare 49 Medium rare 56 Medium 60 Medium well done 65 Well done 71 Poultry boneless Well done 64 Poultry with bone Well done 82 Fish Rare 47 Medium...

Page 10: ...ing it away Pour the water out of the water bath Wipe the water bath and lid with a tea towel Do not immerse the appliance cord or plug in water and make sure no water enters the appliance Wipe the ou...

Page 11: ...C sensor damaged or short circuited Contact help kogan com E3 Dry heating protection 1 Pot empty or water too low Fill above MIN with clean water 2 The PCB is damaged Contact help kogan com 3 The mixe...

Page 12: ...ion We hope that this user guide has given you the assistance needed for a simple set up For the most up to date guide for your product as well as any additional assistance you may require head online...

Reviews: