background image

a.

Turn the browse options, press to confirm.

b.

FM mode

: Turn to manually adjust frequency 0.05MHz per step.

c.

When alarm is sounding

, press to postpone the alarm

Back


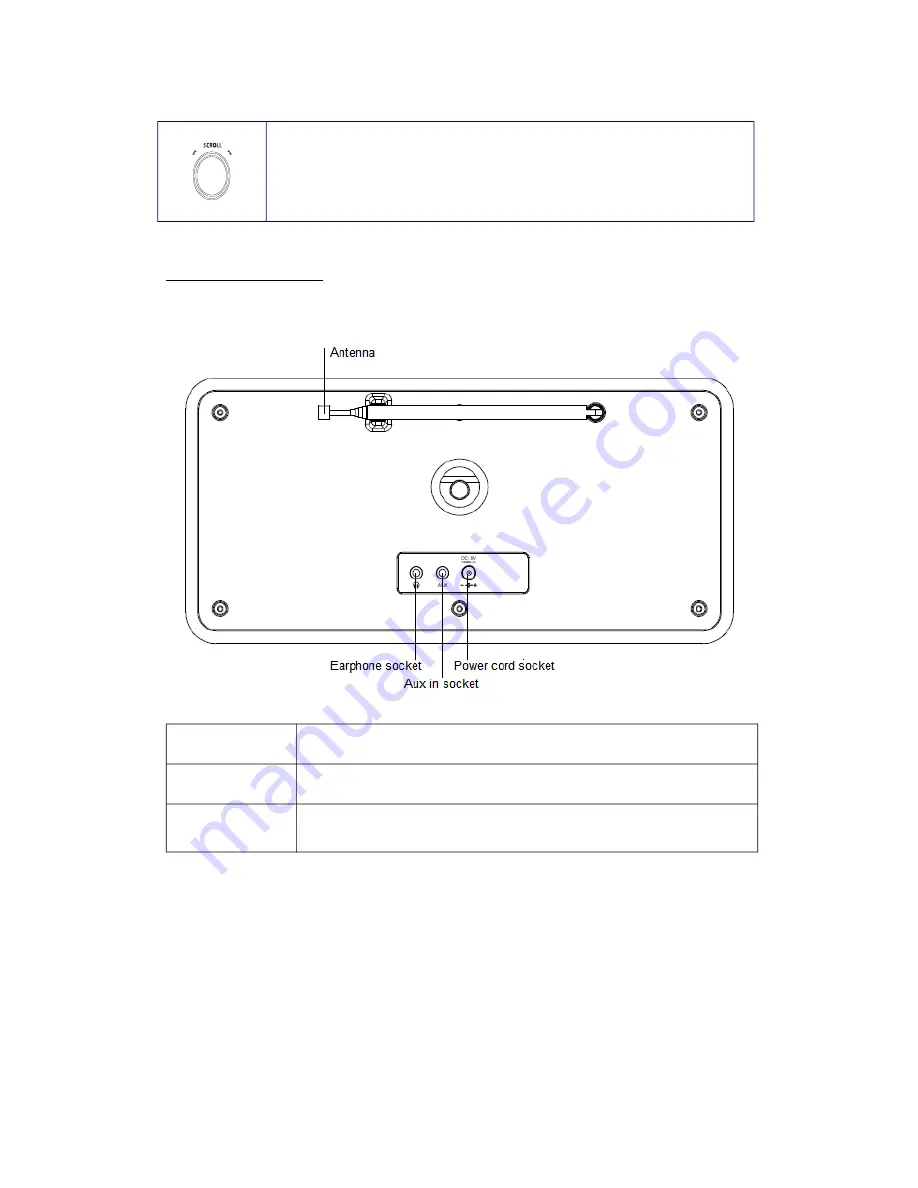
  Overview


Earphone 
socket:

For inserting 3.5mm earphone.

AUX IN 
socket:

Connecting coaxial audio cable.

Power cord 
Socket:

Connect to DC adaptor.

Please use the power adaptor provided by manufacturer only.

Summary of Contents for KADABXXTBLA

Page 1: ...KADABXXTBLA USER MANUAL ...

Page 2: ...KADABXXTBLA DAB and FM Radio Instruction Manual ...

Page 3: ...ning controls and switches as instructed in the manual Before turning on the power for the first time make sure the power cord is properly installed For safety reasons do not remove any covers or attempt to gain access to the inside of the product Refer any servicing to qualified personnel Do not attempt to remove any screws or open the casing of the unit there are no user serviceable parts inside...

Page 4: ...h as vases to be placed on the equipment DON T place hot objects or naked flame sources such as lighted candles or nightlights on or close to equipment High temperatures can melt plastic and lead to fires DON T use equipment such as personal stereos or radios so that you are distracted from the requirements of traffic safety DON T listen to headphones at high volume as such use can permanently dam...

Page 5: ...Menu Tree 8 DRC Dynamic Range Control value 9 The way to Prune 9 View Station Information 9 FM MODE 10 Tune in FM Mode 10 Scan setting 10 Audio Settings 10 FM Menu Tree 11 Station Presets for DAB and FM mode 12 Preset Recall for DAB and FM mode 12 AUX IN MODE 12 General Settings 13 Set Sleep 13 Set Time 13 Set Alarm 14 Set Backlight 15 Set Language 15 Factory Reset 15 Software Upgrade 15 SW Versio...

Page 6: ...s press to turn alarm off MODE Press to change to another mode INFO DAB and FM mode Press to browse station information ALARM Press to set alarm SCAN DAB and FM mode Press to scan stations MENU Press to access main menu PRESET DAB and FM mode Press and hold to activate preset stations function and short press to load preset stations Press to adjust volume level ...

Page 7: ...equency 0 05MHz per step c When alarm is sounding press to postpone the alarm Back Overview Earphone socket For inserting 3 5mm earphone AUX IN socket Connecting coaxial audio cable Power cord Socket Connect to DC adaptor Please use the power adaptor provided by manufacturer only ...

Page 8: ...t to another DAB Station While a program is playing turn SCROLL to cycle through available stations press SCROLL to confirm and then your radio will connect to the selected station Update Stations List Simply press SCAN or press MENU while it shows Full scan press SCROLL to confirm To Show the Signal Strength During playing a DAB program repeatedly press INFO until the LCD screen display shows a s...

Page 9: ...DAB Menu Tree 8 ...

Page 10: ...n 1 Press MENU turn SCROLL to DRC and press SCROLL to confirm 2 Turn SCROLL to your preferred option press to confirm The way to Prune Note Want to remove all currently inactive stations It s easy 1 Press MENU turn SCROLL to Prune press SCROLL to confirm 2 Turn SCROLL to Yes and then press SCROLL to confirm View Station Information It is possible to view the information that is displayed on the se...

Page 11: ...station Scan setting By default FM scans stop at any available station This may result in a poor signal to noise ratio hiss from weak stations To change the scan settings to stop only at stations with good signal strength 1 Press MENU it will show Scan Setting press SCROLL to confirm 2 Turn SCROLL to Strong stations only and press SCROLL to confirm Audio Settings By default all stereo stations are...

Page 12: ...FM Menu Tree 11 ...

Page 13: ...n SCROLL to your preferred station then press SCROLL to confirm AUX IN MODE Note AUX IN allows quick and easy connection of an MP3 player or other external sound source 1 Press MODE shift to Auxiliary Input Mode from FM mode 2 Using a 3 5mm cable lead not provided your radio can be transformed into a high quality digital audio speaker system 3 Connect one end of the cable lead to the headphone or ...

Page 14: ...Sleep option again and then press SCROLL to check how long until the sleep time is reached 5 Radio will automatically go into standby mode once the set time has elapsed 6 To continue enjoying your program press STANDBY ON Set Time It can be activated by pressing MENU Time press SCROLL to enter a range of time settings Set 12 24 hour Set 24 hour and Set 12 hour Set Time Date Manually set up both Ti...

Page 15: ...nds or Weekdays Volume level remember don t have your radio volume level to zero Mute otherwise when alarm triggers it won t be heard Postpone Alarm When alarm is sounding press SCROLL to postpone it for 5 minutes repeated presses will prolong snooze to other user defined snooze time While in SNOOZE function your radio goes into standby mode and shows how long snooze will be elapsed during this mo...

Page 16: ...tivated by pressing MENU Language Press SCROLL to confirm 2 Turn SCROLL to your preferred language then press SCROLL to confirm Factory Reset Note A factory reset resets all user settings to default values so time date alarm settings and presets are lost 1 It can be activated by pressing MENU Factory Reset Press SCROLL to confirm 2 Turn SCROLL to Yes and then press SCROLL to confirm Software Upgra...

Page 17: ...60Hz please use our provided adapter Dimension 268mm x 82mm x 136mm This symbol on the product or in the instructions means that your electrical and electronic equipment should be disposed at the end of its life separately from your household waste There are separate collection systems for recycling in the EU For more information please contact the local authority or your retailer where you purcha...

Reviews: