background image

22 

Dryer Exterior 


The enter dryer has a high-gloss finish. Clean with a soft, damp cloth. Don't use 
abrasive substances. 


Protect the surface from sharp objects as they may scratch or damage the finish. 


Don't place any heavy or sharp objects or a detergent box on the dryer. Keep them on 
the purchased pedestal or in a separate storage box. 


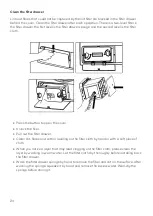
Cleaning the filter 


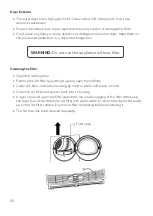
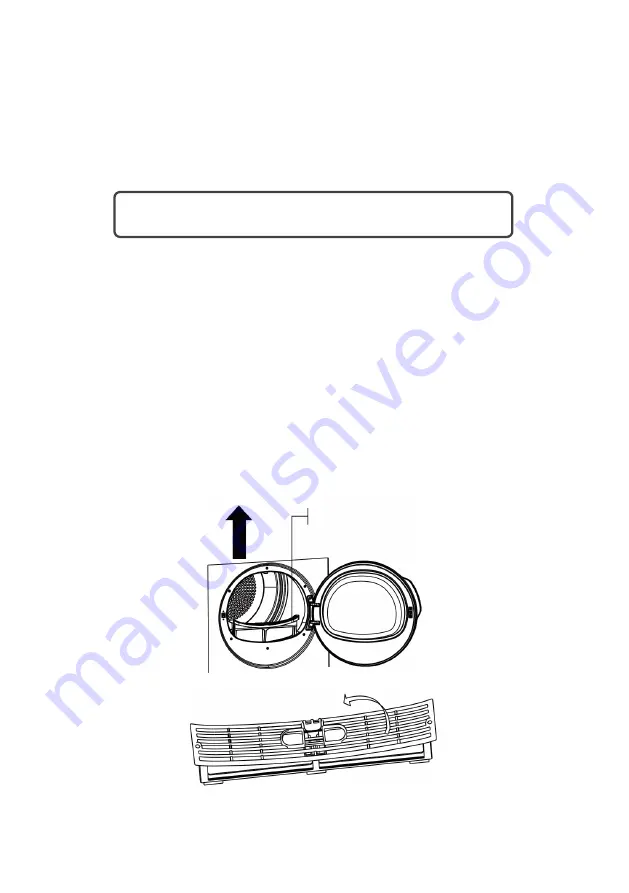
Open the loading door. 


Remove the lint filter by putting it up and open the lint filter. 


Clean lint, fibre and cotton raveling by hand or with a soft piece of cloth. 


Close the lint filter and place it back into its housing. 


A layer can build up on the filter pores that can cause clogging of the filter after using 
the dryer for a while. Wash the lint filter with warm water to remove the layer that builds 
up on the lint filter surface. Dry the lint filter completely before reinstalling it. 


The lint trap has to be cleaned frequently. 


WARNING: 

Do not use the appliance without filter.


Filter case 

Summary of Contents for KAG8HTPPDYA

Page 1: ...8KG HEAT PUMP DRYER KAG8HTPPDYA ...

Page 2: ...2 Safety Warnings 3 Overview 9 Before First Use 11 Operation 12 Display 15 After Each Use 18 Cleaning Care 21 Specifications 26 Troubleshooting 27 ...

Page 3: ...dryer The lint filter and filter drawer should be washed frequently Ensure to ventilate the room well Possible electric shocks Disassembly repair or modification can t be carried out by people other than professional maintenance staff The household electrical supply system the current the voltage the cable such as a fuse with suitable specifications should be provided should meet requirements of t...

Page 4: ...e these items accumulate heat If you have washed your laundry with stain remover you must execute an extra rinse cycle before loading your tumble dryer Please make sure that no gas lighters or matches have accidentally been left in pockets of garments to be loaded into appliance Items that have been soiled with substances such as cooking oil acetone alcohol petrol kerosene spot removers turpentine...

Page 5: ...ow air to circulate freely under the appliance Do not climb onto the dryer or rest heavy objects heating devices or items with water or liquid leakage on the dryer lest deformation of the face panel and the plastic component occur Any objects such as coins safety pins nails screws stones or any other hard sharp material can cause extensive damage and must not be placed into the machine After havin...

Page 6: ... Adequate ventilation must be provided to avoid the back flow of gases into the room from appliances burning other fuels including open fires Items that have been soiled with substances such as cooking oil acetone alcohol petrol kerosene spot removers turpentine waxes and wax removers should be washed in hot water with an extra amount of detergent before being dried in the tumble dryer Remove all ...

Page 7: ...of the appliance by a person responsible for their safety Children should be supervised to ensure that they do not play with the appliance WARNING The appliance must not be supplied through an external switching device such as a timer or connected to a circuit that is regularly switched on and off by a utility Earth Note This appliance must be earthed In case of failure or damage earth can provide...

Page 8: ...s necessary that you install a double pole switch The switch must not break the yellow and green earth cable at any point Disposal This marking indicates that this appliance should not be disposed with other household wastes To prevent possible harm to the environment or human health from uncontrolled waste disposal recycle it responsibly to promote the sustainable reuse of material resources ...

Page 9: ...9 1 Control panel 4 Door 2 Water tank 5 Condenser cover 3 Lint filters 6 Adjustable legs OVERVIEW ...

Page 10: ...10 Control panel 1 Time 6 Delay Start 2 Child Lock 7 Program Selection Knob 3 Dry Level 8 Power 4 Anti Crease 9 Start Pause 5 Buzzer Accessories Vent hose User guide ...

Page 11: ...ding door 2 Pull off adhesive strips from inside machine on top of drum 3 Remove the packaging foam pieces x2 from the machine Check across the corner When press on the edge the machine should not shake up and down please check two direction when press on the top frame across the corner the dryer shakes need to re adjust the adjustable feet Do not put stacks of blanket or a rope on the floor which...

Page 12: ... Press the program selector button to change the program until the corresponding light for the required program is on The program will be switched off if you have not pressed any button for 10 minutes OPERATION Note Some thick clothes jeans large towels may be difficult to dry in some places due to material characteristics If you find that they are not completely dry at the end of the program we r...

Page 13: ...the desired program and before depressing the Start Pause button Select the Buzzer The buzzer can be selected during normal use To enable or disable the buzzer feature press and hold Anti Crease and Delay Start buttons simultaneously until the Buzzer light comes on When the buzzer is on the signal will sound in the following situations Open the door during operation When the water container is ful...

Page 14: ...ched off or running Select Delay start This button allows you to delay the starting of the program by 24 hours max This option must be selected after having selected the program and before pressing Start Pause to start the program Every time the button is pressed the time is increased by one hour It can be selected in both cases before and after selecting option program Buzzer Anti creasing The co...

Page 15: ...Delay Start button again It shows the duration of the previously selected program Incorrect option selection If you select an option that is not compatible with the program you have selected the display shows ErS error If you select other program because of incorrect operation while the program is running the display shows ErS error Select the Start Pause Press this button to start the dryer after...

Page 16: ...easing program is selected Filter light It comes on every cycle to remind you that the filter must be cleaned at the end of the program Child lock light This light indicated the appliance is locked Buzzer light This light is on when buzzer program is selected Delay start light This light is on when delay start program is selected Drying type light This light indicates the set drying intensity Heav...

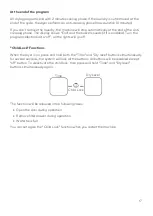
Page 17: ...lector dial to off all the lights will go off Child Lock Functions When the dryer is on press and hold both the Time and Dry level buttons simultaneously for several seconds the system will lock all the buttons All buttons will be disabled except off button To deactivate the child lock then press and hold Time and Dry level buttons simultaneously again The function will be released in the followin...

Page 18: ...umble dry the following Particularly delicate items such as net curtains woollen silk fabrics with metal trim nylon tights bulky materials such as anoraks blankets eiderdowns sleeping bags feather quilts and any items containing rubber foam or materials similar to rubber foam Always follow the instructions on garment labels may be tumble dried delicate drying low temperature normal drying high tem...

Page 19: ...itioner specifically for tumble dryers Remove the laundry when the dryer has finished drying If individual items are still damp after drying set a brief post drying time but at least 30 minutes this will be necessary particularly for multilayered items e g collars pockets etc Make sure that no metal objects are left in the laundry e g hair clips safety pins pins Button up pillowcases close zip fas...

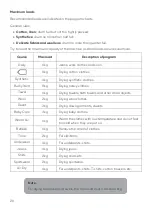
Page 20: ... Drying synthetic clothes Bulky Item 8kg Drying heavy clothes Towel 4kg Drying towels bath towels and other small objects Wool 2kg Drying wool clothes Duvet 3kg Drying down garments duvets Baby Care 3kg Drying baby clothes Warm Air 4kg Warm the clothes with low temperature and do not feel too cold when they are put on Refresh 4kg Remove the smell of clothes Time 2kg For silk items Underwear 4kg Fo...

Page 21: ...Control Panel Clean with a soft damp clothes Do not use abrasive substances Don t spray cleaners directly on the panel The control panel finish may be damaged by some laundry pre treatment soil and stain remover products Apply such products away from your dryer and wipe up any spills or overspray immediately Stainless Steel Tumbler To clean the stainless steel tumbler use a damp cloth with a mild ...

Page 22: ... door Remove the lint filter by putting it up and open the lint filter Clean lint fibre and cotton raveling by hand or with a soft piece of cloth Close the lint filter and place it back into its housing A layer can build up on the filter pores that can cause clogging of the filter after using the dryer for a while Wash the lint filter with warm water to remove the layer that builds up on the lint ...

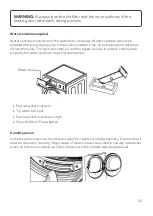
Page 23: ...ust first be emptied Pull out water container Tip water into pool Pull the water container in dryer Press the Start Pause button Humidty sensor In the movement process this device is used for induction clothing humidity it means that it must be carried on cleaning Major cause of clean is must scour out the calcium oxide boiler which on the sensor surface up Clean the sensor in the tumbler see imag...

Page 24: ... open the cover Unlock the fixer Pull out the filter drawer Clean lint fibres and cotton raveling on the filter cloth by hand or with a soft piece of cloth When you notice a layer that may lead clogging on the filter cloth please clean the layer by washing in warm water Let the filter cloth dry thoroughly before installing back the filter drawer Wash the filter drawer sponge by hand to remove the ...

Page 25: ...tive gloves It is recommended to vlean it at least twice every month Water Discharge It s not necessary to discharge the condensed water to the tank it can be drained out directly Change Drainpipe Pull out the water pipe by means of the arrow direction then install the drainpipe You can gently use pliers if it is difficult to do WARNING Never attempt to clean with bare hands Evaporator fins may ca...

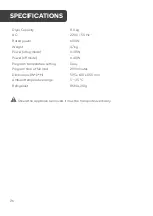
Page 26: ...ling mode 0 48 W Power off mode 0 48 W Program temperature setting Daily Program time at full load 290 minutes Dimensions W D H 595 x 630 x 850 mm Ambient temperature range 5 35 C Refrigerant R134a 310g Should the appliance be moved it must be transported vertically SPECIFICATIONS ...

Page 27: ...ogram the next time you dry see Drying programs section Clean lint filter Observe recommended loading volumes Replace light bulb Drum light does not work option Light bulb is defective Replace light bulb Drying cycle ends shortly after program starts End light illuminated Not enough washing loaded or washing loaded is too dry for selected program Select higher drying level ie heavy instead of damp...

Page 28: ...ation We hope that this user guide has given you the assistance needed for a simple set up For the most up to date guide for your product as well as any additional assistance you may require head online to help kogan com ...

Reviews: