background image

Correct use 


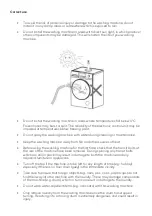
To avoid the risk of personal injury or damage to the washing machine, do not 
install it in any damp areas or somewhere which is exposed to rain. 


Do not install the washing machine in areas with direct sun light, in which plastic or 
other components may be damaged. This will shorten the life of your washing 
machine. 


Do not install the washing machine in areas where temperatures fall below 0

°

C. 

Frozen hoses may burst or split. The reliability of the electronic control unit may be 
impaired at temperatures below freezing point. 


Do not spray the washing machine with water during cleaning or maintenance. 


Keep the washing machine away from fire and other sources of heat. 


Before using the washing machine for the first time, check that the transit bolts at 
the rear of the machine have been removed. During spinning any transit bolts 
which are still in place may result in damage to both the machine and any 
adjacent furniture or appliances. 


Turn off the tap if the machine is to be left for any length of time (e.g. holiday); 
especially if there is no floor drain (gully) in the immediate vicinity. 


Take care to ensure that foreign objects (e.g. nails, pins, coins, paper clips) do not 
find their way into the machine with the laundry. These may damage components 
of the machine (e.g. drum), which in turn can result in damage to the laundry. 


Do not wash water-repellent items (e.g. raincoats) with this washing machine. 


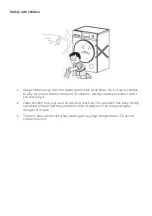
Only remove laundry from the washing machine once the drum has stopped 
turning. Reaching into a moving drum is extremely dangerous and could result in 
injury. 


Summary of Contents for KAGFLWAS10A

Page 1: ...10KG FRONT LOAD INVERTER WASHING MACHINE KAGFLWAS10A...

Page 2: ......

Page 3: ...isting hoses This appliance is not intended for use by persons including children with reduced physical sensory or mental capabilities or lack of experience and knowledge unless they under supervision...

Page 4: ...egularly tested Where there is any doubt the household wiring system should be inspected by a qualified electrician Kogan com cannot be held liable for the consequences of an inadequate electrical sys...

Page 5: ...fore using the washing machine for the first time check that the transit bolts at the rear of the machine have been removed During spinning any transit bolts which are still in place may result in dam...

Page 6: ...its controls Always supervise children whilst you are using it Older children may only use the washing machine if its operation has been clearly explained to them and they are able to use it safely an...

Page 7: ...the water to drain out when the machine is not used for an extended period Control Panel Drawer for detergent or fabric softener Door Glass Door Drainage Pump Damper Drain Pump Filter Top Cover Contro...

Page 8: ...Note The illustrations in this user guide are intended for reference only and may differ from actual product Power Cord Transit Bolts Rear Cover Cold Water Inlet Valve...

Page 9: ...keep them out of the reach of children Some condensation may appear on the packaging plastic bag and the door glass Accessories Make sure that you have received all of the items shown below Accessorie...

Page 10: ...ine Plug the holes using the supplied transit bolt caps Keep the transit bolts for future transportation Whenever the machine is transported the transit bolts must be refitted Note Strong vibration no...

Page 11: ...ine being far less prone to vibrations during the spin cycle than other surfaces The machine must be level and securely positioned The distance between the machine and any walls must be more than 10cm...

Page 12: ...the bottom of the machine Using the spanner rotate the locknut in a clockwise direction Then rotate the locknuts together with adjustable feet to raise or lower Use a spirit level to check the machine...

Page 13: ...e If required the drain hose can be extended to a length of 4m 2 Connected securely to a standpipe Firstly form a hook shape at the end of the drain hose using the supplied U piece Place the drain hos...

Page 14: ...water supply Follow the indication of the picture below to complete the connection Washing preparation 1 Connect the inlet hoses and turn on the tap 2 After making sure the power socket is grounded r...

Page 15: ...his function can help reduce clothing wrinkles by running the Steam Fresh program after the rinse and spin Anti Ironing This function is to reduce the wrinkle of clothes during a washing cycle Once th...

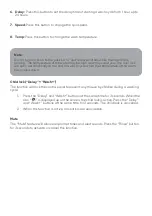
Page 16: ...displayed up on the screen the child lock is active Press the Delay and Wash buttons at the same time for 3 seconds The child lock is cancelled 2 When this function is active all controls are unavaila...

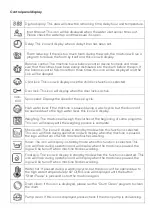
Page 17: ...gh water level this icon will display Weighing The machine will weigh the clothes at the beginning of some programs This icon will display until the weighing process is complete Main wash The icon wil...

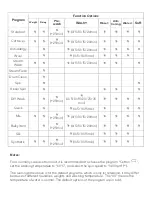
Page 18: ...0 Wool 4 42 00 20 30 40 3 0 600 Steam Wash 4 5 84 00 20 30 40 60 95 2 0 600 800 1000 1200 1400 Steam Fresh 2 5 15 Drum Clean 0 69 60 95 2 600 Spin 10 11 0 600 800 1000 1200 1400 Rinse Spin 10 17 1 0 6...

Page 19: ...x 25min 0 5 10 15 20min Bulky Item 25min 0 5 10 15 20min Silk 0 5 10 15min Synthetic 25min 0 5 10 15min Notes For a normally soiled cotton load it is recommended to choose the program Cotton set the w...

Page 20: ...ndry by colour and referring to the care label Most garments have a textile care label in the collar or side seam 2 Ensure all pockets are empty foreign objects e g nails coins paper clips etc can cau...

Page 21: ...this causes creases and reduces cleaning efficiency Using the detergent drawer 1 Open the drawer and add adequate detergent into the main wash compartment marked or 2 Add the fabric softener into the...

Page 22: ...s 1 Turn on the water tap and connect the power 2 Open the door and load clothing into the drum one by one 3 Close the door and put a suitable amount of detergent and fabric softener into the dispense...

Page 23: ...an This program is used to clean the drum Don t put any clothes into the drum while running this program Spin Separate spin for cotton and linen items Rinse Spin This program can be used for rinsing i...

Page 24: ...nly distributed in the drum the machine will not spin In this case redistributed the load manually and reselect the spin program Door lock When the machine is started the door is locked The door can b...

Page 25: ...or all purpose cleaning agents These may damage the plastic surfaces and other components because of the chemicals they contain Cleaning the drum Clean the drum every 3 months using the Drum Clean pr...

Page 26: ...g Cleaning the water inlet filter Using long nose pliers withdraw the plastic filter Clean the filter and return it back securely These filters should be checked every 6 months or more often if there...

Page 27: ...ower socket and open the lower cover with a screwdriver 2 Place a container under the pump Unscrew and remove the filter 3 Clean the filter carefully Note This filter should be cleaned every 2 months...

Page 28: ...Hz Washing spin capacity 10 0kg Rated power 2000W Water pressure 0 02 0 8MPa Power of off mode 0 38W Power of left on mode 0 38W Program time min 304 Remaining moisture content Class B Average Energy...

Page 29: ...sor and the wire is not secure 3 The water sensor is damaged 1 Change the water inlet 2 Check the connection and ensure it is secure 3 Change the water sensor The motor does not work E05 is on the scr...

Page 30: ...ltage of AC is too high 1 It will be ok once the voltage returns to normal Low AC voltage L AC is on the screen 1 The voltage of AC is too low 1 It will be ok once the voltage returns to normal Dispos...

Page 31: ...NOTES...

Page 32: ...ion We hope that this user guide has given you the assistance needed for a simple set up For the most up to date guide for your product as well as any additional assistance you may require head online...

Reviews: