background image

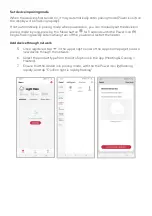
Set device in pairing mode 


When the device is first turned on, it may automatically enter pairing mode (Power icon   on 

the display will be flashing rapidly).  
If not automatically in pairing mode when powered on, you can manually set the device in 
pairing mode by long-pressing the Mode button   for 5 seconds until the Power icon ( ) 

begins flashing rapidly. Alternatively, turn off the power and restart the heater.  


Add device through network


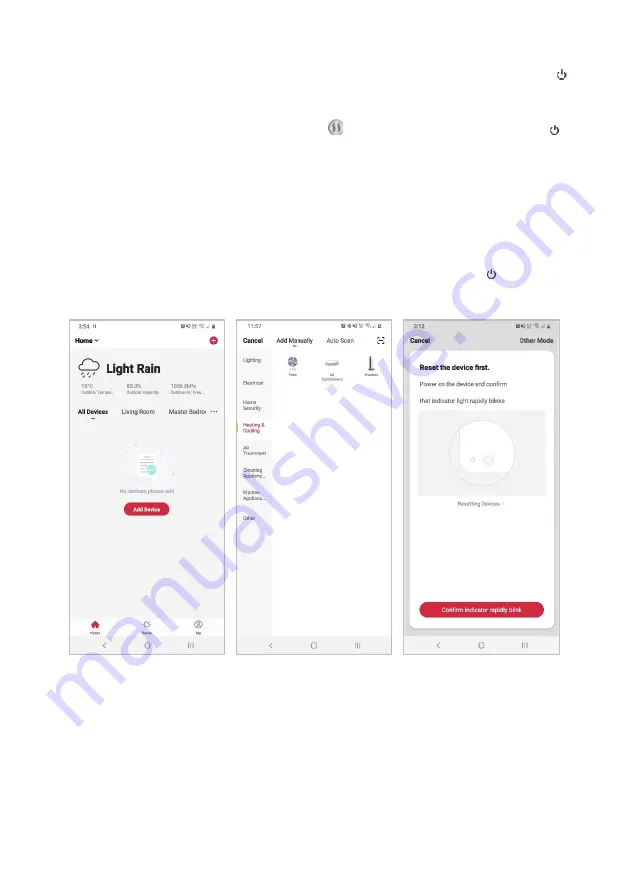
5.


Once registered, tap “

+

” in the upper right corner of the app’s home page to add a 

new device through the network. 

6.


Select the product type from the list of 

options in the app (Heating & Cooling > 

Heaters). 

7.


Ensure that the device is in pairing mode, with the the Power icon ( ) flashing 

rapidly, and tap “Confirm light is rapidly


flashing”. 


Summary of Contents for KAHTP20BLKWA

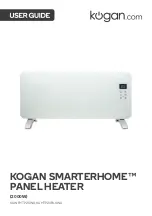
Page 1: ...KOGAN SMARTERHOME PANEL HEATER 2000W KAWFHTP20WA KAHTP20BLKWA ...

Page 2: ......

Page 3: ...ot cover the heater This may cause overheating and or fire hazard To prevent a possible fire never block the air intakes or exhaust vents in any manner Do not touch any hot surfaces directly Do not insert or allow foreign objects to enter into any ventilation or exhaust openings as this may cause electric shock fire or damage to the appliance Always ensure that your hands are dry before operating ...

Page 4: ... lead to serious injury or death in as little as 2 hours due to chemical burns and potential perforation of the oesophagus If you suspect your child has swallowed or inserted a button battery immediately call the 24 hour Poisons Information Centre on 13 11 26 Australia or 0800 764 766 New Zealand for fast expert advice Examine devices and make sure the battery compartment Is correctly secured e g ...

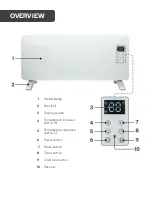
Page 5: ...1 Heater body 2 Feet x2 3 Display screen 4 Temperature increase button 5 Temperature decrease button 6 Power button 7 Mode button 8 Timer button 9 Child lock button 10 Receiver OVERVIEW ...

Page 6: ...ws figure 1 Using the bracket as a guide for the holes drill into the wall and insert the plastic expanded plugs Attach the bracket to the wall with screws figure 2 Place the heater in a suitable position ensuing that the holes align with the bracket figure 3 Tighten screw on the top of bracket to secure figure 4 Ensure the product is securely installed in the correct position and the power cord i...

Page 7: ...lection Press the temperature increase decrese buttons to select the desired temperature from a range of 15 35 C The temperature indicator will remain lit on the display screen for a while Timer Press the timer button to select the desired range between 1 hour to 24 hours The display screen will show the remaining time Child lock Press and hold the child lock button for 3 seconds the child lock ic...

Page 8: ...t by SMS To register 1 Tap to enter registration page 2 The system automatically recognises your country area You can also select your country code manually Enter your email address and tap Next 3 Alternatively you can select Register by mobile number and enter the verification code sent to you by SMS 4 Create a profile on the next page to define your location and room CONNECTTO SMARTERHOME APP ...

Page 9: ...Mode button for 5 seconds until the Power icon begins flashing rapidly Alternatively turn off the power and restart the heater Add device through network 5 Once registered tap in the upper right corner of the app s home page to add a new device through the network 6 Select the product type from the list of options in the app Heating Cooling Heaters 7 Ensure that the device is in pairing mode with ...

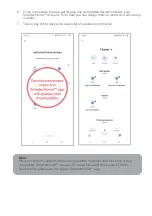
Page 10: ...t to the app Ensure your Wi Fi router mobile phone and the SmarterHome device are kept close until connection is complete 10 After successfully being added you will have the option to rename the device and assign it to a location It will now be listed on the app s home page Tap the device listing to enter its control page Notes The device and the app have to use the same Wi Fi network The device i...

Page 11: ...nd manage page 2 Select Set up device then under the Works with Google banner select Have something already set up 3 Select the search bar and type Smarter Home to locate the Kogan SmarterHome service GOOGLE HOME CONTROL Note You will need to have set up a Google Home account prior to linking your Kogan SmarterHome device ...

Page 12: ...le permission to access the SmarterHome app and your devices 5 From here you will be prompted to sign into your SmarterHome account using either your email or mobile phone number depending on which you registered your account with ...

Page 13: ... assign them to rooms and set up any routines 7 Tap on any of the devices to view a list of available commands Note Please note that Google Home can only control the base core functions of any compatible SmarterHome devices To make full use of this product s smart functionality please use the Kogan SmarterHome app ...

Page 14: ...select the icon in the top right and select Skills Games from the sidebar 2 Select the search bar and type Smarter Home to locate the Kogan SmarterHome skill AMAZON ALEXA CONTROL Note You will need to have set up an Alexa account prior to linking your Kogan SmarterHome device ...

Page 15: ...exa 4 From here you will be prompted to sign into your SmarterHome account using either your email or mobile phone number depending on which you registered your account with 5 Tap Authorise to grant Alexa permission to access the SmarterHome app and your devices ...

Page 16: ...ave successfully connected to the Alexa app you will be able to control your Kogan SmarterHome devices via Alexa s voice commands Note Please note that Alexa can only control the base core functions of any compatible SmarterHome devices To make full use of this product s smart functionality please use the Kogan SmarterHome app ...

Page 17: ...Dimensions 430 x 235 x 920mm Weight 7 4kg Output frequency 50 60Hz Voltage 220 240V Wattage 1000W 2000W Power cord length 1 7m Colour Black White Overheat safety protection Yes SPECIFICATIONS ...

Page 18: ...NOTES ...

Page 19: ......

Page 20: ...tion We hope that this user guide has given you the assistance needed for a simple set up For the most up to date guide for your product as well as any additional assistance you may require head online to help kogan com ...

Reviews: