background image

Auto Recording Mode


After entering settings, slide the power switch to ON to enter auto recording mode. The 
motion indicator will flash red for about 5 seconds, after which the camera will start working. 
It will automatically take pictures or record videos when a person or animal enters into the 
area of the PIR sensor. 
 

Caution:  To avoid potential false triggers due to temperature and motion disturbances, do 
not aim the camera at a heat source (e.g. the sun, heated stone or metal) and remove 
nearby tree branches and twigs. The ideal direction to aim at is an open place to the north 
without nearby heat sources. 


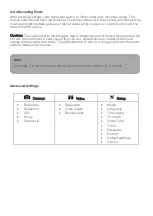
Advanced


Settings 


   Camera  

   Video 

   Setup 


Resolution 


Sequence 


ISO 


Delay 


Camera ID 


Resolution 


Video length 


Record audio 


Mode 


Language 


Time-lapse 


TV mode 


Date/Time 


Timer 


Password 


Format 


Default settings 


Version 


Note: 

Generally, it is recommended to place the camera at a height of 1–2 metres. 


Summary of Contents for KAHUTRCA810A

Page 1: ...HUNTING TRAIL CAMERA 24MP KAHUTRCA810A...

Page 2: ......

Page 3: ...44PCs IR LED LED Indicator Central PIR Sensor Side PIR Sensor Latch Lens OVERVIEW...

Page 4: ...Camera Quick Start Guide Mounting Strap USB Cable 8AA Batteries Depot Colour Display Screen Setup Buttons Stand Knob Port External Power Port Micro SD Card Slot USB Port Mode Switch IN THE BOX...

Page 5: ...ttery compartment Insert the batteries according to the positive and negative battery icons 3 Close the battery compartment tightly to ensure water and dust resistance Note Installing any AA battery i...

Page 6: ...he bottom port 2 Run the cord to the side of the camera where there is a hook provided behind the hinge of the camera door This will support the power cord and take pressure off of the connection poin...

Page 7: ...tacts facing away The Micro SD card should slide in freely with little resistance Continue pressing the card inward until you hear a click This means the Micro SD card is locked in place and ready for...

Page 8: ...ns MENU Open the Settings menu using the MENU button REPLAY Press this button to start the replay mode Change to the manual recording mode for videos Change to the manual recording mode for taking pho...

Page 9: ...false triggers due to temperature and motion disturbances do not aim the camera at a heat source e g the sun heated stone or metal and remove nearby tree branches and twigs The ideal direction to aim...

Page 10: ...ken sequentially ISO Auto 100 200 400 Camera exposure level Delay 1 5 10 30 sec min Delay between shots Camera ID 0 0 0 0 0 0 Camera ID Video Menu Settings Video Sub menu Description Resolution 1080P...

Page 11: ...utes constantly TV Mode NTSC PAL AV output mode Date Time 2018 09 03 16 37 25 YYYY MM DD HH MM SS Timer ON OFF Enable operation only during set period Password 4 digit password universal password 1314...

Page 12: ...1920 x 1080 30fps FHD File format AVI H 264 Sequence length Adjustable from 10 to 90s Capture mode Colour by day black and white by night Audio Sound recording ON OFF Memory storage Support External...

Page 13: ...If the card is full camera will stop taking images Check batteries to make sure that alkaline NIMH or lithium AA batteries left power is enough for camera to work Make sure that the camera power swit...

Page 14: ...a Quick Start Guide and we hope that this has given you the assistance needed for a simple set up For the most up to date guide for your product as well as any additional assistance you may require h...

Reviews: