background image

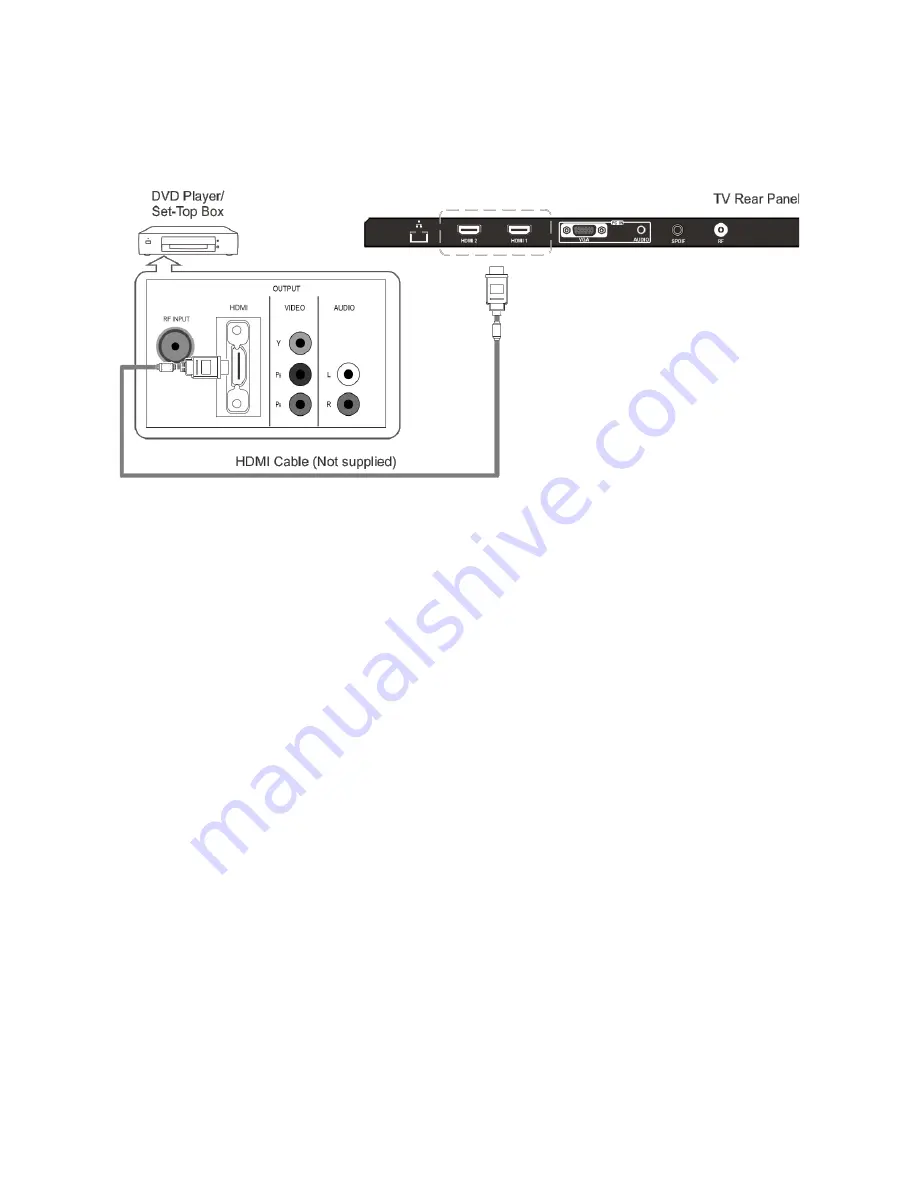
Connecting a DVD Player/Set-Top Box via HDMI

This connection can only be made if there is a DVI output connector on the 
external device.

What is HDMI?

HDMI, or high-definition multimedia interface, is a next-generation interface that 
enables the transmission of digital audio and video signals using a single cable 
without compression.
Multimedia interface is a more accurate name for it, as it allows multiple 
channels of digital audio (5.1 channels).
The difference between HDMI and DVI is that the HDMI connection is smaller in 
size, has HDCP (High Bandwidth Digital Copy Protection) coding installed and 
supports multi-channel digital audio.
Each DVD Player/Set-Top Box has a different panel configuration.

Connect a HDMI cable between the HDMI1, HDMI2, or HDMI3 connector on the 
TV and the HDMI connection on the DVD Player/Set-Top Box.

Note:

Whenever you connect an external device to your TV, make sure that the 
power on the unit is turned off.

When connecting an external device, match the colour of the connection 
terminals to the cable.

13

Summary of Contents for KALED43SMTZA

Page 1: ......

Page 2: ...mcorder Connection 12 Connecting a DVD Player Set Top Box via HDMI 13 Connecting a Digital Audio System 14 Connecting a PC 15 Supported Signals 15 Basic Operation 16 Turning the TV on or off 16 Basic...

Page 3: ...rmation 24 Input Source 24 Function 24 Lock 24 Time 25 Network 26 Wired 26 Wireless 26 PPPOE 26 PVR Personal Video Recorder 26 PVR File System 26 PVR Guide 27 DTV EPG Electronic Program Guide 28 Exter...

Page 4: ...it immediately Disconnect the power plug from the power outlet Contact the Kogan customer support team Never attempt to make repairs yourself Never push objects of any kind into the set through the ca...

Page 5: ...antenna cable during a lightning storm Excessive volume from earphones and headphones can cause permanent hearing loss Always monitor the volume of noise from these devices especially when children a...

Page 6: ...ace this television near water for example near a bathtub wash bowl kitchen sink laundry tub swimming pool or in a damp basement etc When moving the television to a warm location from a cold location...

Page 7: ...C RGB input 2 x USB inputs 1 x component input 1 x headphone output 1 x AV input 1 x SPDIF output Specifications Accessories Specifications Model KALED43SMTZA Display Screen Size 43 Diagonal Maximum R...

Page 8: ...s on the lower left panel control your TVs basic features including the on screen menu To use the televisions more advanced features you must use the remote control Front Panel Rear Panel Note HDMI 1...

Page 9: ...Remote Control 8...

Page 10: ...er supply you must switch the television into standby mode by pressing the POWER button on the remote control or on the television set itself Once the television is in standby mode you may turn off th...

Page 11: ...pose batteries to extreme heat such as sunshine fire etc External Connections Antenna Connections Antenna input impedance of this unit is 75ohm VHF UHF 75ohm coaxial cables can be connected to the ant...

Page 12: ...m the back of the TV 2 Connect the cable or antenna to the ANT IN terminal on the back of the VCR 3 Connect an RF cable between the ANT OUT terminal on the VCR and the ANT IN terminal on the TV 4 Conn...

Page 13: ...colour of the connection terminal to the cable 1 Connect a video cable between the AV VIDEO jacks on the TV and the VIDEO OUT jack on the camcorder 2 Connect audio cables between the AUDIO L and AUDIO...

Page 14: ...of digital audio 5 1 channels The difference between HDMI and DVI is that the HDMI connection is smaller in size has HDCP High Bandwidth Digital Copy Protection coding installed and supports multi cha...

Page 15: ...TV is connected to an external device that supports 5 1 CH sound Connect a coaxial cable between the SPDIF jacks on the TV and the Digital Audio Input jacks on the Digital Audio System When a digital...

Page 16: ...ver you connect an external device to your TV make sure that the power on the unit is turned off When connecting an external device match the colour of the connection terminals to the cable Supported...

Page 17: ...u want to completely switch off the power of the TV for an extended period of time unplug the power cord 6 After switching the unit off you should wait at least 5 seconds before turning it on again St...

Page 18: ...ext step Antenna Type 1 Press key to select the type of antenna DVB T DVB C 2 Press then OK to enter the next step Search Type Country Selection 1 Press to select the item to focus on 2 Press to selec...

Page 19: ...cond area shows some small desktop plug ins Select one and press the OK button where you will enter the relevant application program Applications The Application menu shows all the applications which...

Page 20: ...devices such as USB drives mobile hard disks etc TV Menu Menu Button Open the TV menu When you are in the submenu you can press it to return to the previous menu Exit Button Exit the TV menu Arrow Bu...

Page 21: ...music Movie Provides live and full sound for movies Sports Emphasises bass over other sounds User Selects your custom sound settings See User settings for Sound Equalizer 1 Press key to select an equ...

Page 22: ...on 2 Press key to select On or Off Surround Sound This is used to turn on surround sound to gain better sound effect 1 Press key to select Surround sound option 2 Press key to select On or Off SPDIF M...

Page 23: ...A Mode Window Adjust This option is only used when VGA mode has signal Press key to select Window Adjust option Press OK key to display the Window Adjust menu Auto Adjust Allows you to set the TV to s...

Page 24: ...V will store the DTV channel if there is a DTV signal present Program Edit You can use button to choose Program Edit and enter the menu press the Blue Red Yellow colour button on the remote control to...

Page 25: ...to the input you desire and press the OK button to confirm Function Lock 1 Press the Enter key to select the System Lock submenu 2 Press to select ON or OFF The lock feature requires a Password to be...

Page 26: ...1 Press key to select Sleep Timer option 2 Press key repeatedly until the desired time appears Off 10min 20min 30min 60min 90min 120min 180min 240min Notes The sleep timer you have set will be cancell...

Page 27: ...recommended that you use a dedicated disk for PVR use only Do not disconnect disk or power during formatting 3 Do not modify PVR files on a PC Note Make sure your USB device is compatible with the TV...

Page 28: ...the current broadcast A progress bar will be displayed at the bottom of the screen 2 Recording stops when you press the EXIT button and the recorded file is stored in the external USB device automatic...

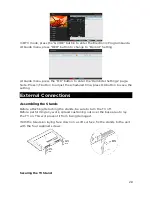
Page 29: ...st the scheduled time press OK button to save the setting External Connections Assembling the Stands Before attaching detaching the stands be sure to turn the TV off Before performing any work spread...

Page 30: ...B with a pencil on the wall by using a long wall mounting bracket as a ruler There will be a 0 engraved in the middle of the long wall mounting and 200 engraved on the end as shown 3 Align the upper h...

Page 31: ...external devices are being used check their volumes are not set too low or turned off If using AVI or Component inputs please make sure cables are connected properly and not loose If using DVI to HDM...

Page 32: ...eo Broadcasts Try re tuning or manually tuning missing channels Check that you are using the correct antenna type Channel cannot be selected Check if the channel has been blocked in the main menu sett...

Page 33: ...SD 4 3 contents Black bars on Top Bottom will be shown on movies that have aspect ratios different from your TV Adjust picture size option on your external device or TV to full screen If you have any...

Reviews: