background image

Summary of Contents for KALED49SUHDZA

Page 1: ......

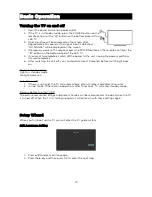
Page 2: ...11 Notes on Battery Usage 11 External Connections 12 Antenna Connection 12 Basic Operation 13 Turning the TV on and off 13 Setup Wizard 13 Settings 16 Preferences 16 Image 16 Sound 17 Auto Search 17 D...

Page 3: ...the Kogan customer support team Never attempt to make repairs yourself Never push objects of any kind into the set through the cabinet slots as they may touch dangerous voltage points or short circui...

Page 4: ...or limited by covering the ventilation slots with items such as newspapers tablecloths curtains etc At least 10cm of space should be left around the apparatus for sufficient ventilation The televisio...

Page 5: ...location allow some time for any dew or condensation inside the television to evaporate fully before you turn the unit on To prevent injury the television must be securely attached to the floor wall...

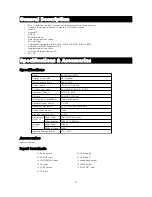
Page 6: ...n 3840 x 2160 Power Supply 110 240V 50 60Hz TV Receive System PAL SECAM BG DK I DVB T Frequency Range DTV 5 12 21 69 Video In PAL NTSC SECAM Antenna Input Impedance 75ohm unbalanced Speaker Output Pow...

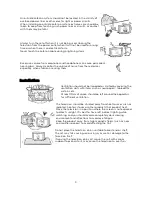
Page 7: ...ching the stand be sure to turn the TV off Before performing any work spread cushioning out over the base area to lay the TV on This will prevent it from being damaged Stand Assembly Instructions Plac...

Page 8: ...tand prior to wall mounting the TV 1 Fasten the mounting screws and sleeves together into the 4 screw holes on the rear cover 2 Fasten the wall mounting bracket with screws on the wall 3 With the assi...

Page 9: ...Overview Back Panel You can connect the TV to video devices such as DVD Blu Ray players VCR and video cameras as well as gaming consoles 8...

Page 10: ...the item in the menu or use to go to the previous channel when watching TV 3 Down Press to select the next menu item in the menu or use to go to the next channel when watching TV Hold to return to the...

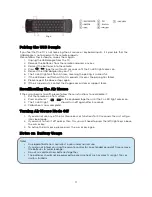
Page 11: ...u can now use the remote with your TV Using the Remote as an Air Mouse The air mouse function will be OFF by default Press to activate the air mouse function Swing your wrist to form easy and smooth m...

Page 12: ...se If the cursor begins to drift please follow these instructions to recalibrate it 1 Put the remote on a flat surface 2 Press and hold on the keyboard together until the Fn LED light comes on 3 The F...

Page 13: ...xial cable can be connected to the antenna jack directly If the antenna cable is 300ohm parallel flat feeder cable you will need to use the 300ohm 75ohm converter to connect the antenna cable to the a...

Page 14: ...rd from the wall completely 6 After switching the unit off you should wait at least 5 seconds before switching it back on Status Indication Lamp Light on standby mode No light power on Auto Power off...

Page 15: ...ur connection type Setting Up Wi fi 1 Wait about 10 seconds for the list of wireless networks to populate 2 Press keys to select your network 3 Press OK to confirm Setting Up a Wired Network 1 Press k...

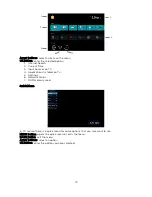
Page 16: ...Applications installed on TV 5 Settings 6 Network Status 7 RAM memory used Quick Menu In TV source there is a quick menu for some options that you may want to use MENU button opens the quick menu or...

Page 17: ...e settings soft vivid user dynamic standard that are preset at the factory You can set your own individual preferences under the USER setting Backlight Adjust the backlight level Aspect Ratio Select t...

Page 18: ...ween channels The auto volume will adjust the volume to ensure that the audio is maintained at a comfortable level Surround Sound you can turn surround sound on and off SPDIF Mode enable disable SPDIF...

Page 19: ...u can press the RED button to enter the DEL menu You can then choose the channel you want to delete then press RED again to delete Skip you can press the GREEN button to skip the channel The channel w...

Page 20: ...ike analogue channels you are not able fine tune a digital channel If the signal strength indicates that the signal is weak a possible solution is to adjust your antenna to increase the signal strengt...

Page 21: ...OK to select the Set Password option 2 Enter your 4 digit password to set the old password Choose any 4 digits for your new password and enter them As soon as the 4 digits are entered the cursor will...

Page 22: ...o Standby This option is used when CEC is enabled to judge whether the TV itself should go into stand by mode when the linked device goes into stand by mode Auto Power On This option is used when CEC...

Page 23: ...the TV set to turn itself on from standby mode You can set a desired source to be displayed automatically when the TV starts up in the SOURCE menu Off Time The off time option allows you to set a time...

Page 24: ...d disk for PVR use only Do not disconnect the disk or power during formatting Do not modify PVR files on a PC Note make sure your USB device is compatible with the TV and able to support PVR recording...

Page 25: ...can only watch channels on the same frequency as the program being recorded If you try to change to another channel or to exit to the main interface a message will appear prompting you to continue or...

Page 26: ...by holding the YELLOW button down for longer than 1 second The picture preview will automatically pop up if the capture is successful Share To When you preview the captured picture you can press the O...

Page 27: ...External Connections Connecting a VCR 26...

Page 28: ...Connecting a Camcorder 27...

Page 29: ...Connecting a DVD Player Blu Ray Player Set Top Box via HDMI 28...

Page 30: ...Connecting a Digital Audio System 29...

Page 31: ...Connecting to PC 30...

Page 32: ...ted to your television Adjust the TV volume accordingly Check that MUTE hasn t been turned on No colour wrong colour or tints Make sure the program itself is broadcast in colour Select the picture men...

Reviews: