background image

11 


a) Using the timer as a minute minder: 

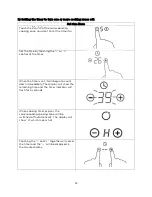
Make sure the cooktop is turned on. 

Note: you can use the minute minder even if you're not selecting any cooking zone. 
Adjust the timer setting by touching the “-” 

or “+” control.  

The minute minder indicator will start 

flashing and will show in the timer display. 

These controls are in the center of the 

control panel. 


When the time is set, it will begin the count 

down immediately. The display will show the 

remaining time and the timer indicator will 

flash for 5 seconds 


Buzzer will beep for 30 seconds and the 

timer display shows “--” when the set time 

is finished. 


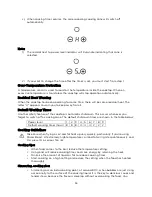
Touching the “-” and “+” together will 

cancel the timer and “--” will show in the 

display. 


Hint: 


Touch the “-” or “+” control of the timer once to decrease or increase by 1 minute. 


Touch and hold the “-” or “+” control of the timer to decrease or increase by 10 

minutes. 


If the setting time exceeds 99 minutes, the timer will automatically return to 0 

minutes. 


Summary of Contents for KAMCOOKTPCA

Page 1: ...1 Ceramic Cooktop 60cm KAMCOOKTPCA Quick Start Guide Table of Contents Safety Warnings 2 Overview 4 Installation 5 Operation 8 Cleaning Care 16 Specifications 17 Troubleshooting 17...

Page 2: ...be supervised A short term cooking process must be supervised continuously Warning Unattended cooking on a hob with fat or oil can be dangerous and may result in fire Never try to extinguish a fire wi...

Page 3: ...d switch the appliance off immediately at the mains power supply wall switch and contact a qualified technician Switch the cooktop off at the wall switch before cleaning or maintenance Failure to foll...

Page 4: ...ximum 1200W zone 2 Maximum 1800W zone 3 Maximum 1200W zone 4 Maximum 1800W zone 5 Glass plate 6 ON OFF 7 Control panel Control Panel 1 ON OFF control 2 Power regulating controls 3 Key lock control 4 T...

Page 5: ...rmation caused by the heat radiation from the hotplate Note The safety distance between the sides of the hob and the inner surfaces of the worktop should be at least 3mm L mm W mm W mm D mm A mm B mm...

Page 6: ...hob into position Be aware that the glue that joins the plastic or wooden material to the cooktop must resist temperatures up to 150 C The rear wall adjacent and surrounding surfaces must therefore be...

Page 7: ...upply should be connected in compliance with the relevant standard or a single pole circuit breaker The method of connection is shown below 1 If the cable is damaged or needs replacement this should b...

Page 8: ...me a touch is registered Make sure the controls are always clean dry and that there is no object e g a utensil or a cloth covering them Even a thin film of water may make the controls difficult to ope...

Page 9: ...e pan and the surface of the cooking zone are clean and dry Select a heat setting by touching the or control If you don t choose a heat setting within 1 minute the cooktop will automatically switch of...

Page 10: ...controls Touch the lock control The timer indicator will show Lo To unlock the controls Make sure the ceramic hob is turned on Touch and hold the lock control for a while When the hob is in the lock...

Page 11: ...me is set it will begin the count down immediately The display will show the remaining time and the timer indicator will flash for 5 seconds Buzzer will beep for 30 seconds and the timer display shows...

Page 12: ...f the timer When the time is set it will begin to count down immediately The display will show the remaining time and the timer indicator will flash for 5 seconds When cooking timer expires the corres...

Page 13: ...than one heating zones use this function the timer indicator will show the lowest time e g zone 1 setting time of 5 minutes zone 2 setting time of 15 minutes the timer indicator shows 5 Note The red...

Page 14: ...tch off a cooking zone The default shutdown times are shown in the table below Power level 1 2 3 4 5 6 7 8 9 Default working timer hour 8 8 8 4 4 4 2 2 2 Cooking Guidelines Take care when frying as oi...

Page 15: ...fore serving For stir frying 1 Choose a ceramic compatible flat based wok or a large frying pan 2 Have all the ingredients and equipment ready Stir frying should be quick If cooking large quantities c...

Page 16: ...s but beware of hot cooking zone surfaces 1 Switch the power to the cooktop off at the wall 2 Hold the blade or utensil at a 30 angle and scrape the dirt or spill on a cool area of the cooktop 3 Clean...

Page 17: ...our finger when touching the controls Make sure the touch control area is dry and use the ball of your finger when touching the controls The glass is being scratched Rough edged cookware Unsuitable ab...

Reviews: