background image

15 


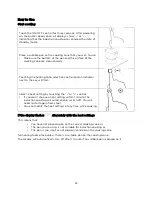
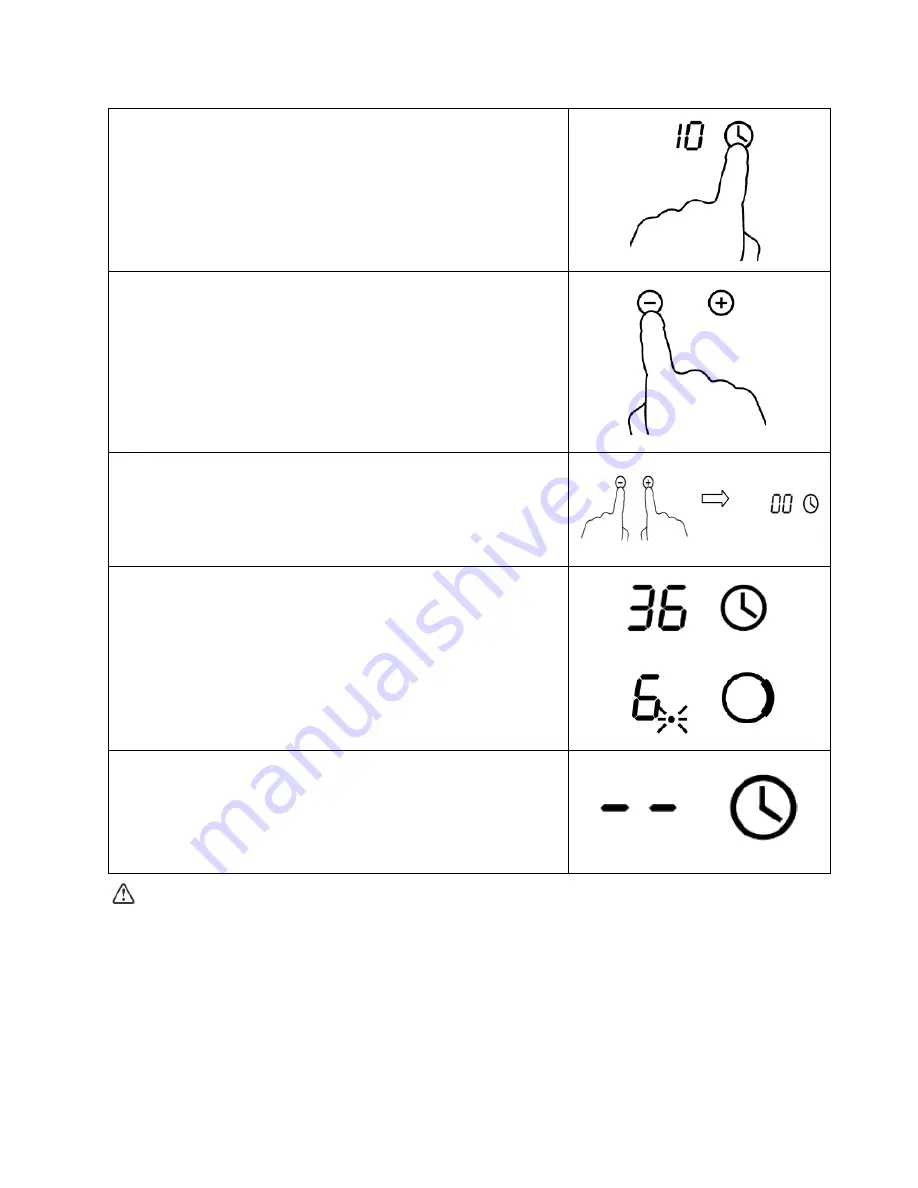
Touch the timer control, the minder indicator will start 

flashing and “10” will show in the timer display. 


Set the time by touching the “-” or “+” controls of the timer. 
Hint: Touch the “-” or “+” control of the timer once will 

decrease or increase by 1 minute. 
Touch and hold the “-” or “+” control of the timer will 

decrease or increase by 10 minutes. 


Touching the “-” and “+” together will cancel the timer and 

“00” will show in the minute display. 


When the time is set, it will begin to count down 

immediately. The display will show the remaining time and 

the timer indicator flash for 5 seconds. 
Note: The red dot next to power level indicator will 

illuminate indicating that zone is selected. 


When cooking timer ends, the corresponding cooking zone 

will be switched off automatically. 


Other cooking zones will keep operating if they were turned on previously. 


Summary of Contents for KAMCOOKTPIA

Page 1: ...1 Induction Cooktop 60cm KAMCOOKTPIA Quick Start Guide Table of Contents Safety Warnings 2 Overview 4 Installation 6 Operation 10 Cleaning Care 17 Specifications 18 Troubleshooting 19...

Page 2: ...e control system The cooking process must be supervised A short term cooking process has to be supervised continuously Warning Unattended cooking on the cooktop with fat or oil can be dangerous and ma...

Page 3: ...or cracked switch the appliance off immediately at the mains power supply wall switch and contact a qualified technician Switch the cooktop off at the wall before cleaning or maintenance Failure to f...

Page 4: ...4 Overview Top View 1 Maximum 1500W zone 2 Maximum 2000W zone 3 Maximum 1500W zone 4 Maximum 2000W zone 5 Glass plate 6 Control panel 7 ON OFF control...

Page 5: ...Key lock control 4 ON OFF control 5 Timer control Induction cooking works by electromagnetic vibrations generating heat directly into the pot or pan rather than indirectly through heating the glass s...

Page 6: ...cal shock and larger deformation caused by the heat radiation from the hotplate Note The safety distance between the sides of the hob and the inner surfaces of the worktop should be at least 3mm L mm...

Page 7: ...cooktop is installed above an oven the oven must have a built in cooling fan The installation complies with all clearance requirements and applicable standards and regulations A suitable isolating sw...

Page 8: ...urfaces of the worktop after installation see picture Cautions 1 The induction hotplate must be installed by a qualified personnel or technicians Please never conduct the installation by yourself 2 Th...

Page 9: ...he rating plate To connect the cooktop to the mains power supply do not use adapters reducers or branching devices as they can cause overheating and fire The power supply cable must not touch any hot...

Page 10: ...ion Operation Before using your new induction cooktop Remove any protective film that may still be on your induction cooktop Touch Controls The controls respond to touch so you don t need to apply any...

Page 11: ...urved base Make sure that the base of your pan is smooth sits flat against the glass and is the same size as the cooking zone Use pots and pans whose diameter is as large as the graphic of the zone se...

Page 12: ...etting by touching the or control If you don t choose a heat setting within 1 minute the induction cooktop will automatically switch off You will need to start again from step 1 You can modify the hea...

Page 13: ...If you want to heat other pans use the hotplate that is still hot Locking the Controls You can lock the controls to prevent unintended use for example children accidentally turning the cooking zones...

Page 14: ...will start flashing and 10 will show in the timer display Set the time by touching the or control of the timer Hint Touch the or control of the timer once to decrease or increase by 1 minute Touch an...

Page 15: ...e by 10 minutes Touching the and together will cancel the timer and 00 will show in the minute display When the time is set it will begin to count down immediately The display will show the remaining...

Page 16: ...occasionally to the surface of the cooking liquid It is the key to delicious soups and tender stews because the flavours develop without overcooking the food You should also cook egg based and flour...

Page 17: ...nd the settings that best suit you Heat Setting Suitability 1 2 delicate warming for small amounts of food melting chocolate butter and foods that burn quickly gentle simmering slow warming 3 4 reheat...

Page 18: ...n the glass they may be difficult to remove or even permanently damage the glass surface Cut hazard when the safety cover is retracted the blade in a scraper is razor sharp Use with extreme care and a...

Page 19: ...crackling or clicking noises This may be caused by the construction of your cookware layers of different metals vibrate differently This is normal for cookware and does not indicate a fault The cookto...

Page 20: ...ery E1 Supply voltage is above the rated voltage Please inspect whether power supply is normal Power on after the power supply is normal E2 Supply voltage is below the rated voltage E3 High temperatur...

Page 21: ...Replace the display board The cooking mode indicator comes on but heating does not start High temperature of the cooktop Ambient temperature may be too high Air intake or air vent may be blocked There...

Page 22: ...iance should not be disposed of with other household wastes To prevent possible harm to the environment or human health from uncontrolled waste disposal recycle it responsibly to promote the sustainab...

Reviews: