background image

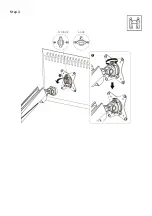
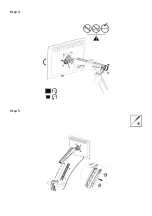
Step 4 


Step 5


Summary of Contents for KASMM39S12A

Page 1: ...FULL MOTION SPRING ASSISTED RGB GAMING MONITOR MOUNT WITH USB HUB SINGLE KASMM39S12A ...

Page 2: ......

Page 3: ...ipment and all attached hardware and components Use the mounting screws provided and DO NOT OVER TIGHTEN mounting screws This product contains small Items that could be a choking hazard If swallowed Keep these items away from children This product is intended for indoor use only Using this product outdoors could lead to product failure and personal injury IMPORTANT Ensure that you have received al...

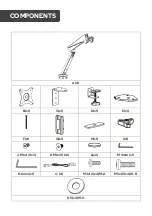
Page 4: ...A x1 B x1 C x1 D x1 E x1 F x1 G x1 H x1 I x1 J M6x12 x3 K M6x10 x2 L x2 M 4mm x1 N 6mm x1 O x1 M4x12 x4 M A M5x12 x4 M B D5 x4 M C COMPONENTS ...

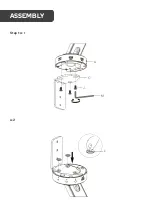
Page 5: ...Step 1 a 1 a 2 ASSEMBLY A C J M L ...

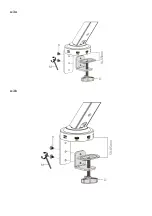
Page 6: ...a 3a a 3b D M K 10 55mm D M K 50 85mm ...

Page 7: ...a 4 a 5 G ...

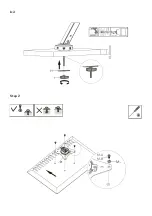
Page 8: ...b 1 b 2 A E J M F L ...

Page 9: ...b 3 Step 2 H I 10 80mm ø 10mm ø 3 8 B M C M B M A ...

Page 10: ...Step 3 Lock Unlock ...

Page 11: ...Step 4 Step 5 N M ...

Page 12: ...Step 6 ...

Page 13: ...Step 7 Rotate the display If the display does not stop at your desired position tighten the screws a and b as shown 40 40 90 M N b a ...

Page 14: ...Inputs and controls O USB 3 0 Micro B USB 3 0 Ports Earphone Jack Microphone Jack Light Switch Button To Turn ON OFF press for 2 Sec ...

Page 15: ...NOTES ...

Page 16: ...tion We hope that this user guide has given you the assistance needed for a simple set up For the most up to date guide for your product as well as any additional assistance you may require head online to help kogan com ...

Reviews: