background image


KOGAN SMARTERHOME™ 

G60 ROBOT VACUUM 

WITH MOPPING FUNCTION


KAVACRBG60A 

Summary of Contents for KAVACRBG60A

Page 1: ...KOGAN SMARTERHOME G60 ROBOT VACUUM WITH MOPPING FUNCTION KAVACRBG60A...

Page 2: ......

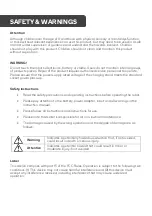
Page 3: ...uctions Read the safety precautions and operating instructions before operating the robot Please pay attention to the battery power adapter robot and all warnings in the instruction manual Please foll...

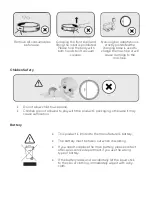
Page 4: ...Do not use in a suspended environment without a guard bar Do not use the power cord to drag or move the product Do not allow the product to be near fire or near flammable explosive and corrosive mater...

Page 5: ...ren Safety Do not allow child to use alone Children are not allowed to play with the product s packaging otherwise it may cause suffocation Battery This product is limited to the manufacturer s batter...

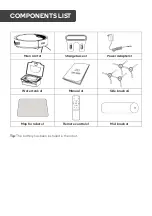
Page 6: ...Main Unit x1 Charge base x1 Power Adapter x1 Water tank x1 Manual x1 Side brush x4 Mop for robot x1 Remote control x1 Mid brush x1 Tip The battery has been installed in the robot COMPONENTS LIST...

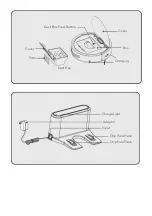
Page 7: ...Spot Clean Turn ON Press 2 second Automatic Clean Press once Bumper Cover Switch Auto Charging Front Sensor Left Brush Air Outlet Left Wheel Brush Main Wheel Right Brush Right Brush Water Tank Outlet...

Page 8: ...Dust Box Press Button Cover Filter Dust Box Cover Box Charging Charge Light Chip Pole Piece Input Adaptor Chip Pole Piece...

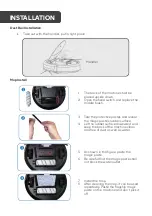
Page 9: ...reveal the magic paste s rubber surface 4 Let the rubber surface downward and keep the back of the machine clean and free of dust as well as water 5 As shown in the figure paste the magic paste 6 Be c...

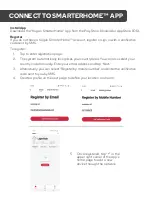
Page 10: ...The system automatically recognises your country area You can also select your country code manually Enter your email address and tap Next 3 Alternatively you can select Register by mobile number and...

Page 11: ...ds The buzzer will sound as it enters the network configuration mode and the indicator light will begin flashing Add device through network 5 Ensure that the device is in pairing mode with the indicat...

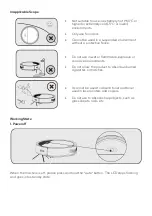
Page 12: ...Please take out the foam strip and clean the area around the robot Ground for Use OPERATION Foam Foam Scope of application Products are applicable to the following ground environment Wood Marble...

Page 13: ...use in wet or flammable explosive or corrosive environments Do not allow the product to absorb unburned cigarettes or matches It cannot be used to absorb toner and toner used in laser printers and co...

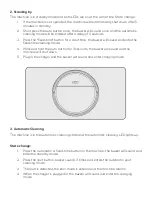
Page 14: ...Press and hold the auto button for 3 seconds the buzzer will sound and the machine will shut down 5 Plug in the charger and the buzzer will sound and enter charging mode 3 Automatic Cleaning The machi...

Page 15: ...a in a bow shape stops after the cleaning and enters the automatic recharging mode State change 1 Press the automatic or fixed time buttons on the machine with the buzzer sounds it enters the standby...

Page 16: ...n the top of the machine the buzzer will sound once and the machine will enter the automatic cleaning mode or the spot cleaning mode after exiting the charging stand Charging Operation 1 Put charger i...

Page 17: ...r adapter directly to the machine and output 1 Fill the robot for 12 hours when charging for the first time 2 For daily using store the machine on the charging stand and ensure that the charging stand...

Page 18: ...e to clean along the edges of the wall Spot Button Press Spot button buzzer rings once the robot will enter to spot cleaning mode to start cleaning specific areas Auto Charging Button Press Auto Charg...

Page 19: ...In the standby mode press the button to enter the sleep state press twice to enter standby mode In any working mode of the machine press once to enter standby mode Press twice to go to sleep Note The...

Page 20: ...tes in the designated area Auto clean In standby mode or other working state press the button to enter the automatic cleaning mode Robot will automatically clean the room Edge clean In standby or othe...

Page 21: ...ce Tip Before each use please check whether the side sweep has been assembled otherwise it will affect the normal cleaning of the vacuum cleaner Please distinguish the L side brush and the R side brus...

Page 22: ...sed otherwise it will affect the dust absorption effect and service life 3 Clean the sensor and chip pole piece Gently wipe the sensor and the chip pole piece with a cleaning tool or a soft cloth Tips...

Page 23: ...pp Login to App Add Device Select Device 4 Log into your SmarterHome account with your email address or mobile number 5 Once linked it will show the devices linked to your account you can assign them...

Page 24: ...Set Up New Device Add and Manage Device Assign Room Update Home Control...

Page 25: ...Login to your SmarterHome account with your email address or mobile number 4 Select Discover Devices and the app will begin searching 5 When successfully linked you will see a list of connected Kogan...

Page 26: ...Login to App Discover Devices Setup Device...

Page 27: ...15W Battery type Lithium battery Battery capacity 4400mAh Charging time 6 hours Working time 90 minutes Temperature range 10 C 45 C Humidity range 90 RH Dust bin capacity 350ml Noise 65dB Size 310 x 3...

Page 28: ...been blocked 5 Left impact failure LED flash 5 times buzzer sounds once Check whether the left front shell has been blocked 6 Left wheel failure LED flash 8 times buzzer sounds once Check whether the...

Page 29: ...NOTES...

Page 30: ...a Quick Start Guide and we hope that this has given you the assistance needed for a simple set up For the most up to date guide for your product as well as any additional assistance you may require h...

Reviews: