background image


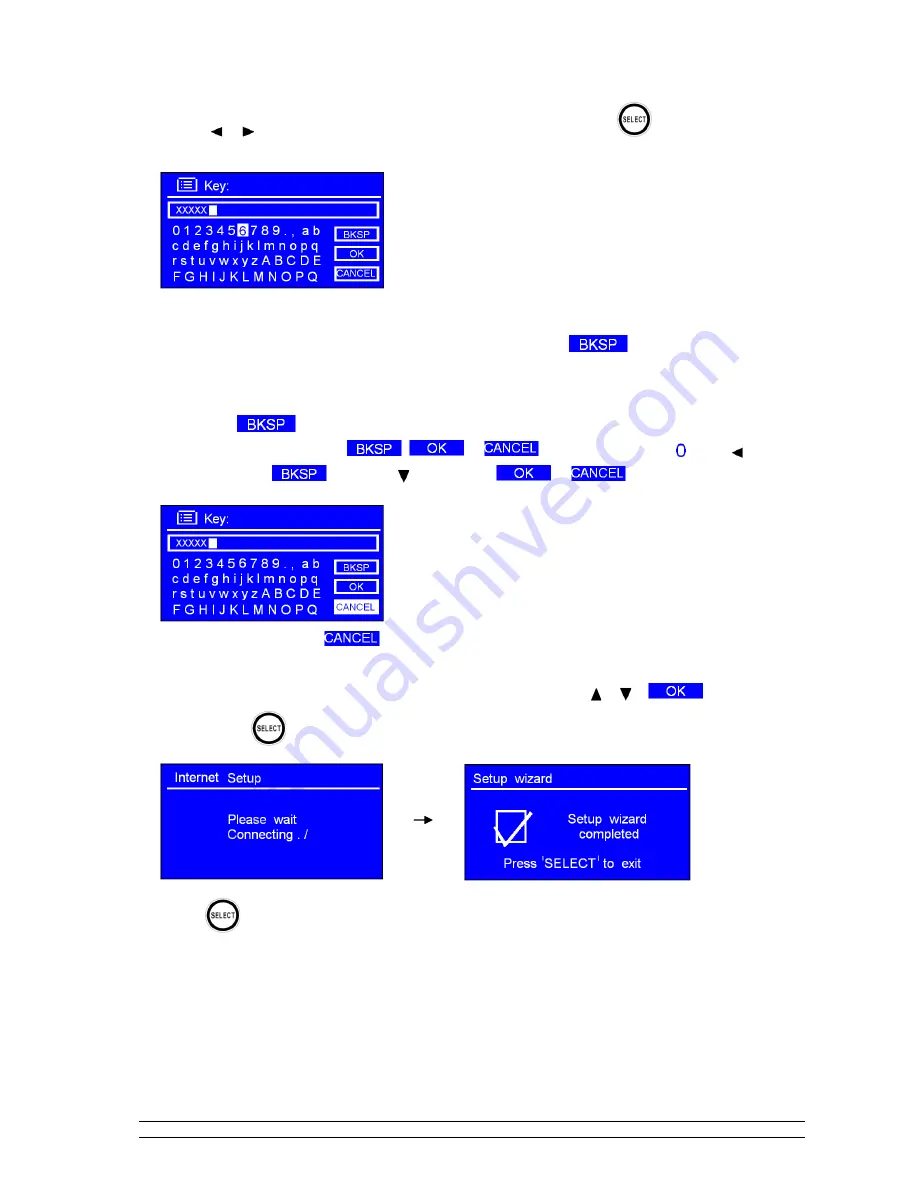
Press 


or


to  cycle  through  the  alphanumeric  character  list,  press 

 to  select  an  appointed 

character. 


Note

: WEP/WPA pass codes are case-sensitive. 


If  you  make  a  mistake  while  entering  your  password,  select 


to  delete  a 

character.


Note

:   a.> 

= Backspace. 

b.> Method for selecting

,

or 

: while cursor points to 

‘ ’, 

press   , and you 

can select 

, then press  you can select 

or 

in turn. 


c.>  If you select 

, you

 will be returned to previous track. 

d.>  Radio


will automatically save the WEP/WPA password you have entered. 

e.>  After  selecting  the  final  character  of  your  password,  press 


or


to 

,  and  then  press 

 to confirm.  


7.   Press 

 to exit. 


The WiFi setup is complete! 


Summary of Contents for KGNDRVCA

Page 1: ......

Page 2: ... have fallen into the apparatus the apparatus has been exposed to rain or moisture does not operate normally or has been dropped 15 The apparatus shall not be exposed to dripping or splashing and no objects filled with liquids such as vases shall be placed on the apparatus 16 The mains plug or an appliance coupler is used as the disconnect device the disconnect device shall remain readily operable...

Page 3: ...24 Setting Station Presets 25 Selecting a Preset Station 25 iPod Mode 26 AUX IN Mode 27 Sleep Function 28 Setting Clock 29 Daylight Savings 30 Setting Alarm 31 General Operation 34 Return to Main Menu 34 Adjust Volume Level 34 Browse Station Information 34 System settings 35 Equaliser 35 Network setup 35 Contrast Setting Backlight Level 36 Language 37 Factory Reset 38 Software Updates 39 Enter Set...

Page 4: ...2 Package Content Main unit Remote ...

Page 5: ...the WEP or WPA code so you can get the Internet Radio to communicate with the network If your wireless network is configured for trusted devices you will need to enter the Radio s MAC address into your wireless access point s configuration settings To find the Radio s MAC address use menu items as follows Main menu System settings Network View settings MAC Address To enter the MAC address into you...

Page 6: ...4 Unit Top and Back Overview Unit Top Overview Unit Back Overview ...

Page 7: ...se only Press or to change tracks Press to play or pause Press and hold to store preset stations Press to load the stored stations Press to display Queue information in AUX IN mode this button is out of service Press to change modes between Internet Music player DAB FM iPod and AUX IN mode in turn Press or to scroll left and right Press or to scroll up and down Press to return to previous menu pag...

Page 8: ...by pressing For initial use it will ask you to follow the Setup wizard Step 2 Setup wizard 1 Continue above as show Press to confirm YES and then press or to your preferred hour format Press to confirm While cursor point to Update from Network and then press to confirm 2 Press or to your local timezone and then press to confirm Press or to select the Daylight saving status and then press to confir...

Page 9: ...nt in memory Note In some cases radio may find more than one network Press or to your favourite one press to confirm 5 If your network is not configured to request a password WEP WPA radio will connect to the network and display 6 If a WEP WPA key password is required radio will ask you to input the WEP WPA code and display the password entry screen as follows ...

Page 10: ...elete a character Note a Backspace b Method for selecting or while cursor points to press and you can select then press you can select or in turn c If you select you will be returned to previous track d Radio will automatically save the WEP WPA password you have entered e After selecting the final character of your password press or to and then press to confirm 7 Press to exit The WiFi setup is co...

Page 11: ...so press repeatedly until Internet radio shows up then stop pressing to enter Later it will show 2 While cursor points to Station list press to confirm After trying to connect to network if it says Please do the following a Check if your router is working or not b Relocate your radio to a stronger WiFi signal area c Make sure your WiFi password is entered correctly ...

Page 12: ...int to Station list and then press to confirm 2 Press or to Local China and then press to confirm Note Local China is can be changed according to your current location for instance it can be local US or local UK etc When set to your location it is easy to find local internet radio stations 3 Press or to select an option then press to confirm ...

Page 13: ...then press to confirm 3 There are five options available to choose a station as above image shows Location enables you to choose from the radio stations provided by any country which you choose from a list a While cursor points to Location press to confirm b Press or to select the region you want then press to confirm c Using the same method select country and then the desired station The station ...

Page 14: ...firm b Press or to select genre then press to confirm c Press or to select station then press to confirm Note a Some radio stations do not broadcast 24 hours per day and some stations are not always on line b Some stations have on demand content This means that it provides an option of listening to older programs that have already been broadcast ...

Page 15: ...et already 1 Press and then press or to Main menu press to confirm 2 Press or to System settings press to confirm 3 Press or to Network press to confirm 4 Press or to Manual settings press to confirm 5 While cursor points to Wired press to confirm 6 While cursor point to DHCP enable press to confirm ...

Page 16: ... repeatedly until Internet Radio is showing up stop pressing or Step3 Access Network Continue above steps few seconds later and it will say or If display reports that the device Failed to connect please do the following a Check your Router to see if it is working normally or not b Check your LAN cable make sure it is not damaged c Check the ports where the cable inserts into LAN socket is l ...

Page 17: ... a Factory Reset and proceeding with the setup wizard again 1 Refer choose LAN setting page 13 Press or to Wireless press to confirm 2 While cursor points to DHCP enable press to confirm and then proceed with the steps from page 7 to configure the WiFi network WiFi setup is now complete ...

Page 18: ...s or to select an option 3 Press to confirm and then select the desired program Get Access Code for internet portal use 1 After your radio connect to network press or to Help and then press to confirm Note at this step you can also listening radio FAQ solutions 2 While cursor point to Get access code press to confirm then you get it ...

Page 19: ...ures and services offered by the Frontier Internet Radio Portal 5 To change My favourites it is recommended to restart the radio after any changes are made The proceed a While cursor point to My favourites press to confirm b Press or to your favorite station and then press to loading Note Your added my favourites stations will show up in the my favourites subdirectory Doing a factory reset will no...

Page 20: ... Frontier internet Radio Portal 4 To change My Added Stations it is recommended to restart the radio after any changes are made The proceed a When cursor point to My added stations press to confirm b Press or to your favourite station and then press to loading Note Your added stations will show up in the my added stations subdirectory Doing a factory reset will not erase them as they are stored on...

Page 21: ...caster Station Location This is a description of the type of programme provided by either internet radio station or broadcaster Reliability This will show the degree of reliability of station which you are listening to Signal Info This shows the digital bit rate and the signal mode Playback Buffer This displays the playback buffer strength of current station Date Info This displays the date which ...

Page 22: ...r enter Main menu then press or to Music player Press to confirm 2 Select Shared media then press to confirm and then select the desired music to play B Repeat play mode a Press and then press or to Repeat play Off press to shift Off to On or press again to shift from On to Off C Shuffle play mode a Press and then press or to Shuffle play Off press to shift Off to On or press again to shift it fro...

Page 23: ...list will be selected 3 You can move back to the previous screen at any time by pressing 4 Press or to cycle through stations list and then press to confirm 5 Changing to another station can be reached by pressing or to get to the DAB menu list While cursor point to Station list press to confirm and then refer to above step 4 to access Note if no DAB signal is found in your area it may be necessar...

Page 24: ...e is a multiplex corresponding to this channel and frequency then the display will show a tuning meter with the signal strength and the multiplex name after a few seconds 3 Press or repeatedly to exit this order Prune Invalid 1 Press and then press or to Prune invalid press to confirm 2 Press or to select YES and then press to confirm This will remove all invalid stations ...

Page 25: ...onfirm 2 Press or to desired option press to confirm To Change Station Order 1 Press and then press or to Station order press to confirm Note There are 3 options Alphanumeric Ensemble and Valid shows before the default of your setting option to indicate current station order STATION ORDER DESCRIPTION Alphanumeric Display all stations in alphanumeric order Ensemble List active stations ones that ar...

Page 26: ...he frequency by 0 05MHz steps 3 To auto searching press and hold or or simply press or press Note a To auto search the next active station repeat step 3 b The unit will display the frequency changing until it reaches the next active station c After it runs to the end of the frequency range it will start again from the beginning of range B Scan setting 1 FM mode at any point press or to enter the s...

Page 27: ...d hold and then press or to desired preset 2 Press to confirm Radio will then return to its normal operation and preset icon will appear on display Selecting a Preset Station To select a stored station 1 Press to go into desired mode limited to Internet DAB and FM modes only 2 Press then press or to desired preset 3 Press to confirm ...

Page 28: ...our iPod if necessary Charging will stop when the iPod is fully charged check the iPod screen 2 Press repeatedly until iPod is Selected 3 Select and play a track either by operating the iPod or by pressing to change to previous track or to change to the next track Press to Play Pause 4 Adjust the volume level by pressing or repeatedly Do not adjust the volume on the iPod ...

Page 29: ...speaker system 3 Connect one end of the audio cable to the headphone or auxiliary out socket of your source device the other end connect to AUX IN socket on the rear of your radio The radio display will show 4 To gain optimal volume levels adjusting the output volume levels on both the source device and on radio itself is recommended Note AUX IN allows for quick and easy connection to MP3 players ...

Page 30: ...can be between 0 60 minutes 3 When desired period is chosen stop pressing and buttons Note a The interval time is 15 minutes per step B At this step and sleep icon shows up as well as shows how long it will be expired 4 Radio will automatically put itself into standby mode after the sleep time period has elapsed 5 To return to normal playback press ...

Page 31: ...ints to Set Time Date press and then press or to set the date 3 Using the same method to set month year hour and minute in turn Setting to Auto update Note Choose Auto update please ensure your radio is connected to the internet 1 Press or to select Auto update press to confirm 2 You can either choose Update from DAB or Update from Network press to confirm ...

Page 32: ...mezone 1 Press or to select Set timezone press to confirm 2 Press or to select location timezone press to confirm The clock settings are now complete Daylight Savings 1 Daylight Savings settings can be accessed from Main menu System settings Time Date Daylight savings press to confirm 2 Press or to ON and then press to confirm ...

Page 33: ...u Alarms press to confirm 2 Press or to select alarm press to confirm 3 While cursor points to Enable Off press to confirm 4 Press or to select desired alarm frequency press to confirm 5 Press or to Time 00 00 press to confirm 6 Press or to change hours press to confirm 7 Use the same method to set minutes and then press to confirm ...

Page 34: ...r to Preset Last listened to choice alarm sound 9 Press to confirm and then press or to Volume 12 press to confirm 10 Press or to chose desired volume level press to confirm 11 Finally Press or to Save press to confirm The display will show Alarm Saved for 3 seconds Alarm icon will appear To check alarms status press to enter standby mode ...

Page 35: ...nkling and will show how long has elapsed During this time you also can press to turn the alarm off b After SNOOZE time has elapsed alarm should sound again To cancel Alarm a Select desired Alarm ALARM 1 or ALARM 2 then enter alarm setting mode b While cursor points to Enable Daily or other frequency press to enter c Press or to select Off press to confirm d Press or to Save and then press to conf...

Page 36: ...Volume Level Adjust the volume level by pressing or repeatedly Radio will remember previous volume level Browse Station Information It is possible to view the information that is displayed on the second line of the display when listening to an Internet Radio program To browse more information you can press repeatedly Note AUX in mode does not provide station information ...

Page 37: ...press to confirm 3 Press or to select desired sound setting press to confirm Network setup Note Familiarity with this will allow you To shift to another SSID Internet Wizard To check MAC address Wlan region IP address Gateway address DNS etc View settings To convert the connection method between wireless and wired Manual settings ...

Page 38: ...confirm Contrast Set Backlight Level Contrast settings can be accessed from Main menu System settings Contrast and then press to confirm A Setting Power On Level 1 While cursor points to Power On press to confirm 2 Press or to select desired setting press to confirm Having the display set to high is recommended for best visibility ...

Page 39: ...ress to confirm 2 Press or to select desired contrast setting press to confirm The low settings is recommended Language 1 Language settings can be accessed from Main menu System settings Language press to confirm 2 Press or to desired setting and then press to confirm ...

Page 40: ...gs It will not reset the stations saved in the favorites via the Frontier Radio internet portal 1 Factory reset can be accessed from Main menu System settings Factory reset 2 Press to confirm and then press or to select YES 3 Press to confirm Note If you do not wish to continue at step 2 press or to select NO and then press to cancel this order ...

Page 41: ...While cursor points to Auto check setting press to confirm 3 Press or to select YES press to confirm 4 Press or to Check now press to confirm Radio should display the following Note software update can take several minutes Do not switch Radio off until this procedure has been complete otherwise permanent damaged may be caused ...

Page 42: ...wizard press to confirm 2 Follow the prompts on the display to complete the setup wizard SW Version and Radio ID 1 Software Version and Radio ID can be accessed from Main menu System settings Info 2 Press to confirm This information may be requested when dealing with technical support issues ...

Page 43: ...o the network you need to set up media sharing so that you can share music with your Radio The following steps describe how to set up media sharing in Windows Media Player 11 1 In Windows Media Player 11 click the small arrow below the Library tab and then click Media Sharing 2 In the Media Sharing dialogue box select the Share my media check box ...

Page 44: ...vice and select Properties your Radio s MAC address will be shown Step 2 Play Music on the Internet Radio After installing and configuring your Radio and Windows Media Player 11 you are now ready to play music via a wireless connection The following steps describe how to play music with your Radio 1 Select UPNP Servers in the Media Player menu 2 Select the computer you wish to play the music files...

Page 45: ...e Personal File Sharing and Windows Sharing In order to do this tick the corresponding boxes or click on Start for each of these services Under the Firewall section switch off the firewall Under the Internet section switch off Internet Sharing Accounts Setup From the System Preferences window in the System section click on Accounts Select an account and remember its Short Name and password This wi...

Page 46: ...orrect key or password into the Radio Remember that text format keys are case sensitive If when attempting to connect to an encrypted network your Radio displays Wireless error followed by a 5 digit number then please ensure that you enter the correct passphrase for the network If the problem persists then you may need to consult your network configuration 5 If your Radio can connect to the networ...

Page 47: ...efer rear panel silk screen Line out socket impedance 47Kohm Earphone socket impedance 32ohm Dimension 320mm x 150mm x 150mm This symbol on the product or in the instructions means that your electrical and electronic equipment should be disposed at the end of its life separately from your household waste There are separate collection systems for recycling in the EU For more information please cont...

Reviews: