background image


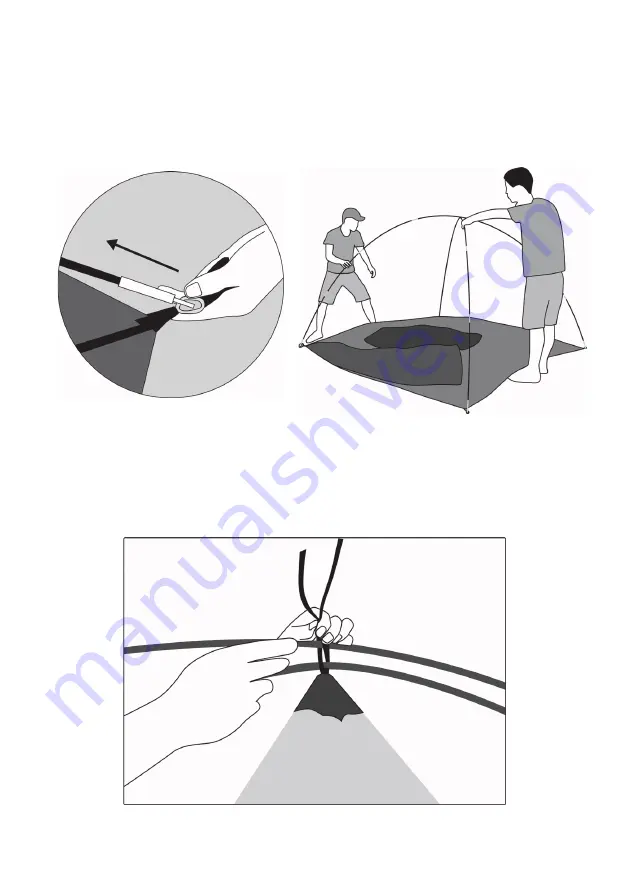
Step 4: 

Insert one end of a tent pole into a pin located at the corners of the tent body. 

Secure the other end of the tent pole to the pin located at the corner diagonally opposite.  
Repeat this process to the other tent pole with the two remaining pins.   
Once secured, pull up both tent poles. They should resemble a dome shape, intersecting 

each other in the centre.  


Step 5: 

Tie the string from the centre of the tent body to the intersection of the two tent 

poles. 


Summary of Contents for KOMODO KDCMPTNT3PA

Page 1: ...CAMPING TENT 3 PERSONS KDCMPTNT3PA...

Page 2: ......

Page 3: ...aterial Ensure the area the tent is set up is clear of sharp objects and obstructions to avoid damage to the material Do not pitch the tent under trees due to the potential of lightning strikes and fa...

Page 4: ...t body x1 Fly x1 Tent pole x2 Peg x12 Guy rope x4 Carry bag x1 Step 1 Ensure you are in a flat open area clear of any obstructions Remove and lay out all components from carry bag COMPONENTS LIST ASSE...

Page 5: ...Step 2 Stretch the tent body flat on the ground Step 3 Unfold and connect the joints of one tent pole Repeat this process with the other tent pole x2...

Page 6: ...the pin located at the corner diagonally opposite Repeat this process to the other tent pole with the two remaining pins Once secured pull up both tent poles They should resemble a dome shape interse...

Page 7: ...Step 6 Clasp the plastic hooks located on all four sides of the tent body to the tent poles This completes the assembly of the tent body...

Page 8: ...y attach the hooks on each corner of the fly to the metal rings located on each corner of the tent body Step 8 Further secure the fly by tying the hook and loop strips located on the four sides of the...

Page 9: ...Secure the tent down by inserting pegs onto the four corners of the tent Tent assembly is now complete Note The guy ropes may also be used to further secure the tent to the ground during windier cond...

Page 10: ...Step 1 Remove all pegs from the four corners of the tent Step 2 Detach the hooks located on the fly from the metal rings on each corner of the tent body DISASSEMBLY...

Page 11: ...Step 3 Detach the hook and loop strips located on the fly from the poles Step 4 Remove the fly from the tent body...

Page 12: ...Step 5 Unclasp the plastic hooks on all four sides the tent body from the tent poles Step 6 Untie the string on the top of the tent body from the tent poles...

Page 13: ...Step 7 Release the ends of each tent pole from the metal pins Remove the two tent poles from the tent body Step 8 Fold the two tent poles up back to their original state...

Page 14: ...Step 9 Fold up the tent body and place all components back into the carry bag...

Page 15: ...Height A 140cm Width B 220cm Depth C 220cm DIMENSIONS...

Page 16: ...ion We hope that this user guide has given you the assistance needed for a simple set up For the most up to date guide for your product as well as any additional assistance you may require head online...

Reviews: