background image

Welcome

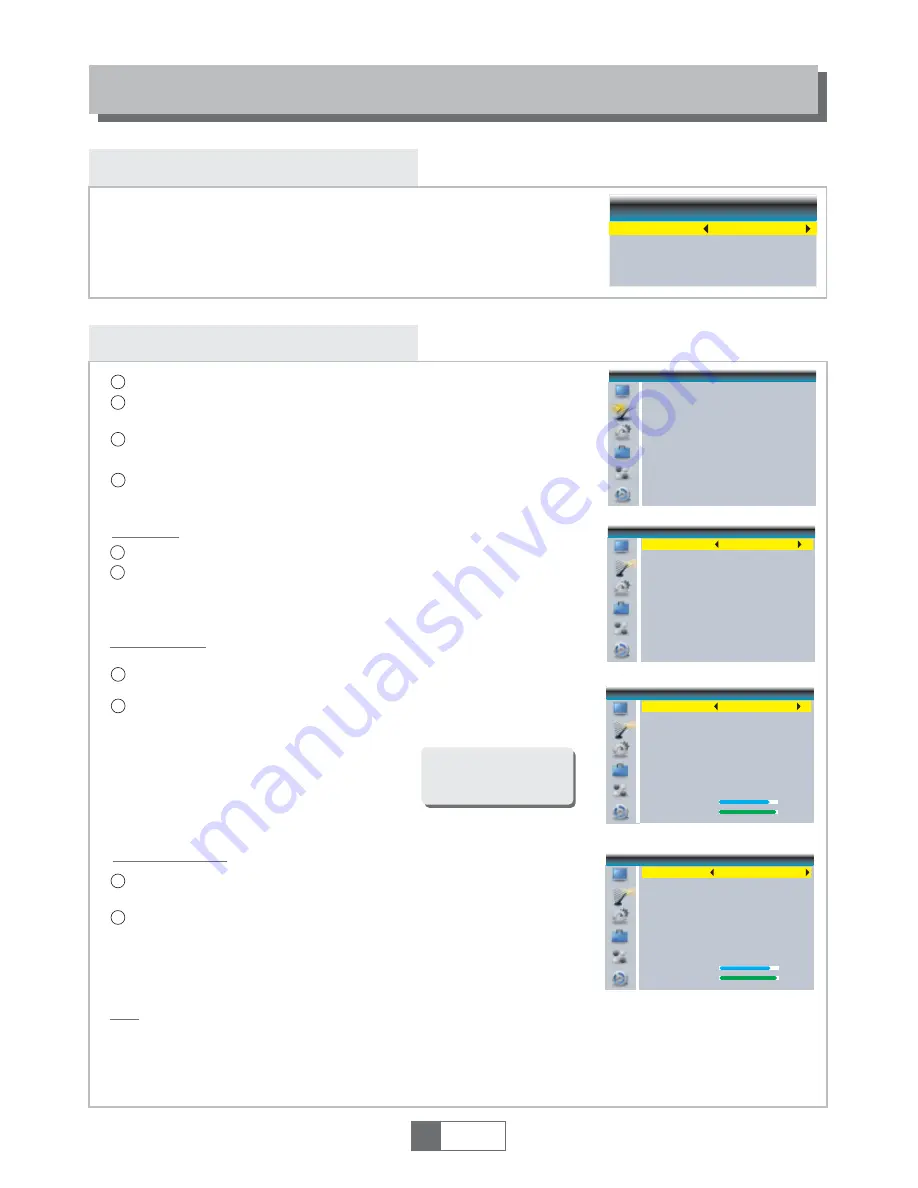
If you use the STB for the first time, the "Welcome" menu appears.
Press cursor button to setup the Region, Language, Display Mode 
and Aspect Mode.
Highlight "OK" and press the "OK" button to start channel search.

GETTING STARTED

Installation

Select "Channel Scan", press the "OK" button to enter the Channel 
Scan menu. 
Press cursor button to set Scan mode, Scan Band ,
Channel No., Frequency and Bandwidth, then highlight "Search",  
press "OK" button to start channel scan . 

1

1

2

2

4

Press the cursor button to set "FTA Only", then highlight "Search", 
press the "OK" button to start auto scan .

1

2

3

Channel Scan mode: 

By channel

By frequency

Select the "Aerial Adjustment", press"OK" to enter the Aerial 
Adjustment.

Press the cursor button to set the desired setting. 
When "Tuner Power" is selected "On", the STB will provide 5V power 
to antenna.
It will not provide when selected "Off".     

1

2

1

English

4

Auto Scan

Channel Scan

Aerial Adjustment

LCN

Press the "MENU" button to enter main menu.
Press "UP"or " DOWN " button to highlight "Installation", press 
"RIGHT" button to enter the Installation menu.
Press "UP" or "DOWN" cursor button to highlight the desired item 
and press "OK"button to enter the sub-menu .
Press "EXIT" button to exit.

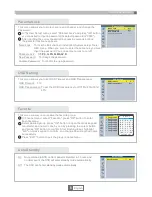
Select the "Auto Scan", press "OK" button to enter the Auto Scan menu.

If  LCN( Logical Channel Number) Select function is activated, you can't change the original 
number of TV channels by scanning . 
You can activate/disactivate the LCN function by setting the "LCN Mode" to on/off.

Auto Scan
Channel Scan
Aerial Adjustment
LCN

Installation

Auto Scan

FTA Only
Search

No

Channel Scan

Scan Mode
Scan Band
Ch No.

Search

Frequency
Bandwidth

By channel

UHF

CH37(666000KHz)

666000KHz

8MHz

Signal Intensity
Signal Quality

81%
97%

Aerial Adjustment

Ch No.
Tuner Power

CH37(666000KHz)

Off

Signal Intensity
Signal Quality

81%
97%

Welcome

Region

Language

Display Mode

Aspect Mode

Australia

English

Auto

1080i

OK

Summary of Contents for LAPVR50XXXA

Page 1: ... WsZϱϬyyy USER MANUAL ...

Page 2: ...essories Do not place this video product on an unstable cart stand tripod bracket or table The video product may fall causing serious injury to a child or adult as well as serious damage to the video product Use this video product only with a cart stand tripod bracket or table recommended by the manufacturer s or sold with the video product Any mounting of the product should follow the manufacture...

Page 3: ...EM SETUP System setup menu Language TV System Local Time Setting Timer Setting Parental Lock OSD Setting Favorite Auto Standby TOOLS Tools main menu Information Load Factory Setting Software Upgrade Remove USB device safely GAMES Game REC REC main menu Media Player HDD Information PVR Setting TIMESHIFT RECORD Timeshift Record Two Programs Recording in the same TP Transponder Two Programs Recording...

Page 4: ...1 English 1 USB port Standby button Down Mix Audio 2 Channel L R Display Progressive Scan Video Y Pb Pr MENU Channel Up Down Volume Up Down OK button OK Cursor Enter REC PLAY PAUSE MENU EXIT STANDBY ON OK USB REC PLAY PAUSE Coaxial Digital Audio KAPVR50XXXA AC 220 240V 50 60Hz DVB T RECEIVER POWER SUPPLY AC 220 240V 50 60Hz MAX POWER CONSUMPTION 15W RF IN Pr CVBS R L Y Pb HDMI RF OUT ...

Page 5: ...eractive service 8 9 11 10 12 13 15 14 4 5 6 7 16 17 18 19 20 21 22 23 24 25 BACK Switch to previous channel EPG Open up Electronic Program Guide Menu Cursor CH VOL Cursor Navigation buttons used to navigate menu s items CH Channel Up and Down VOL Volume Up and Down RECORD Record the TV program Search backward forward FAV Open the Favorite list RED GREEN YELLOW BLUE Buttons For interactive functio...

Page 6: ...hat you can connect to the STB In this manual you will see some of the most common ways to connect your equipment General Connecting a HiFi system Coaxial cable Connecting the TV 1 English 3 Hi Fi AC 220 240V 50 60Hz MAX 9W Y Pb Pr VIDEO R AUDIO L ANT IN ANT OUT HDMI COAXIAL HDMI TV RF cable Audio Down mix stereo HDMI cable Component Video Video Composite ...

Page 7: ...when selected Off 1 2 1 English 4 Auto Scan Channel Scan Aerial Adjustment LCN Press the MENU button to enter main menu Press UP or DOWN button to highlight Installation press RIGHT button to enter the Installation menu Press UP or DOWN cursor button to highlight the desired item and press OK button to enter the sub menu Press EXIT button to exit Select the Auto Scan press OK button to enter the A...

Page 8: ...also select the required channel directly from on screen channel list This is displayed using the STB s main menu See Edit Channel in this manual for operation detail 1 2 3 Accessing the EPG of all channels 1 2 3 Press EPG button to enter EPG menu Press cursor button to switch between channel list events schedule of the selected channel and now next events Press Green button to Timer the events Pr...

Page 9: ...0007 Sky News 0001 No Name 0002 YooPlay Ga 0003 E4 1 0004 UKTV Histor 0005 SKY THREE 0006 Sky Spts Ne 0007 Sky News i Radio Channel list In the Edit Channel menu select Radio Channel List press OK button to enter the Radio Channel list menu Press UP or DOWN button to highlight channel press the OK button to listen the desired TV channel 1 2 NOTE Basically the operation of Radio Channel List is the...

Page 10: ... DOWN cursor button to highlight the desired item and press OK button to enter the sub menu Press EXIT button to exit Language First Audio Second Audio Subtitle Language Subtitle Display Teletext English English German English Off English Language Timer Setting This menu allows us to set the program timer You can set 8 timers Timer Mode Timer Service Wakeup Channel Wakeup Date Wakeup Time Duration...

Page 11: ... channel and change the Password Favorite In Channel menu select Favorite press OK button to enter Favorite menu Select desired group press OK button to open the mock keypad Input letter and numeric one by one by pressing the cursor button and press OK button to confirm After finishing input highlight OK on mock keypad to confirm you change Favorite group name successfully Press EXIT button to qui...

Page 12: ...ngs Press EXIT button to exit We offer the functions for user to upgrade software version by OTA or by USB 1 English 9 4 1 2 3 Press the MENU button to enter main menu Press UP or DOWN button to highlight Tools press RIGHT button to enter the Tools menu Press UP or DOWN cursor button to highlight the desired item and press OK button to enter the sub menu Press EXIT button to exit 3 Tools Informati...

Page 13: ... button to enter main menu Press UP or DOWN button to highlight Game press RIGHT button to enter the Game menu Press UP or DOWN cursor button to highlight the desired item and press OK button to enter the game Press EXIT button to exit 1 English 10 Game Othello Sudoku ...

Page 14: ...usic Image Press RED button to show Play List Move the highlight to the file which you want to add to play list then press Green button to add It will mark a favorite icon on the file Press Yellow button to add all file of current directory to play list Press again to delete all file of current directory from the play list Press Blue button to enter to edit sub menu Press 1 button to open the sort...

Page 15: ... Press LEFT or RIGHT cursor button to change DVR Type Select OK to confirm Select Cancel to cancel Press YELLOW button to open Format menu Press LEFT or RIGHT cursor button to change Disk Mode Select OK to format Select Cancel to cancel Format FAT NTFS DVR Set DVR Type OK REC TMS Cancel Format Disk Mode OK FAT Cancel Record Press Red button to open rename window Move the highlight to the program w...

Page 16: ...eously start a record on the current channel Press RECORD button again can input duration Press STOP button to stop recording then a confirmation window appears Select Yes to stop recording Select No to continue recording Press STOP button to stop TimeShift BBC FOUR Play 00 02 37 00 07 12 TS 2 03 19 01 36 1 English 13 NOTE Please use internal storage or USB 2 0 disk when recording or timeshift For...

Page 17: ...NG HITACHI and SONY Some USB devices maybe can t be supported due to its quality famous brand NOTE Two Programs Recording in Difference TP When recording 2 FTA programs in difference TP user can tune to FTA programs in the two TP In the channel list the programs outside of the TP are grayed and can not be selected ...

Page 18: ... aimed correctly Front panel obstructed Hand set batteries exhausted 1 The batteries in your remote control need replacing 2 There is an obstruction blocking the signal path between the remote control and the box The aerial feed former new point may come through a distribution system which may reduce the digital signal now received by the box 1 Poor contact between PVR and HDD 2 HDD runs out Check...

Page 19: ...ON INPUT RATE MAX 48Mbit s 4 3 16 9 SWITCHABLE QPSK 16QAM 64QAM CONNECTION MAIN POWER CABLE TUNER SPDIF FIXED TYPE ANTENNA INPUTx1 RF OUTPUT x1 COAXIAL x1 USB slot POWER SUPPLY INPUT VOLTAGE POWER CONSUMPTION AC220 240V 50 60Hz MAX 15W DATA PORT 1 English 16 MPEG 2 MP HL MPEG 4 ASP SUPPORTED AVC H 264 HP L4 1 MPEG 1 Layer 1 2 PCM HE AAC V1 0 ICE958 SPDIF RCA OUTPUT V L R x1 SPECIFICATIONS NOTE HDM...

Page 20: ......

Reviews: