background image


Need more information? 

We hope that this user guide has given you 

the assistance needed for a simple set-up. 

For the most up-to-date guide for your product, 

as well as any additional assistance you may require, 

head online to 

help.kogan.com


Summary of Contents for NBSPMRKTPLA

Page 1: ...KIDS SUPERMARKET PLAYSET NBSPMRKTPLA ...

Page 2: ......

Page 3: ...ure Dispose of used button batteries immediately and safely Flat batteries can still be dangerous Tell others about the risk associated with button batteries and how to keep their children safe WARNING Not suitable for children under 3 years Contains small parts Ensure you have all parts prior to assembly Keep unassembled parts out of the hands of children Adult supervision is recommended when chi...

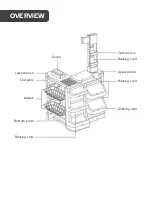
Page 4: ...OVERVIEW Cashier rack Scale End pillar Upper bench Backing card Shelving wall Bottom plate Backing card Backing card Basket Lower bench ...

Page 5: ...Accessories Note Accessories and designs shown are for reference only and are subject to change without notice ...

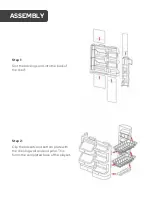
Page 6: ...Step 1 Slot the backing cards into the back of the shelf Step 2 Clip the baskets and bottom plate with the shelving wall and end pillar This forms the completed base of the playset ASSEMBLY ...

Page 7: ...Step 3 Attach the scale onto the lower bench Attach the cashier rack onto the upper bench Attach the upper bench onto the lower bench Step 4 Attach the bench assembly onto the base of the playset ...

Page 8: ...Step 5 Ensure all components are secure Step 6 Place the point of sale machine and scanner on top of the bench Decorate the supermarket with the included accessories such as fruits drinks and snacks ...

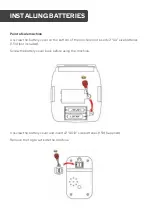
Page 9: ...ottom of the machine and insert x2 AA size batteries 1 5V not included Screw the battery cover back before using the machine Unscrew the battery cover and insert x2 AD13 size batteries 1 5V supplied Remove the tag to activate the machine INSTALLING BATTERIES ...

Page 10: ...Scanner Unscrew the battery cover and insert two AA batteries 1 5V each not included Screw the battery cover back before using the scanner ...

Page 11: ...NOTES ...

Page 12: ...tion We hope that this user guide has given you the assistance needed for a simple set up For the most up to date guide for your product as well as any additional assistance you may require head online to help kogan com ...

Reviews: