TP-6196 10/09
92
Section 6 Component Testing and Adjustment
Overcrank Shutdown
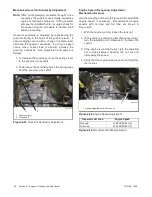
Disconnect the starter motor lead at the starter solenoid
(K20) terminal. Move the controller master switch to the
RUN position. Observe that the generator set simulates
cranking for 15 seconds and then rests for 15 seconds.
Check that the generator set shuts down after the third
crank/rest cycle.
High Engine Temperature Shutdown
Connect a jumper wire across coolant temperature
sensor (CTS) connections P1-8 and P1-9. Start the
generator set. Verify that the generator set shuts down
approximately 5 seconds after the generator set comes
up to speed.
Remove the jumper wire.
Start the
generator set and run it for at least 30 seconds to verify
that the generator set does not shut down.
6.11.2 Fault Shutdown Switches
Check the low oil pressure and high engine temperature
shutdown switches on the engine by performing the
following tests.
If the sensor does not function as
described, replace it.
Hazardous voltage.
Can cause severe injury or death.
Operate the generator set only when
all guards and electrical enclosures
are in place.
Moving parts.
WARNING
Servicing the generator set when it is operating. Exposed
moving parts can cause severe injury or death.
Keep
hands, feet, hair, clothing, and test leads away from the belts
and pulleys when the generator set is running. Replace
guards, screens, and covers before operating the generator
set.
Short circuits.
Hazardous voltage/current can cause
severe injury or death.
Short circuits can cause bodily injury
and/or equipment damage
.
Do not contact electrical
connections with tools or jewelry while making adjustments or
repairs. Remove all jewelry before servicing the equipment.
Temperature Sensor (CTS)
The coolant temperature sensor (CTS) is used to
monitor engine temperature for the high engine
temperature fault shutdown (HE).
See Section 1.7,
Service View, for the coolant temperature sensor
location. Set the generator set master switch to the OFF
position and allow the generator set to cool. Disconnect
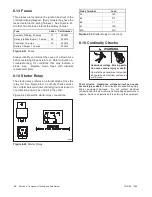
the CTS and use an ohmmeter to measure the
resistance across the sensor. The sensor resistance
varies with temperature and should be within the values
shown in Figure 6-30.
If the resistance is very low
(indicated a short circuit) or very high (indicating an open
circuit) replace the CTS.
Note:
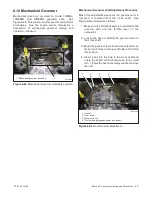
The HET switch is located in the engine oil pan.
Drain the engine oil before removing the switch.
Temperature,
!
C (
!
F)
Resistance, Ohms
30
(86)
2100--2500
100 (212)
180--200
Figure 6-30
Coolant Temperature Sensor Resistance
Readings
Low Oil Pressure (LOP) Switch
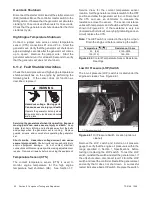
The low oil pressure (LOP) switch is located under the
engine air cleaner. See Figure 6-31.
1
tp6196
1. Oil pressure switch
Figure 6-31
Oil Pressure Switch Location (under air
cleaner)
Remove the LOP switch and install an oil pressure
gauge to verify that the engine oil pressure is within the
range specified in Section 1, Specifications, before
testing or replacing the LOP switch. To test the LOP
switch, reinstall the switch and start the generator set. If
the unit shuts down, disconnect lead 13 from the LOP
switch and reset the controller. Restart the generator set
and verify that it does not shut down. A successful
restart indicates a bad LOP switch. Replace the switch.
Summary of Contents for 12RES
Page 2: ......
Page 6: ...TP 6196 10 09 6 Notes ...
Page 34: ...TP 6196 10 09 34 Section 3 Troubleshooting Notes ...
Page 52: ...TP 6196 10 09 52 Section 4 ADC 2100 and DC 2200 Controllers Notes ...
Page 72: ...TP 6196 10 09 72 Section 5 ADC RES and DC RET Controller Notes ...
Page 100: ...TP 6196 10 09 100 Section 6 Component Testing and Adjustment Notes ...
Page 131: ......


