background image

하기


설명을


보관해


주세요

주요


안전경고사항

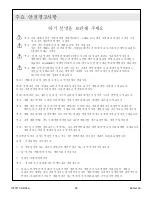
경고: 감전,화재나 인싱 상해의 위험.전용의220V~, 

6

0Hz, 10A 접지 고장 회로 차단기나 접지 누전 

        보 호기의 전로에만 연결할 수 있다.

경고:감전 혹은 제품파손 위험. 제품을 물에 넣지 마십시오.
        모든 기계 해체는 플러그(전원선 있는 모델)를 빼거나 기계 내부 보호 스위치 손잡이를 돌리다.  
        (전원선이 없는 모델)

경고 : 본 변기를 설치할 때 어떠한 젤라틴(시멘트 모르타르) 성분의 재료도 사용하지마 십시오.

젤라틴(시멘트 모르타르) 성분은 열 팽창으로 인해 변기 다리 부분의 터짐과 손상을 초래할 수 
있습니다. KOHLER는 젤라틴(시멘트 모르타르)으로 인한 변기 파손에 대해 책임지지 않습니다.

경고: 제품 손상에 주의합니다.변기 내에 신문지나 기저귀,여성 생리대 등 쉽게 변기를 막히게 하는 
        물품을 넣지 않습니다. 파손을 방지하기 위해서 도자기를 무거운 힘으로 충돌하지 마세요. 
        0℃이하의 물에서 사용하지 않습니다. 

중요! 제품 파손 위험. 물이 튈수 있는 곳에 설치하지 마십시오.

중요! 제품 파손 위험. 제품을 습한 곳에 설치하지 마십시오. 습기가 제품 표면에 응결될 수 있습니다. 
통풍을 시종일 관하게 유지하여 전자 소자의 파손을 방지해야 합니다.

중요! 제품 파손 혹은 재산 손실 위험. 호스 이음쇠를 무리하게 밀거나 당기면 누수가 발생할 수 있습니다.

경고:제품 파손에 주의. 노즐에 무리한 힘을 가하지 말아야 합니다. 제품이 파손될 수 있습니다

경고:제품 파손에 주의. 일부 호스의 결빙이 발생하는 부분에 보온 조치를 취하십시오.임의의 제품속에 

잔류한 물은 겨울철 저장시 결빙할 수 있습니다.재설치 및 사용전 제품 온도를 실온으로 유지하십시오.

주의:따스한 기후에서 열보호기는 저장 또는 운송과정에서 효력을 잃어 제품 작동 불가를 초래할 수 있습니다.

재설치 또는 사용전 제품을 실온으로 냉각하십시오.

전기제품 사용시, 특히는 어린이가 있는 경우 기본 안전규범을 준수하기 바라며 아래를 포함합니다:

위험 – 감전위험을 낮추십시오.

이 설비를 추락 또는 욕조나 물탱크에 떨어 뜨릴수 있는 곳에 설치하지마십시오.

물 및 기타 액체에 방치 또는 떨어뜨리지 마십시오.

전원선 모델에 한합니다.

경고 – 저온화상,감전,화재 또는 인명사고를 피하십시오.

아동,노인,장애인 및 심체,감지,능력,지력이 결함 있거나 경험과 시도가 결함한 사람들이 이 제품을

사용하거나 접촉할 때 근거리의 감호는 필수적이다.아동이 제품에 대한 사용하거나 접촉하면 원칙적으로
안되다. 아동에게 스스로 이 제품 설치가 있는 방에 있지 마세요.아동이 기구를 놀면 안되다.

경고:제품 파손에 주의. 설치작업이 끝나기전에는 전원을 연결하지 마십시오.제품 고장을 일으킬수 있습니다.

경고:고정 배선중에는 반드시 배전반에 과압등급 3급 전제하에서 전기를 단절하는 장치가 있어야 함.

1373171-KR01-A

26

Kohler Co.

Summary of Contents for 77795MY

Page 1: ...n District Shanghai PRC Post Code 200436 Manufacturer Shanghai Kohler Electronics Ltd No 1955 Fengxiang Road Baoshan Area Shanghai PRC Post Code 200444 Homeowners Guide EIR INTELLIGENT TOILET K 77795K...

Page 2: ...tions before initial use 11 Cover seat OPEN CLOSE function 12 Flushing your toilet 13 Auxiliary key function 15 Wide oscillate mode 15 Standby mode 15 UV sterilization function 15 Sterilized water 16...

Page 3: ...frozen should be protected by thermal insulation Any water left in the product may be frozen during the winter season Please keep the product in room temperature before reinstallation or usage Attenti...

Page 4: ...r is connected Prevent water splash on power plug only for models with power cord Prevent any exposed skin contact with heated seat too long to prevent low temperature burning In case the power cord i...

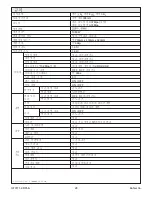
Page 5: ...peration Environment 1 40 YES adjustable YES adjustable YES adjustable Water flow water pressure 0 2Mpa Max rear wash shall be no less than 500mL min OFF adjustable 5 dials About 300s Check valve OFF...

Page 6: ...a few minutes to read this user manual and pay special attention to the maintenance and cleaning instructions All information in this instruction is based on the latest published product information...

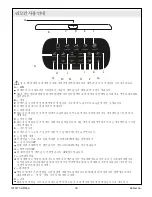
Page 7: ...Rear wash When seated press this button to enter rear wash auto stop after 5min or press STOP button to turn off immediately B C D E F G H I J K L Q M N O P Q A F Flush full Press this button to perfo...

Page 8: ...he remote control is almost used up Attach the remote control to the docking station and allow it to charge Note pairing operation can only be done under unseated status Cover and seat is powered on p...

Page 9: ...ing indication function activated 2 Night light slow flush once long beep prolonged seating indication function deactivated D Rear wash Deodorizer function setting Remote setup instruction B C D E F G...

Page 10: ...kaline battery Do not place remote at a place where it may be splashed by liquid or immersed in liquid Do not place remote near hand dryer hair dryer etc small size home appliances to avoid disturbanc...

Page 11: ...link indicates self check is in process When night light stop blinking indicates self check is completed Front wash Seat temp mid Night light ON Energy saving OFF Auto cover OPEN CLOSE ON Auto flush f...

Page 12: ...nse is made please open or close the cover with the remote control or by hands 2 The function of auto cover opening closing works only when setting of cover opening closing in remote controller is ON...

Page 13: ...users intend to open or close the seat under normal condition the seat can open or close automatically against the trend of motion Users will not have to use force Once being stopped by any obstacle...

Page 14: ...6 b For male use When cover is OPEN open seat manually or by remote Toilet will auto flush after unseated for a certain time Auto close cover after a period of time B Remote control flush Customer sha...

Page 15: ...ght sensor area E Press to perform flush full push and hold for 2s to enter emergency flush mode when power is off button until nozzle extension perform manual clean for nozzle press button to deactiv...

Page 16: ...the idle hours and decrease the heating temperature to reach of energy saving purpose For details of automatic energy saving refer to page 9 1 2 4 1 Product default factory setting is auto activate d...

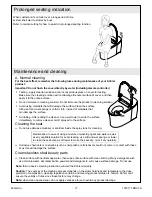
Page 17: ...the following rules during maintenance of your Kohler product Important Do not flush the cover directly by water including remote controller Maintenance In case of using a mixture of washing agent and...

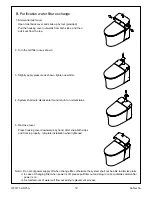
Page 18: ...ii In case of changing filter when power is off please pull filter out and plug in once to dismiss alarm after B Purification water filter exchange 1 Dismantle toilet cover Open toilet back cover and...

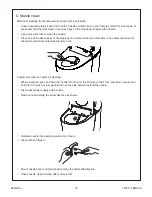
Page 19: ...nt wash or rear wash key on the side panel to extend the nozzle Use a wet soft brush to clean the nozzle Press one of the above keys or the stop key on remote control one more time The nozzle will ret...

Page 20: ...enough water volume or water is not coming out Disconnect the power supply turn off stop valve with power cord Take out filter and clean it Cleaning the toilet filter Filter 1 Filter 2 With power cor...

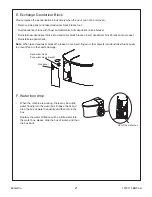
Page 21: ...er block bracket Insert deodorizer block bracket into product Reinstall side panel back Note When take deodorizer block off please do not insert finger or other objects into deodorizer block cavity to...

Page 22: ...er pipe please turn off the tee valve and perform one flush or discharge the toilet 4 When use after long term idle status please close the tee valve and then press it again for flushing 5 When use af...

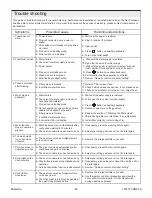
Page 23: ...red B Plug in or detect the socket A Water failure B Tee valve for water supply is closed C Power failure D Product is at standby mode E Wash mode is in progress F Auto flushing is deactivated Wash mo...

Page 24: ...seat temp set too low B Toilet is on standby mode A Please sit or leave the sensing area B Review Guide on remote controller setting C Wait until the flushing process is completed A Please close the...

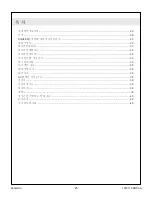
Page 25: ...26 28 KOHLER 29 29 30 32 34 35 36 38 38 38 UV 38 39 39 39 39 40 40 46 Kohler Co 25 1373171 KR01 A...

Page 26: ...220V 60Hz 10A KOHLER 0 3 1373171 KR01 A 26 Kohler Co...

Page 27: ...KOHLER Kohler Co 27 1373171 KR01 A...

Page 28: ...6 4 3 0 305mm 0 07Mpa 0 74Mpa 1080W 700mm x 418mm x 523mm 46kg 1 35 1 40 0 2Mpa OFF 5 300s 5 ON OFF ON OFF OFF 5 ON OFF UV 0 2Mpa 15 1373171 KR01 A 28 Kohler Co...

Page 29: ...2 1 2 37 2 KOHLER KOHLER KOHLER KOHLER KOHLER KOHLER Kohler Co 29 1373171 KR01 A...

Page 30: ...E A A ON ON ON B UV C 5 D 5 A B C D E F G H I J K L Q M N O P Q F G ON OFF ON OFF H ON OFF ON OFF I J K 4 1373171 KR01 A 30 Kohler Co...

Page 31: ...Q Q N Q Q O Q Q P M O N P ON OFF OFF Q Q Q Q Q L M Kohler Co 31 1373171 KR01 A...

Page 32: ...D F G H J L N 1 1 2 1 F 1 1 2 1 G ON OFF 1 1 2 2 3 3 4 H 1 2 D B C D E F G H I J K L Q M N O P Q J 1 2 L UV ON OFF 1 1 2 1 N 1 1 2 1 E F G H J L N 3 P 1373171 KR01 A 32 Kohler Co...

Page 33: ...5 4 1 2 3 Kohler Co 33 1373171 KR01 A...

Page 34: ...ON ON OFF ON ON UV ON ON OFF OFF 1373171 KR01 A 34 Kohler Co...

Page 35: ...B ON OFF ON OFF ON OFF ON OFF ON OFF ON OFF ON OFF ON OFF ON OFF A ON OFF 1 ON OFF ON OFF ON OFF ON ON OFF 32 40cm ON OFF 32 2 3 4 Kohler Co 35 1373171 KR01 A...

Page 36: ...1 12 11 10 2 3 4 5 9 8 7 6 a ON OFF ON OFF A 1373171 KR01 A 36 Kohler Co...

Page 37: ...b 1 2 ON 32 C 1 12 11 10 2 3 4 5 9 8 7 6 B 1 2 Kohler Co 37 1373171 KR01 A...

Page 38: ...2 ON A 1 2 5 D B F D 1 2 38 2 C E 2 3 4 1 2 2 UV 1 UV 2 UV UV 24 UV UV UV 32 1373171 KR01 A 38 Kohler Co...

Page 39: ...1 2 UV 3 UV 1 2 UV UV 1 32 2 41 1 2 3 4 Kohler Co 39 1373171 KR01 A...

Page 40: ...A KOHLER KOHLER OFF KOHLER 1373171 KR01 A 40 Kohler Co...

Page 41: ...4 5 i B 1 2 3 ii iii Kohler Co 41 1373171 KR01 A...

Page 42: ...2 2 2 2 2 C 1373171 KR01 A 42 Kohler Co...

Page 43: ...D 1 3 2 Kohler Co 43 1373171 KR01 A...

Page 44: ...E F 1373171 KR01 A 44 Kohler Co...

Page 45: ...G a 1 2 3 4 5 6 b Kohler Co 45 1373171 KR01 A...

Page 46: ...R 1 A B C 2 A B C D E F 3 A B 4 A B C OFF D E F G A B C D E F G 41 5 A 5 B A B 6 A A 7 A 4 B A B 8 A B C A B 2S C 9 10 ON OFF A B C A B C D E A B C D E A B C D E F A B C A B A B 1373171 KR01 A 46 Kohl...

Page 47: ...A B A B A B C A B C D E A B 11 12 13 14 15 A B A B C A B C D E A B A B Kohler Co 47 1373171 KR01 A...
Reviews: