background image

TOOLS AND MATERIALS REQUIRED (Not
supplied)

·

·

·

·

·

·

·

·

·

·

·

·

·

254mm (10") adjustable wrench
305mm (12") pipe wrench
Metal file (file cut)
Tape measure
Tubing cutter
Level
Hacksaw
Putty knife
Screwdriver
Toilet gasket (wax seal)
Toilet installation flange
Toilet T-bolts (2), 8mm (5/16") diameter
Toilet supply shut-off valve, 10mm(3/8 ) recommended

If the existing toilet does not have a supply shut-off

valve below the tank, install one before installing the new
toilet.

"

* Flexible hose are recommended to connect the supply line
to the fill valve. If you use a rigid connection, take care not to
apply side forces to the bottom of the fill valve.

NOTICE:

·
·
·
·
·
·
·
·
·
·
·
·
·

254mm
305mm

8mm

T

2

10mm

*

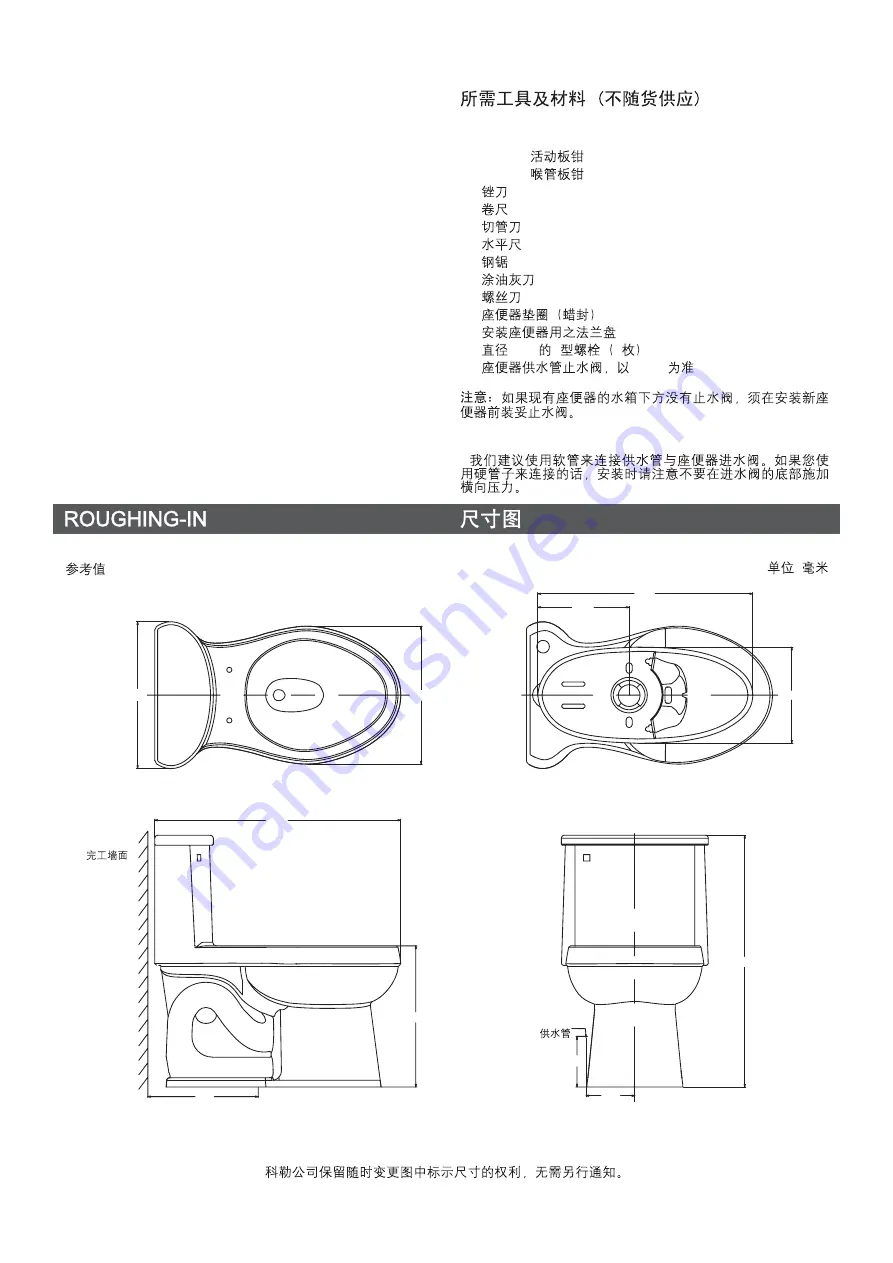
Unit: mm

:

-2-

Reference Value

Kohler reserves the right to change marked dimensions without prior notice.

Finished
Wall

Supply

405

381

680

390

305

594

252

265

696

135

140

1264349-T01-A

Summary of Contents for ADAIR K-5306T

Page 1: ...Observe all local plumbing and building codes Shut off the water supply Seat post holes are on 140mm 5 1 2 centers Ensure that the new drain has the correct roughing in dimension This toilet has a 305...

Page 2: ...ed If the existing toilet does not have a supply shut off valve below the tank install one before installing the new toilet Flexible hose are recommended to connect the supply line to the fill valve I...

Page 3: ...sert new T bolts If installation of the new toilet is delayed temporarily cover the closet flange hole with a rag T Do not use white cement or high lime content cements to install this toilet The expa...

Page 4: ...wax seal Wax Seal NOTE 1 NOTE 2 Wax ring type toilet gasket should not be installed at temperatures less than 21 If you are using a toilet gasket with an integral plastic sleeve make sure the gasket i...

Page 5: ...m 11 Flush several times and check for leaks 12 Fill Float With Ballast Test flush the toilet Periodically check all connections for leaks for several days following installation Set the tank cover in...

Page 6: ...r level Rotate screw clockwise and raise float to the desired water level Elevate water cup to a proper position as well Refer to float adjustment instructions b c Screw CLOSE Fasten the snap along CL...

Page 7: ...e tank and tighten the flush valve nut if flush valve gasket is leaking Do not overtighten If leakage continues replace the gasket E Adjust the tank water level if it is too high 2 No Flush IMPORTANT...

Page 8: ...ittings in the tank This damage can cause leakage and property damage Kohler Company shall not be responsible or liable for any damage to these tank fittings caused by the use of cleaners containing c...

Reviews: