background image

Garantía (cont.)

limitaciones y exclusiones pueden no aplicar a su caso. Esta garantía le otorga ciertos
derechos legales específicos. Además, usted puede tener otros derechos que varían de
estado a estado y provincia a provincia.

El presente documento constituye la garantía exclusiva por escrito de Kohler Co.

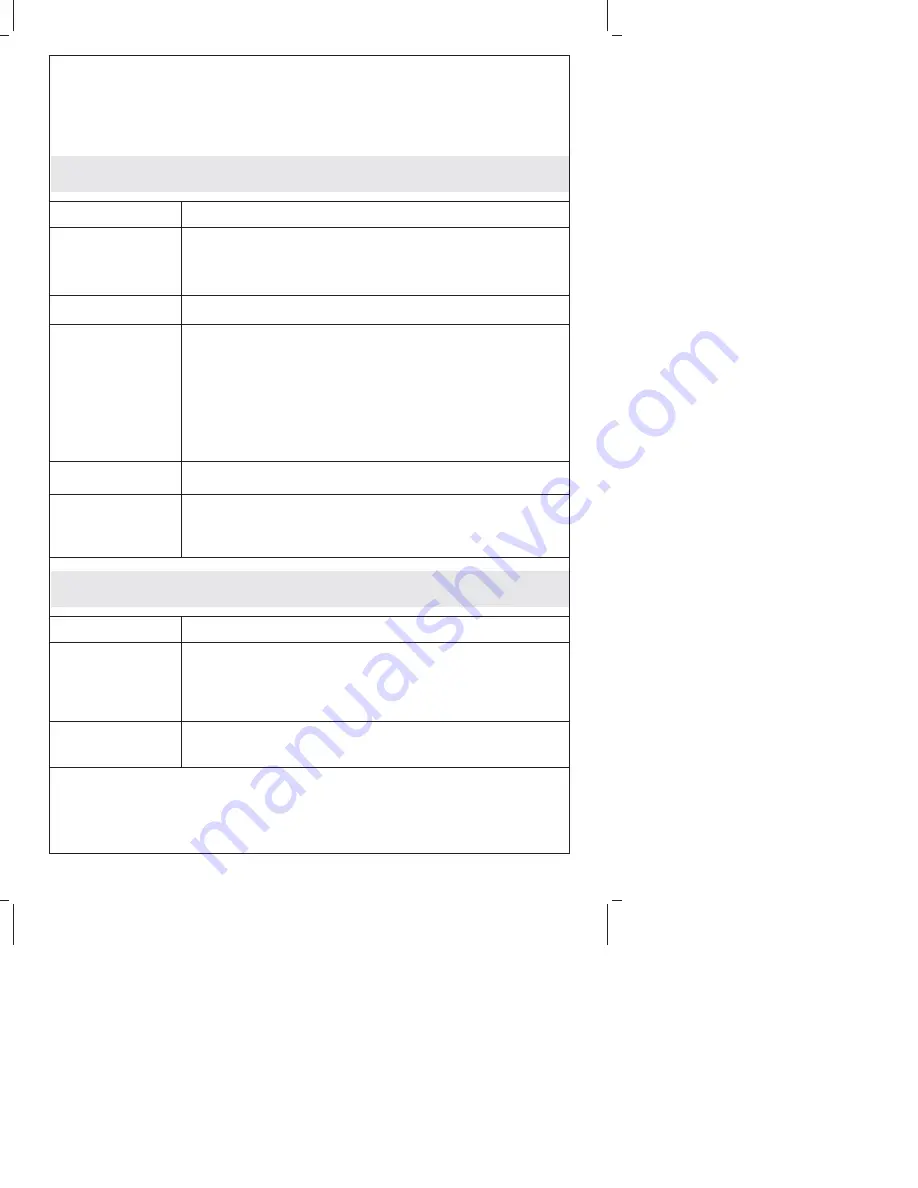
Troubleshooting Guide

Symptoms

Recommended Action

1.

Poor flush.

A.

Adjust the tank water level to match the waterline.

B.

Fully open the water supply shut-off valve.

C.

Clear obstructions from the trapway, jet or bowl rim holes.

D.

Clear obstructions in the soil pipe or vent pipe.

2.

No flush.

A.

Make sure the push button rods are in place. Adjust as needed,

following the directions in the Installation and Care Guide.

3.

The fill valve

turns on/off by

itself or it runs,

allowing water

to enter the

tank.

A.

Adjust push button rods for proper slack so the flush valve seal

isn’t held off the flush valve.

B.

Clean or replace the flush valve seal if it is worn, dirty, or

misaligned with the valve seat or flush valve seat is damaged.

C.

Replace the flush valve gasket.

D.

Clean the fill valve seat/seat washer of debris or replace the

piston/seat washer assembly.

E.

Replace the fill valve if the valve float sinks.

F.

Adjust the tank water level if it is too high.

4.

Long tank fill

cycle.

A.

Fully open the water supply shut-off valve.

B.

Clean the valve inlet, valve head, or supply line. Flush the lines.

5.

Noisy tank fill

cycle.

A.

Partially close the water supply shut-off valve if the water

pressure to the toilet is too high. Check the toilet performance

following any such adjustment.

B.

Remove dirt or obstructions from the valve head. Flush the lines.

Guide de dépannage

Symptômes

Action recommandée

1.

Chasse faible.

A.

Régler le niveau d’eau du réservoir au niveau du repère.

B.

Ouvrir complètement la valve d’arrêt d’alimentation.

C.

Dégager toutes obstructions du siphon, jet ou trous du rebord de

la cuvette.

D.

Dégager le tuyau d’évacuation ou d’aération.

2.

Pas de chasse.

A.

S’assurer que les tiges de bouton-poussoir soient bien en place.

Ajuster si nécessaire, en suivant les instructions du guide

d’installation et d’entretien.

Kohler Co.

15

1087602-2-B

Summary of Contents for K-14338

Page 1: ...uide d installation et d entretien Gu a de instalaci n y cuidado Dual Flush Toilet W C double chasse Inodoro de doble descarga USA Canada 1 800 4KOHLER M xico 001 800 456 4537 kohler com 2010 Kohler C...

Page 2: ...pper de l ouverture de la bride si elle n est pas bloqu e IMPORTANT Ne pas soulever ou secouer la cuvette du W C apr s sa mise en place Si le joint tanche se casse en r installer un nouveau en cire RE...

Page 3: ...Informaci n importante cont Kohler Co se reserva el derecho de modificar el dise o de los productos sin previo aviso tal como se especifica en la lista de precios Kohler Co 3 1087602 2 B...

Page 4: ...ministro de 3 8 NPT Important Toilet must have 12 30 5 cm minimum rough in to install properly Important Le W C doit avoir un raccordement minimum de 12 30 5 cm pour correctement installer Importante...

Page 5: ...W C Deslice la tuerca en la manguera de suministro con el extremo acampanado al final y corra la manguera a trav s de la pared del inodoro 2 5 1 cm Position brackets as shown on the template and inst...

Page 6: ...ce dos piezas de inserci n en el extremo acampanado de la gu a de la manguera Inserte en la pared del inodoro y apriete la tuerca 10 Wax Ring Plate Plaque de l anneau en cire Placa del anillo de cera...

Page 7: ...und base Appliquer du mastic autour de la base Aplique sellador alrededor de la base Caulk Mastic Sellador Carefully thread the screws into the brackets until toilet is secure Alternately tighten left...

Page 8: ...down on the large button Presser vers le bas sur le grand bouton Presione sobre el bot n grande 15 3 8 Supply Alimentation de 3 8 Suministro de 3 8 Connect supply and turn on the water Connecter l ali...

Page 9: ...ifices du logement du bouton poussoir Insert the rods into the holes in the push button housing Presione el bot n grande sobre la varilla negra Presser le grand bouton sur la tige noire Press the larg...

Page 10: ...d washers Periodically check for leaks for several days following the installation Installer le couvercle du r servoir et le si ge Utiliser des boulons de si ge de 1 4 20 et des rondelles V rifier p r...

Page 11: ...olored buttons are in their original positions Pivoter le conteneur de fa on ce que les boutons color s soient dans leurs positions initiales Gire el cilindro de manera que los botones de color queden...

Page 12: ...iliser des d tergents con us pour le r servoir dans les WC Les produits contenant du chlore hypochlorite de calcium peuvent s rieusement endommager les raccords du r servoir Cet endommagement peut cr...

Page 13: ...itar informaci n sobre el cuidado y la limpieza llame al 1 800 456 4537 Warranty ONE YEAR LIMITED WARRANTY KOHLER plumbing products are warranted to be free of defects in material and workmanship for...

Page 14: ...ie vous donne des droits l gaux sp cifiques Vous pouvez galement avoir d autres droits qui varient d un tat province l autre Ceci constitue la garantie crite exclusive de Kohler Co Garant a GARANT A L...

Page 15: ...aligned with the valve seat or flush valve seat is damaged C Replace the flush valve gasket D Clean the fill valve seat seat washer of debris or replace the piston seat washer assembly E Replace the f...

Page 16: ...s Gu a para resolver problemas S ntomas Acci n recomendada 1 Descarga deficiente A Ajuste el nivel de agua en el tanque para que sea igual a la l nea de agua B Abra completamente la llave de paso del...

Page 17: ...la v lvula o la tuber a de suministro Haga circular agua por las l neas 5 El ciclo de llenado del tanque es ruidoso A Cierre parcialmente la llave de paso del suministro de agua si la presi n del agua...

Page 18: ...nut Contre crou Contratuerca 1057941 Nut crou Tuerca 42397 Washer Rondelle Arandela 85307 1097230 Washer Rondelle Arandela 42398 Seal Joint Sello 83143 Cap Capuchon Tapa 1057940 Clip Clip Clip 51261 1...

Page 19: ...aci n 2 c u Hinge Kit Kit de charni re Kit de bisagra Mount Monture Montaje Toilet Seat Si ge du W C Asiento de inodoro Finish color code must be specified when ordering Vous devez sp cifier les codes...

Page 20: ...1087602 2 B...

Reviews: