-4-
INSTALL THE BATH
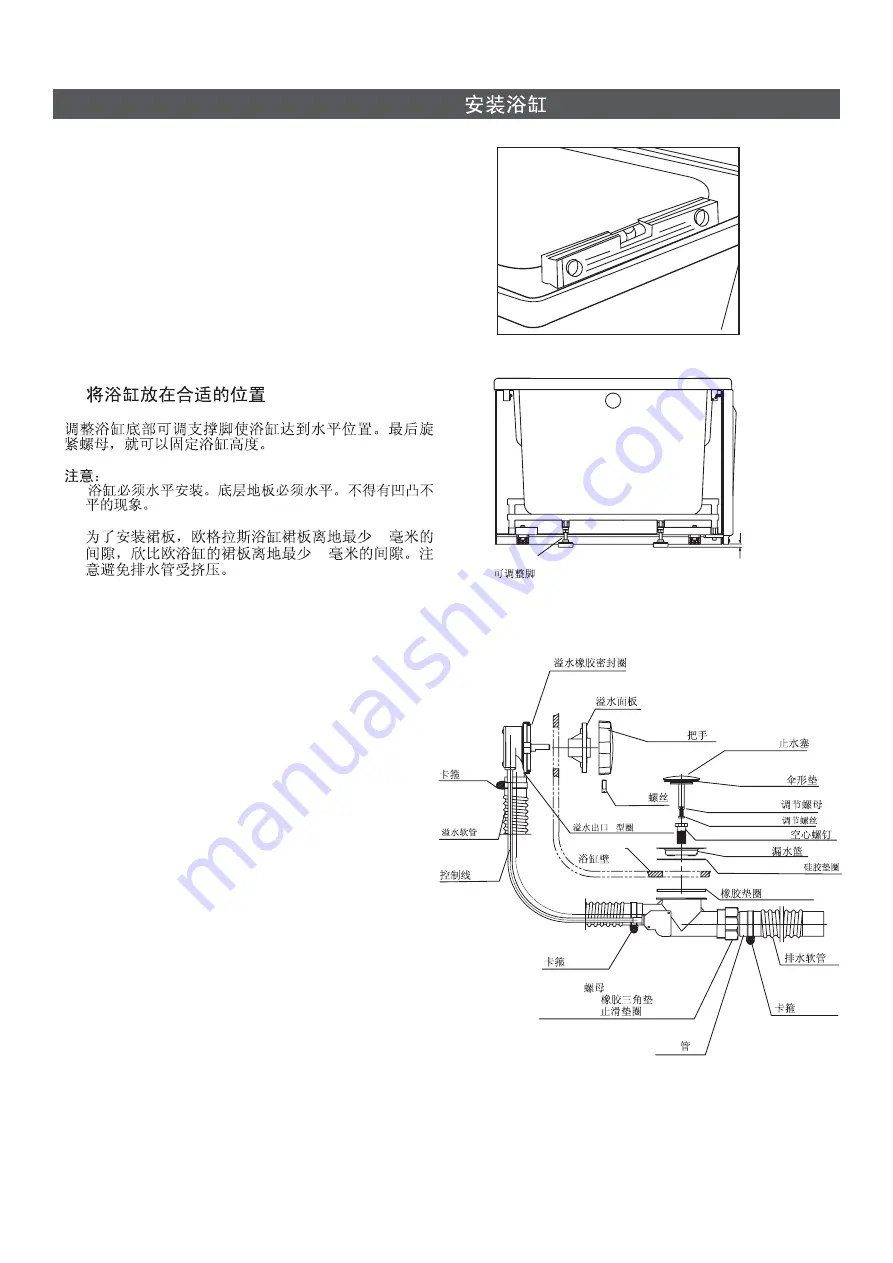
A. Locate the bath in the proposed position
Adjust the feet under the bath to make it level. Tighten
the nut to fix the height of the bath.
The bath must be installed level on all top edges.
Floor should be flat, level and free of any bumps or
protrusions.
Keep the clearance of minimum 10mm (for
HOURGLASS)/15mm (for SYMBIO) from floor to the
apron for installing the apron. Be careful with the
drain hose to prevent it to be squeezed.
10
15
IMPORTANT:
!
!
!
!
A.
Adjustable Feet
HOURGLASS>10mm
SYMBIO>15mm
Gasket, Overflow
Handle
Cover, Overflow
Fix Clip Assy
Flexible Pipe,
Overflow
Control Cable
O-ring for Overflow outlet
O
Screw
Bath Wall
Seal Plug
Adjustable Nut
Adjustable Screw
Fix screw, Strainer
Gasket, Thin, Drain
Gasket, Thick, Drain
Joint Nut
Joint Gasket
PVC Gasket
Fix Clip Assy
B. Plumbing Installation and Electric
Wiring
CAUTION: Risk of damage to bath bottom and
subfloor.
1 . When the bath is securely positioned, connect the
drain to the trap and apply silicone sealant.
2 .
Open the hot and cold
water valves, and check the supply connections for
leaks.
The installation of the faucet and drain has been
completed before the bath leaves factory. Connect
cold and hot water supplies.
3). Connect power supply (220V/50Hz, 10A) to motor.
This should be a separato line, direct from the
switchboard.
The electrical connections must comply with
local authority regulations and must be done by an
authorized electriclan.
4).
Note:
Fill bathtub with water to the height of the
overflow and trial run pump for 10-15 minutes.
Check all the fittings for leaks and test the
control functions. Check the pump and pipes
union connections for leaks. Hand tighten union
connections if required. Check bath drains and
overflow for leaks.
)
)
Plug Body
Strainer
Fix Clip Assy
PVC Pipe
PVC
Flexible Pipe
1073414-T01-B


