background image

-10-

B. Time Setting

Under the heater mode, there is a delay of 30 secs after
the heater mode is stopped or switched ventilation mode.
Fan light flashes while air flow light is on within the 30
secs of delay.
Under the fan mode, there is a delay of 3 secs after the
fan mode is stopped or switched to heater or ventilation
mode.
Under the ventilation mode, there is a delay of 3 secs
after the ventilation mode is stopped or switched to heater
or fan mode.
The defaulted duration time of heater, fan and ventilation
mode is 2 hrs.

!

!

!

!

C. Pairing Setting

Press ventilation and air flow for 2 secs within 3 minutes
after turning on power.
Pairing is successful after a beeping sound.

* The host of this product and the Wall Controller Assy have
been set and paired. Each host is packaged with a Wall
Controller Assy. Do not confuse the host with the wall
mounted switch during installation and removal. Avoid pairing
again.

!

!

B.

"

"

"

"

30

30

"

"

"

"

"

"

3

"

"

"

"

"

"

3

"

"

"

"

"

2

!

!

!

!

C.

3

2

*

!

!

TROUBLESHOOTING

Problem

Diagnosis

Solution

Bathroom heater does not
work.

Wall controller break down.

A. Power failure.

B. Disconnected power cord.

A. The pilot lamp does not turn on.

C. Circuit breaker is

off

.

B. Fail to control the bathroom heater.

C. Fail to control the bathroom heater.

A. Wait until the power is restored.

B. Connect the power cord into the junction box

of bathroom heater properly.

A. Ensure the wall controller is powered.

C. Turn on the power at the breaker.

B. Ensure the heater is powered.

C. Pair the heater again.

A.

B.

A.

C.

B.

C.

A.

B.

A.

C.

B.

C.

1369766-T01-E

Summary of Contents for K-22489T-0

Page 1: ...llation and Homeowners Guide Underscore Bathroom Heater S300 S300 K 22489T 0 KOHLER CHINA INVESTMENT CO LTD NO 158 JIANG CHANG SAN ROAD JING AN DISTRICT SHANGHAI PRC POST CODE 200436 158 200436 1369766 T01 E ...

Page 2: ...iance shall be installed according to the national wiring rules Otherwise it may cause electric shock or fire This product must be used under the power supply with leakage protection switch conforming to CCC the leakage current is below 30mA Otherwise it may cause electric shock and fire When installing the product A power full pole switch with a contact opening distance of not less than 3mm must ...

Page 3: ...arning Do not install near curtains and other combustible materials Otherwise combustibles may be ignited Warning Warning Warning Warning It is forbidden to place the product directly under the power socket Otherwise it may cause fire It is forbidden to use methods other than those specified in this manual for installation Otherwise the product may fall and cause injury This product must be ground...

Page 4: ...ctory The exhaust air volume air change noise and other data are the test results of Kohler company which are all central values which are measured under the static pressure of 0 Pa The error of exhaust air volume shall not be less than 90 of the express value The ventilation noise value is A weighted average sound pressure level which is the central value of Kohler company s test results and the ...

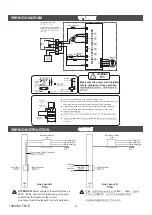
Page 5: ...into the pillar terminal hole and make sure all the cords under the terminal are inserted into the pillar terminal completely Suggest using a power cord which with specification 60227 IEC 53 Model s powercord Specified in GB T 5023 5 and with cross section of 3X1 5mm GB T 5023 5 60227 IEC 53 3X1 5mm 2 2 WIRING INSTRUCTION Bathroom Heater Bathroom Heater Live Wire Live Wire Null Wire Null Wire Eart...

Page 6: ...Outlet window installation Fix the air exhaust pipe to the outlet window on the wall with the clamp as the preparation of bathroom heater installation Seal the pipe and the outlet window with foaming agent 1 2 Ceiling Air Exhaust Pipe Wall Inside Outside Outlet Window The situation of outlet window on the wall outside The situation of outlet window on the wall inside Outlet Window Outlet Window Ho...

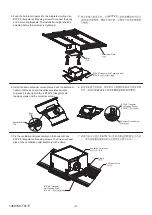
Page 7: ...that the gap between the product edge and the wall is 300mm or above The power cord to the product shall have enough length for the installation The distance between the product and the air outlet window shall be 1000mm or lower Cut the screw rod M6 to suit the distance between the ceiling and the roof Keels should afford at least 25kg 200mm 200mm 300mm 1000mm M6 25kg Air Exhaust Pipe Wall Lower t...

Page 8: ...or installation see the figures below 3 Match a keel lock with an L mounting bracket 4 Pre install the 4 matched L mounting brackets on the keel Make sure the installation clearance is appropriate The location of L mounting brackets can be adjusted on the keel before the columnar round screws are tightened 2 3 L 4 4 L L 300mm 300mm integrated ceiling 300mm 300mm 300mm 450mm integrated ceiling 300m...

Page 9: ...y tighten the 8 BTP4 8 triangular self tapping screws and the columnar screws 5 BTP4 8 L 6 BTP4 8 8 7 Fix the ventilation outlet assembly on the body with one BTP4 8 triangular self tapping screws Then fix air exhaust pipe on the ventilation outlet assembly with a clamp 7 BTP4 8 1 8 BTP4 8 Triangular Self Tapping Screw BTP4 8 8 BTP4 8 Triangular Self Tapping Screw BTP4 8 Decorated Plate Decorated ...

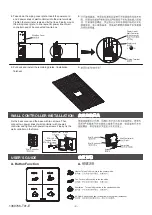
Page 10: ...S GUIDE A Button Function A Heater Turn on off or switch to the heater mode Fan Turn on off or switch to the fan mode Ventilation Turn on off or switch to the ventilation mode Air Flow Switch the air flow to fixed flow or swing flow defaulted Power Line Wall Controller Wall Controller L L Wall Controller N N Screw 2 ST4 10 Self Tapping Screw ST4 10 Base Wall Controller Back Cover Power Line of Wal...

Page 11: ...essful after a beeping sound The host of this product and the Wall Controller Assy have been set and paired Each host is packaged with a Wall Controller Assy Do not confuse the host with the wall mounted switch during installation and removal Avoid pairing again B 30 30 3 3 2 C 3 2 TROUBLESHOOTING Problem Diagnosis Solution Bathroom heater does not work Wall controller break down A Power failure B...

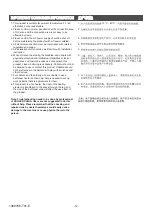
Page 12: ... liquid detergent to clean casing or air louver 3 Never try to put a small screw driver or any other object into the holes of air Louver from outside This might cause damage to the interior parts and electric shock may occur 4 Shut off the all pole switch 5 Wipe the front panel and the panel base with a soft cloth 6 Remove the filter from the louver 7 Use a vacuum cleaner to remove dust and dirt f...

Page 13: ...experience and common sense use or approach this product close monitoring is necessary Children should not be allowed to use or contact this product Children should not be left alone in the bathroom to play with switches and other devices 7 For children and the elderly who are unable to use a bathroom heater on their own help is needed to set up work patterns that are appropriate for them 8 This p...

Reviews: