background image

Homeowner’s Guide

Integrated Toilet

1153043-X5-C

©2012 Kohler Co.

Homeowner’s Guide

Integrated Toilet

คู่มือการดูแลรักษาสุขภัณฑ์

สุขภัณฑ์ชิ้นเดียวพร้อมระบบชำาระทำาความสะอาดอัตโนมัติ

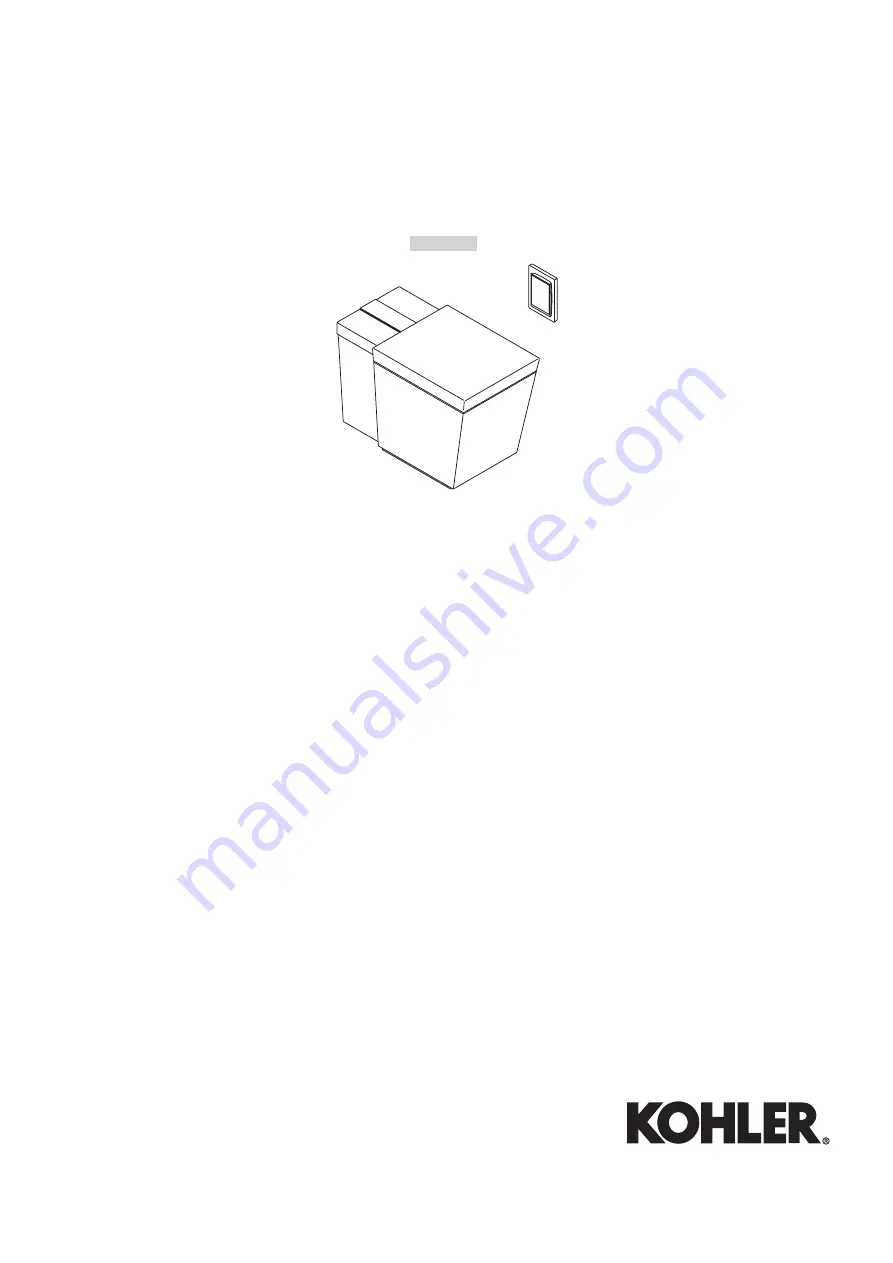
 K-3900X

Summary of Contents for K-3900X

Page 1: ...1153043 X5 C 2012 Kohler Co Homeowner s Guide Integrated Toilet คู มือการดูแลรักษาสุขภัณฑ สุขภัณฑ ชิ นเดียวพร อมระบบชำ ระทำ ความสะอาดอัตโนมัติ K 3900X ...

Page 2: ... Control Screen Backlight and Language 18 Settings Date and Time 19 Settings Remote Control Power Save 20 Settings Toilet Sleep Mode 21 Settings User Setting 23 Settings Auto Open Auto Flush Deodorizer 24 Settings Sounds and Lighting 26 Using the Manual Clean Settings 27 Setting Automatic Bidet Wand Cleaning 28 Remote Control to Toilet Connection and Remote Control Power 30 Resetting the Users or ...

Page 3: ...ore reinstalling or using IMPORTANT Risk of product damage Do not supply electrical power to the unit until the plumbing installation work has been completed it could cause the product to malfunction NOTE The thermal protectors may trip during storage or transportation in warm weather causing the unit to not operate Allow the unit to cool to room temperature before installation or operation When u...

Page 4: ...manufacturer the Maintenance Department or a similar department professionals is necessary Specifications Thank You for Choosing Kohler Company SKU Electrical Water Supply Pressure K 3900X 220 240 V 50 60 Hz 2000W 0 20 0 74MPa Thank you for choosing Kohler Kohler craftsmanship offers you a rare combination of proven performance and graceful sophistication that will satisfy you for years to come Th...

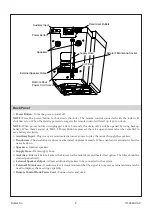
Page 5: ...Front Motion Sensor When auto open close is enabled the lid may be opened without contact Activating the motion sensor by moving your foot before the toilet The sensitivity of the front motion sensor which opens the lid can be adjusted using the remote control The toilet arrives with this feature enabled Side Motion Sensor The blue light on the right side of the toilet that is projected on the flo...

Page 6: ...t the night light feature The toilet arrives with this feature enabled Welcome Light when enabled the ambient light will automatically turn on when the toilet is activated The toilet arrives with this feature enabled Night Light The Ambient Light will automatically turn on in low light conditions when this feature is enabled The toilet arrives with this feature enabled Music and Sounds Music Your ...

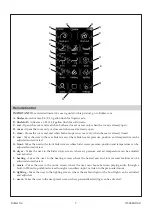
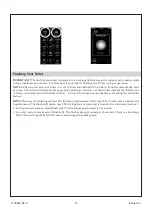
Page 7: ...ion and temperature can be adjusted and activated G front Takes the user to the front bidet screen where bidet water pressure position and temperature can be adjusted and activated H dryer Takes the user to the bidet dryer screen where air pressure and air temperature can be adjusted and activated I heating Takes the user to the heating screen where the heated seat and foot warmer features can be ...

Page 8: ...e settings N stop Click STOP will stop the in progress bidet music feet heating the light will turn off unless night light is on O clock Indicates current time P user indicator Indicates current user preset settings Q signal indicator Indicates remote control to toilet signal strength R battery indicator Indicates remote control battery remaining capacity ...

Page 9: ... Button is pressed the valve open command can be cancelled to save battery electricity Auxiliary Input Plug in any standard external music source to play the music through the speakers Deodorizer The deodorizer reduces or eliminated unpleasant smells When enabled it is activated when the user sits down Speakers Internal speakers Supply Hose Water supply hose Air Filter Filters air before it enters...

Page 10: ... eco or flush full automatically Refer to the Setting Auto Open Auto Flush Deodorizer section for instructions on enabling or disabling the auto flush feature NOTE There are two flushing options The flush eco option uses 0 6 2 3 l gallons of water and is intended for liquid removal The flush full option uses 1 28 4 8 l gallons of water and is intended for solid waste removal For liquid waste remov...

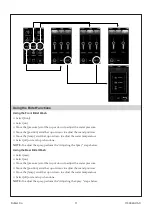
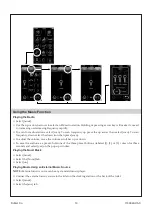
Page 11: ...ust the water temperature Select off or stand up when done NOTE To adjust the spray perform the Adjusting the Spray steps below Using the Rear Bidet Wash Select rear Select on Move the pressure scroll bar up or down to adjust the water pressure Move the position scroll bar up or down to adjust the wand position Move the temp scroll bar up or down to adjust the water temperature Select off or stand...

Page 12: ...ter emitted from the bidet wand pulses When oscillate is selected the bidet wand moves while a steady stream of water is emitted Select front or rear Select options NOTE When wave is selected the water will pulsate and oscillate simultaneously Select pulsate oscillate or wave Using the Dryer Select dryer Select on Move the pressure scroll bar up or down to adjust the air pressure Move the temp scr...

Page 13: ...cy down select the down icon then press scan To adjust the volume move the volume scroll bar up or down To save the station as a preset hold one of the three preset buttons labeled 1 2 or 3 down for three seconds and select yes on the pop up window Playing the Numi Music Select music Select the Numi tab Select on Playing Music Using an External Music Source NOTE External music source can be any st...

Page 14: ... of external player at middle Adjusting the Bass Treble and Balance Select music Select the radio Numi or aux tab Select options Select toilet for the internal speakers or external for external speakers To adjust the desired acoustic effect move the bass or treble scroll bar up or down To adjust the balance of left and right channel move the balance scroll bar up or down ...

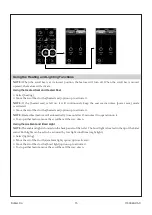
Page 15: ... scroll bar for the heated seat option up to activate it NOTE Heated Feet feature will automatically time out after 15 minutes if no operation on it To stop either feature move the scroll bar all the way down Using the Ambient and Bowl Light NOTE The ambient light is located on the back panels of the toilet The bowl light is located in the tip of the bidet wand Both lights can be set to be activat...

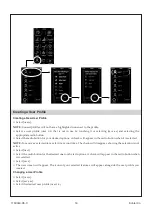
Page 16: ...ptions A check will appear in the radio button when it is selected NOTE To remove a selected item select it a second time The check will disappear showing the selection is not active Select next Select the radio button for the desired one touch start options A check will appear in the radio button when it is selected Select save The user screen will appear The icons of your selected features will ...

Page 17: ... selection is not active Select next Select the radio button for the desired one touch start options A check will appear in the radio button when it is selected Select save The user screen will appear The icons of your selected features will appear alongside the user profile you created Calling out a user profile Select users Select user profile user 1 6 with the desired preset options The user pr...

Page 18: ...rn to the main screen or back to return to the previous screen Changing the On Screen Language Select settings Select system settings Select languages NOTE If the language you desire does not appear on the screen move the scroll bar down to see additional language options Select the radio button for your desired language The screen icons will immediately change Select home to return to the main sc...

Page 19: ...for the date format Select home to return to the main screen or back to return to the previous screen Setting or Changing the Time Select settings Select system settings Select Set time Select the radio button for the 12 hr or 24 hr option Use the up and down indicators to adjust the hour and minute Select the radio button for the am or pm option Select home to return to the main screen or back to...

Page 20: ... screen will stay active after its last use To reactivate the remote touch any area of the screen and it will immediately wake up Select settings Select system settings Select power save Select remote sleep Select the desired radio button Select home to return to the main screen or back to return to the previous screen ...

Page 21: ... to schedule a specific time for the toilet to enter sleep mode If you would like to schedule the sleep mode select set schedule The next screen is the start time for sleep mode Use the up and down indicators to adjust the hour and minute to the time you desire the toilet to enter the sleep mode Select the radio button for the am or pm option Select next The next screen is the end time for sleep m...

Page 22: ...Co Settings Toilet Sleep Mode cont Select the radio buttons for the days of the week you would like the sleep schedule to be active Select save Select home to return to the main screen or back to return to the previous screen ...

Page 23: ...e activated when the toilet is used Select settings Select system settings Select user settings Select previous user for the last users profile to be activated at each use Select user 1 for user one s profile to be activated at each use Select default for the default settings to be activated at each use ...

Page 24: ...oms should be set at near large bathrooms at far To adjust the setting the same instructions apply Select the radio for the desired sensitivity if you wish to enable the auto open and close feature Select home to return to the main screen or back to return to the previous screen Setting Auto Flush and Animated Flush Select settings Select feature settings Select flushing Select auto flush to enabl...

Page 25: ...ttings Auto Open Auto Flush Deodorizer cont Setting the Deodorizer Select settings Select feature settings Select deodorize Select enable or disable Select home to return to the main screen or back to return to the previous screen ...

Page 26: ...activate or disable to deactivate the key sounds Select home to return to the main screen or back to return to the previous screen Setting Welcome Night Light and Bowl Light NOTE Each of these features comes enabled Select settings Select feature settings Select lighting Select the corresponding radio button to enable or disable each of the features Select home to return to the main screen or back...

Page 27: ...er should drain out of the bowl Clean or plunge the bowl Select close when the cleaning is complete Select home to return to the main screen or back to return to the previous screen Manually Cleaning the Bidet Wand Select settings Select cleaning Select manual clean Select extend wand The bidet wand will deploy Clean the bidet wand and if needed remove the bidet wand tip Select close when the clea...

Page 28: ... return to the main screen or back to return to the previous screen Scheduling the Clean Cycle NOTE During the clean cycle the bidet wand will extend and retract This is normal Select settings Select cleaning Select UV clean wand Select set schedule The next screen is the start time for the clean cycle Use the up and down indicators to adjust the hour and minute to the time you desire the toilet t...

Page 29: ...leaning cont Select next Select the radio buttons for the days of the week you would like the clean cycle to run Select save Confirm the apply schedule radio button is checked Select home to return to the main screen or back to return to the previous screen ...

Page 30: ...ettings Select maintenance Select reconnect Connecting a New Remote Control NOTE This setting can be used to connect a new or a second remote control Select settings Select maintenance Select learn remote Follow the instructions on the remote control screen When complete select yes Turning Off the Remote Control NOTE It is applicable for shutting off remote control when toilet will not be used for...

Page 31: ...Users All NOTE This procedure erases all users profiles Select settings Select reset Select reset user Select yes Resetting the System NOTE This procedure puts all remote features back to their original settings Select settings Select reset Select reset system Select yes ...

Page 32: ...user seated on the ring activate flush eco while no user on the ring Front Wash Push the front wash button to activate the bidet wand for front wash Rear Wash Push the rear wash button to activate the bidet wand for rear wash NOTE When the bidet features are activated using the manual buttons they will default to the middle temperature pressure and position settings Dryer Push the dryer button to ...

Page 33: ...d Remove the air filter cover Remove the air filter Clean the air filter using water Reinstall the air filter Reinstall the air filter cover Servicing the Inlet Screen NOTE This procedure should be performed once every six months Turn off the water at the water supply stop or main water supply if the supply stop is not accessible Remove the back cover not shown if installed Remove the clip securin...

Page 34: ...od condition reinstall it If the screen is worn or damaged replace it To reinstall the inlet screen insert the inlet screen into the inlet aligned as shown Reinstall the water supply hose and secure using the clip Reinstall the cover if removed Turn on the water supply and check for leaks ...

Page 35: ...and spray tip by inserting a small thin object into the hole on the underside of the wand pushing the spray tip up Inspect the spray tip If there is mineral buildup in the spray tip remove the minerals by soaking it a cleaning solution until the minerals are gone Remove any mineral deposits from the spray tip opening in the bidet wand Replace the spray tip if needed Reinstall the spray tip once it...

Page 36: ...ider contact Call Center 0 2204 6222 Troubleshooting Information Care and Cleaning NOTE When the remote control is not in use it will fall into sleep mode Press touch the remote control screen to activate the remote control NOTE If the back light is off the first touch on the remote control screen activates the light The second touch activates the function Start up When the toilet is first install...

Page 37: ...ve close repeatedly 2 Automatic flush does not work A Automatic flush is not enabled A Use the remote control to enable automatic flush by selecting settings feature settings flushing auto flush B User is a small child A The automatic flush feature requires a sensor in the ring to be activated Children less than 122cm 48 may not activate this sensor Flush the toilet using the remote control 3 Ther...

Page 38: ...orated when there is extended period of time between uses A Flush the toilet to refill the bowl B There is a blockage that does not allow the trapway valve to close all the way A Use the remote control to open and close the trapway valve several times by selecting settings cleaning manual clean open bowl valve close repeatedly B Open the trapway valve manually using the remote control select setti...

Page 39: ...nformation provided at the back cover 3 Lid sways when it reaches the full open position A Some lid sway is normal A No action required for minimal lid sway B Call the Customer Care Center using the information provided at the back cover 4 Ring fails to open when side sensor is activated A Auto open feature is disabled A Use the remote control to enable the feature by selecting settings feature se...

Page 40: ...or stops A The bidet wand movement was interrupted unexpectedly A Press and hold the power button on the back of the toilet for 2 seconds to restart the system B Call the Customer Care Center using the information provided at the back cover 5 Bidet dryer air is too hot A Temperature is set too high Lower the temperature A Lower the dryer air temperature using the remote control by selecting dryer ...

Page 41: ...ote controlcloser to the toilet C Press and hold the power button on the back of the toilet for 2 seconds to restart the system D Using a pen or similar item push the reset button on the back of the remote control E Reconnect the toilet using the remote control and selecting settings maintenance learn remote control then following the directions on the remote control screen F Call the Customer Car...

Page 42: ...Call the Customer Care Center using the information provided at the back cover Lights Troubleshooting Symptoms Probable Causes Recommended Action 1 Back panel lights do not illuminate A Light is not activated A Activate the light using the remote control by adjusting lighting ambient light B The environment is very bright B No action needed 2 Toilet beeps when unplugged or plugged in A This is nor...

Page 43: ...t the volume scroll bar up 2 External player silence A External player volume down to a minimum or in mute state A Open the volume of external player or release mute state 3 External player sound quality is not good A External player sound quality is not good A Change the external player B Input signal too high or too low B Set the volume of external sound input to middle position 4 Toilet beeps w...

Page 44: ......

Page 45: ...ที และเวลา 62 การตั งค าระบบประหยัดพลังงานของรีโมทคอนโทรล 63 การตั งค าระบบประหยัดพลังงานของตัวสุขภัณฑ 64 การตั งค าสถานะผู ใช งาน 66 การตั งค าระบบเปิดอัตโนมัติ ระบบชำ ระล างอัตโนมัติ ระบบดับกลิ น6 67 การตั งค าเสียงและแสงสว าง 69 การทำ ความสะอาดแบบแมนนวล 7 70 การตั งค าการทำ ความสะอาดก านฉีดชำ ระแบบอัตโนมัติ 1 71 วิธีการเชื อมต อการใช งานรีโมทคอนโทรลกับสุขภัณฑ 73 การตั งค าใหม สำ หรับผู ใช งานแล...

Page 46: ...งอาจจะเกาะเป นนํ าแข ง ควรปล อยให สุขภัณฑ มีอุณหภูมิใกล เคียงอุณหภูมิห องก อนการติดตั งใหม 4 หรือใช งานอีกครั ง ข อสำ คัญ ความเสี ยงซึ งอาจทำ ให ผลิตภัณฑ ชำ รุด ห ามต อกระแสไฟฟ าเข ากับสุขภัณฑ จนกระทั งจะติดตั งระบบนํ าเสร จเรียบร อย ซึ งอาจเป นสาเหตุทำ ให สุขภัณฑ ทำ งานผิดปกติ ข อสังเกต อุปกรณ ควบคุมอุณหภูมิอาจจะเกิดความผิดพลาดระหว างการเก บหรือขนส งสินค าในสภาพอากาศที ร อน ซึ งอาจทำ ให อุปกรณ ไม...

Page 47: ... หากจำ เป น ขอขอบพระคุณที เลือกใช สุขภัณฑ โคห เลอร ขอขอบพระคุณที ท านได เลือกใช ผลิตภัณฑ โคเลอร ผลิตภัณฑ ของโคห เลอร ถูกสร างสรรค อย างปราณีตโดยผู เชี ยวชาญที มีประสบการณ 4 จึงเปรียบประดุจดั งประติมากรรมชิ นเอกที มีความโดดเด นทั งในด านประโยชน ใช สอย ผสมผสานไปกับความหรูหรางดงามในดีไซน ที 4 ภูมิฐานของผลิตภัณฑ ก อให เกิดความสุนทรียภาพทางอารมณ ที ควรค าแก การเป นเจ าของตราบนานเท านานท านจะภูมิใจในผลิ...

Page 48: ...ิดเองโดยอัตโนมัติโดยผ าน4 เซ นเซอร จับการเคลื อนไหวด านหน าหรือโดยการขยับเท าที บริเวณด านหน าสุขภัณฑ ระยะการรับสัญญาณเซ นเซอร สามารถปรับได 4 จากการตั งค าผ านรีโมทคอนโทรล ระบบเปิด ปิดอัตโนมัติถูกตั งค าเป น เปิด จากโรงงาน เซ นเซอร จับการเคลื อนไหวด านข าง แสงสีนํ าเงินที ส องพื นทางด านขวาของสุขภัณฑ ถูกออกแบบมาเพื อท ำให ที รองนั ง เปิดขึ น4 และปิดลงอัตโนมัติโดยที ไม ต องสัมผัสกับตัวสุขภัณฑ โดยกา...

Page 49: ...ว างภายในโถสุขภัณฑ ถูกตั งค าเป น เปิด จากโรงงาน แสงไฟต อนรับ แสงไฟด านข างโถสุขภัณฑ จะเปิดอัตโนมัติเมื อสุขภัณฑ เริ มทำ งาน ระบบแสงไฟต อนรับถูกตั งค าเป น เปิด จาก โรงงาน แสงไฟกลางคืน แสงไฟด านข างโถสุขภัณฑ จะเปิดอัตโนมัติเมื อแสงสว างบริเวณโดยรอบลดลง ระบบแสงไฟกลางคืนถูกตั งค า เป น เปิด จากโรงงาน เสียงและดนตรี เพลง สุขภัณฑ สามารถรับคลื นวิทยุเอฟเอ ม เล นดนตรีบรรเลงจากผู ผลิต และสามารถเล นเพลงได ...

Page 50: ...ฝารองนั งหากที รองนั งปิดอยู ฉ ฉีดช ำระด านหลัง rear เข าสู ค ำสั ง การฉีดช ำระด านหลัง สามารถปรับความแรงของนํ า ต ำแหน งของก านและ อุณหภูมิน ำ ช ฉีดช ำระด านหน า front เข าสู ค ำสั ง การฉีดช ำระด านหน า สามารถปรับความแรงของนํ า ต ำแหน งของก านและ อุณหภูมิน ำ ซ ระบบเป าแห ง dryer เข าสู ค ำสั ง ระบบเป าแห ง สามารถปรับความแรงลมและอุณหภูมิลม ฌ ระบบท ำความอุ น heating เข าสู ค ำสั ง ระบบท ำความอุ น ซ...

Page 51: ...ทำ งานของระบบก านฉีดชำ ระ การเล นเพลง ระบบเป าลมที เท า และระบบแสงไฟ โดย แสงไฟจะไม ดับลงหากไฟกลางคืนกำ ลังทำ งาน ฒ เวลา clock บอกเวลาปัจจุบัน ณ แสดงค าผู ใช งาน user indicator แสดงผู ใช งานปัจจุบันหรือการตั งค าปัจจุบัน ด แสดงค าการจับสัญญาณ signal indicator แสดงความแรงของสัญญาณระหว างรีโมทคอนโทรลและสุขภัณฑ ต แสดงค าแบตเตอรี Battery indicator แสดงพลังงานของแบตเตอรี ที เหลืออยู ...

Page 52: ...ำรอง ช วงที เสียงสัญญาณ ปิ บปิ บ ก ำลังดังอยู หากกดปุ มค ำสั งเปิด ปิด วาล วท อระบายน ำจะไม ถูกเปิดออก เพื อเป นการประหยัด4 แบดเตอรี ส ำรอง ช องเสียบอุปกรณ เสริม สามารถเชื อมต อเครื องเล นเพลงชนิดต างๆ เพื อฟังเพลงผ านล ำโพงของสุขภัณฑ ได ระบบดับกลิ น ช วยลดและก ำจัดกลิ นอันไม พึงประสงค ได ระหว างการใช สุขภัณฑ ระบบนี จะท ำงานอัตโนมัติเมื อผู ใช นั งบนที รองนั ง ล ำโพง ล ำโพงภายใน สายนํ าดี สายนํ าด...

Page 53: ...รายละเอียดได ที การตั งค าระบบเปิด อัตโนมัติ ระบบช ำระล างอัตโนมัติ ระบบดับกลิ น ในหัวข อการเปิด ปิดระบบช ำระล างอัตโนมัติ ข อสังเกต ค ำสั งเลือกระบบช ำระล างมี 2 แบบ คือ ช ำระล างแบบประหยัด ช ำระล างโดยใช น ำในปริมาณ 2 3 ลิตร เหมาะส ำหรับช ำระล าง ปัสสาวะ และช ำระล างแบบปกติช ำระล างโดยใช น ำในปริมาณ 4 8 ลิตร เหมาะส ำหรับช ำระล างสิ งปฏิกูล ส ำหรับช ำระล างปัสสาวะ เลือกค ำสั ง ช ำระล างแบบประหยัด...

Page 54: ...ด off หรือยืนขึ นเมื อใช งานเสร จเรียบร อย ข อสังเกต หากต องการปรับระบบฉีดพ น ให ปฎิบัติตามหัวข อ การปรับระบบฉีดพ น ตามขั นตอนถัดไป การใช ค ำสั งก านฉีดช ำระด านหลัง เลือกค ำสั ง ด านหลัง rear เลือกค ำสั ง เปิด on เลื อนแถบค ำสั ง ความแรง pressure ขึ นหรือลง เพื อปรับความแรงของน ำ เลื อนแถบค ำสั ง ต ำแหน ง position ขึ นหรือลง เพื อปรับต ำแหน งของก านฉีด เลื อนแถบค ำสั ง อุณหภูมิ temp ขึ นหรือลง เพ...

Page 55: ...ดพ นหน า หลัง ก านฉีดช ำระจะขยับหน า หลัง ด วยความแรงของน ำคงที เลือกค ำสั ง ด าหน า front หรือ ด านหลัง rear เลือกค ำสั ง ตัวเลือก Options ข อสังเกต เมื อเลือกค ำสั ง ฉีดพ นแบบคลื น wave น ำจะฉีดพ นเป นจังหวะและในขณะเดียวกันก านฉีดช ำระจะขยับหน า หลัง เลือกค ำสั ง ฉีดพ นเป นจังหวะ pulsate ฉีดพ นหน า หลัง oscillate หรือ ฉีดพ นแบบคลื น wave การใช ระบบเป าแห ง เลือกค ำสั ง เป าแห ง dryer เลือกค ำสั ...

Page 56: ...ามถี น อยลงให กดปุ มลูกศรลงและกดคำ สั ง หาคลื นวิทยุ scan ปรับเสียงดัง เบาด วยการเลื อนแถบความดัง volume ขึ นหรือลง การบันทึกสถานีวิทยุที เลือกไว เลือกกดปุ มช องสถานี หมายเลข 1 2 หรือ 3 ค างไว 3 วินาทีและเลือกคำ สั ง ใช yes บน หน าต างที ปรากฏขึ นมา การเล นเพลงบรรเลงนูมิ Numi เลือกคำ สั ง เพลง music เลือกคำ สั ง เพลงบรรเลงนูมิ Numi เลือกคำ สั ง เปิด on การเล นเพลงจากเครื องเล นเพลงอื นๆ ข อสังเกต ...

Page 57: ...และเสียงสมดุล เลือกคำ สั ง เพลง music เลือกคำ สั ง วิทยุ Radio เพลงบรรเลงนูมิ Numi หรือ ช องเสียบอุปกรณ เสริม aux เลือกคำ สั ง ตัวเลือก options เลือกคำ สั ง สุขภัณฑ toilet สำ หรับใช ลำ โพงของตัวสุขภัณฑ หรือ ลำ โพงภายนอก external สำ หรับใช ลำ โพงภายนอก ถ าต องการเปลี ยน รูปแบบเสียง อะคูสติก ให เลื อนแถบเสียงทุ ม bass หรือแหลม treble ขึ นหรือลง ถ าต องการเปลี ยน ความดังของเสียงระบบลำ โพงซ ายและขวา ใ...

Page 58: ...ป าลมอุ นที เท า heat feet ขึ นเพื อให ระบบท ำงาน ข อสังเกต ระบบเป าลมอุ นที เท าจะหยุดท ำงานอัตโนมัติภายใน 15 นาที ถ าหากไม มีการใช งานใดๆ เกิดขึ น หากต องการหยุดระบบทั งสองอย าง ให เลื อนแถบค ำสั งลงจนสุด การใช ไฟด านข างโถสุขภัณฑ และไฟส องภายในโถสุขภัณฑ ข อสังเกต ไฟด านข างโถสุขภัณฑ อยู ติดกับแผงปิดด านหลังสุขภัณฑ ไฟส องภายในโถสุขภัณฑ อยู ที ปลายก านฉีดช ำระของสุขภัณฑ แสงไฟทั งสองระบบจะท ำงานเม...

Page 59: ...องหมายถูก จะปรากฏอยู หน าระบบที ถูกเลือกไว ข อสังเกต ในกรณีที ต องการยกเลิกระบบที เลือกไว ให เลือกระบบนั นซ ำอีกครั ง เครื องหมายถูก หน าระบบจะหายไปและค าของ ระบบนั นจะไม ถูกบันทึก เลือกค ำสั ง ต อไป next เลือกปุ มค ำสั งเพื อตั งค าค ำสั งการใช งานแบบกดครั งเดียว เครื องหมายถูก จะปรากฏขึ นหน าป ุมเลือกค ำสั งที เลือกไว เลือกค ำสั ง บันทึก save การตั งค าผู ใช งานจะปรากฏขึ น สัญลักษณ รูปของระบบที ...

Page 60: ...ทึก เลือกคำ สั ง ต อไป next เลือกปุ มคำ สั งเพื อตั งค าคำ สั งการใช งานแบบกดครั งเดียว เครื องหมายถูก จะปรากฏขึ นหน าป ุมเลือกคำ สั งที เลือกไว เลือกคำ สั ง บันทึก save การตั งค าผู ใช งานจะปรากฏขึ น สัญลักษณ รูปของระบบที ถูกเลือกบันทึกค าไว จะปรากฏอยู ด านข างของข อมูลบันทึกผู ใช งานส วนตัว ที ได สร างไว เลือกค าผู ใช งาน เลือกคำ สั ง ผู ใช งาน users เลือกหมายเลขผู ใช งานส วนบุคคล user 1 6 ตามค ...

Page 61: ... อกลับมาที หน าจอหลัก หรือเลือกคำ สั ง ย อนกลับ back เพื อกลับไปยังหน าจอก อนหน านี การเปลี ยนภาษาบนรีโมทคอนโทรล เลือกคำ สั ง การตั งค า setting เลือกคำ สั ง การตั งค าระบบ system setting เลือกคำ สั ง ภาษา lanquaqes ข อสังเกต หากภาษาที ต องการไม ปรากฏบนหน าจอ ให เลื อนแถบคำ สั งด านข างลงเพื อดูภาษาที สามารถเลือกได เพิ มเติม เลือกปุ มของภาษาที ต องการ ภาษาใต สัญลักษณ บนหน าจอจะเปลี ยนทันที เลือกคำ...

Page 62: ...ัก home เพื อกลับมาที หน าจอหลัก หรือเลือกคำ สั ง ย อนกลับ back เพื อกลับไปยังหน าจอก อนหน านี การตั งค าหรือเปลี ยนเวลา เลือกคำ สั ง การตั งค า setting เลือกคำ สั ง การตั งค าระบบ system setting เลือกคำ สั ง ตั งค าเวลา set time เลือกคำ สั ง 12 ชม 12 hr หรือ 24 ชม 24 hr ใช ลูกศรขึ นและลง เพื อปรับเปลี ยน ชั วโมง และ นาที เลือกรูปแบบการแสดงเวลา 12 ชม 12 hr หรือ 24 ชม 24 hr เลือกช วงเวลา เช า am หร...

Page 63: ...หน าจอรีโมทคอนโทรล เพื อให รีโมทคอนโทรลทำ งานอีกครั ง เลือกคำ สั ง การตั งค า setting เลือกคำ สั ง การตั งค าระบบ system setting เลือกคำ สั ง ระบบประหยัดพลังงาน power save เลือกคำ สั ง ปิดหน าจอรีโมทคอนโทรล remote sleep เลือกระยะเวลาที ต องการให หน าจอรีโมทคอนโทรลแสดงผลหลังการใช งานครั งสุดท าย เลือกคำ สั ง กลับสู หน าจอหลัก home เพื อกลับมาที หน าจอหลัก หรือเลือกคำ สั ง ย อนกลับ back เพื อกลับไปย...

Page 64: ...รพักการท ำงานของสุขภัณฑ ข อสังเกต ค ำสั ง ก ำหนดเวลาล วงหน า set schedule สามารถก ำหนดเวลาเพื อให สุขภัณฑ เข าสู ระบบพักการท ำงานเมื อถึงเวลาที ตั งไว เพื อก ำหนดเวลาพักการท ำงานของสุขภัณฑ เลือกค ำสั ง ก ำหนดเวลาล วงหน า set schedule หน าจอถัดไปจะเป นเวลาเริ มต นที 4 สุขภัณฑ จะพักการท ำงาน ใช เครื องหมายลูกศรขึ นหรือลง เพื อตั งชั วโมงและนาทีที ต องการให สุขภัณฑ เข าสู ระบบพักการท ำงาน กดปุ มเพื อ...

Page 65: ...ะหยัดพลังงานของตัวสุขภัณฑ ต อ เลือกวันในสัปดาห ที ต องการให ระบบพักการทำ งาน ตามเวลาที กำ หนดไว เลือกคำ สั ง บันทึก save เลือกคำ สั ง กลับสู หน าจอหลัก home เพื อกลับมาที หน าจอหลัก หรือเลือกคำ สั ง ย อนกลับ back เพื อกลับไปยังหน าจอก อนหน านี ...

Page 66: ...าระบบ system setting เลือกคำ สั ง ตั งค าสถานะผู ใช งาน user settings เลือกคำ สั ง ผู ใช งานก อนหน านี previous user เพื อให สุขภัณฑ ใช ค าการทำ งานครั งล าสุดในการใช งานแต ละครั ง เลือกคำ สั งค าส วนบุคคลคนที 1 user1 เพื อให สุขภัณฑ ใช ค าการทำ งานของค าส วนบุคคลคนที 1ที บันทึกไว ในการใช งานแต ละครั ง เลือกคำ สั ง ค าจากโรงงาน default เพื อให สุขภัณฑ ใช ค าการทำ งานด วยค าที ตั งจากโรงงานในการใช ...

Page 67: ...ับค าระยะการ รับสัญญาณโดยปฏิบัติตามขั นตอนที ได กล าวไว ข างต น เลือกระยะการรับสัญญาณตามที ต องการเพื อให ระบบเปิดหรือปิดอัตโนมัติท ำงาน เลือกค ำสั ง กลับสู หน าจอหลัก home เพื อกลับมาที หน าจอหลัก หรือเลือกค ำสั ง ย อนกลับ back เพื อกลับไปยังหน าจอก อนหน านี การตั งค าระบบช ำระล างอัตโนมัติและภาพจ ำลองการช ำระล าง เลือกค ำสั ง การตั งค า setting เลือกค ำสั ง การตั งค ารูปแบบการท ำงาน featuring se...

Page 68: ... าระบบดับกลิ น เลือกคำ สั ง การตั งค า setting เลือกคำ สั ง การตั งค ารูปแบบการทำ งาน featuring setting เลือกคำ สั ง ระบบดับกลิ น deodorize เลือกคำ สั ง เปิด enable หรือ ปิด disable เลือกคำ สั ง กลับสู หน าจอหลัก home เพื อกลับมาที หน าจอหลัก หรือเลือกคำ สั ง ย อนกลับ back เพื อกลับไปยังหน าจอก อนหน านี ...

Page 69: ...ยงสัญญาณทำ งาน หรือ ปิด disable ปิดเสียงสัญญาณ เลือกคำ สั ง กลับสู หน าจอหลัก home เพื อกลับมาที หน าจอหลัก หรือเลือกคำ สั ง ย อนกลับ back เพื อกลับไปยังหน าจอก อนหน านี การตั งค าไฟต อนรับ ไฟกลางคืน และ ไฟโถสุขภัณฑ ข อสังเกต ค าต างๆเหล านี ถูกตั งค าเป น เปิด จากโรงงาน เลือกคำ สั ง การตั งค า setting เลือกคำ สั ง การตั งค ารูปแบบการทำ งาน featuring setting เลือกคำ สั ง แสงไฟ lighting เลือกคำ สั ...

Page 70: ... งอุดตันออก เลือกค ำสั ง ปิด close เมื อการท ำความสะอาดเสร จเรียบร อย เลือกค ำสั ง กลับสู หน าจอหลัก home เพื อกลับมาที หน าจอหลัก หรือเลือกค ำสั ง ย อนกลับ back เพื อกลับไปยังหน าจอก อนหน านี การท ำความสะอาดก านฉีดช ำระแบบแมนนวล เลือกค ำสั ง การตั งค า setting เลือกค ำสั ง การท ำความสะอาด cleanning เลือกค ำสั ง การท ำความสะอาดแบบแมนนวล manual clean เลือกค ำสั ง ยื นก านฉีดช ำระ extend wand ก านฉี...

Page 71: ...จอหลัก home เพื อกลับมาที หน าจอหลัก หรือเลือกคำ สั ง ย อนกลับ back เพื อกลับไปยังหน าจอก อนหน านี การกำ หนดเวลารอบการทำ ความสะอาด ข อสังเกต ระหว างระบบทำ ความสะอาดแบบยูวีกำ ลังทำ งาน ก านฉีดชำ ระจะเลื อนเข าและเลื อนออก ซึ งเป นการทำ งานปกติของ ระบบ เลือกคำ สั ง การตั งค า setting เลือกคำ สั ง การทำ ความสะอาด cleanning เลือกคำ สั ง ระบบทำ ความสะอาดแบบยูวี UV clean wand เลือกคำ สั ง กำ หนดเวลาล วง...

Page 72: ...สัปดาห ที ต องการให ระบบการทำ ความสะอาดแบบยูวีทำ งาน เลือกคำ สั ง บันทึก save ให มั นใจว า คำ สั ง ทำ งานตามกำ หนดเวลา apply schedule ถูกเลือกไว โดยมีเครื องหมายถูก ปรากฏอยู ด านหน าของคำ สั ง เลือกคำ สั ง กลับสู หน าจอหลัก home เพื อกลับมาที หน าจอหลัก หรือเลือกคำ สั ง ย อนกลับ back เพื อกลับไปยังหน าจอก อนหน านี ...

Page 73: ...โทรลชุดใหม ข อสังเกต การตั งค านี สามารถใช ได กับ รีโมทคอนโทรลตัวใหม หรือรีโมทคอนโทรลอันที สองได เลือกคำ สั ง การตั งค า settings เลือกคำ สั ง การบำ รุงรักษา maintenance เลือกคำ สั ง รู จักกับรีโมทคอนโทรล learn remote ปฎิบัติตามขั นตอนที แสดงบนหน าจอรีโมทคอนโทรล เมื อทำ ตามทุกขั นตอนเสร จเรียบร อยแล วให เลือกคำ สั ง ใช yes การปิดรีโมทคอนโทรล ข อสังเกต หากสุขภัณฑ ไม ได ถูกใช เป นเวลานาน แนะนำ ให ปิ...

Page 74: ... งไว ทั งหมด เลือกคำ สั ง การตั งค า settings เลือกคำ สั ง ล างระบบ reset เลือกคำ สั ง ล างข อมูลผู ใช reset user เลือกคำ สั ง ใช Yes การตั งค าระบบใหม ข อสังเกต เป นขั นตอนที ทำ ให การตั งค าระบบต างๆ กลับมาที ค าตั งต นจากโรงงาน เลือกคำ สั ง การตั งค า settings เลือกคำ สั ง ล างระบบ reset เลือกคำ สั ง ล างข อมูลระบบ reset system เลือกคำ สั ง ใช Yes ...

Page 75: ...งนั ง และจะช ำระล างแบบประหยัดหากไม มีผู ใช งานนั ง4 อยู บนที รองนั ง ปุ มฉีดช ำระด านหน า กดปุ มฉีดช ำระด านหน าเพื อให หัวฉีดช ำระด านหน าท ำงาน ปุ มฉีดช ำระด านหลัง กดปุ มฉีดช ำระด านหลังเพื อให หัวฉีดช ำระด านหลังท ำงาน ข อสังเกต เมื อระบบฉีดช ำระท ำงานโดยการกดปุ มแมนนวล อุณหภูมิน ำ ความแรงน ำ และ ต ำแหน งของก านฉีดช ำระจะอยู ใน ระดับกลาง ปุ มเป าแห ง กดปุ มเป าแห งเพื อให ระบบเป าแห งท ำงาน ก...

Page 76: ...ันใหม กลับเข าไปในฝาครอบก อนดับกลิ น การบ ำรุงรักษาไส กรองอากาศ ข อสังเกต ควรปฏิบัติปีละหนึ งครั ง หรือมากกว านั นหากจ ำเป น ถอดฝาครอบไส กรองอากาศออก ถอดไส กรองอากาศ ใช น ำท ำความสะอาดไส กรองอากาศ ใส ไส กรองอากาศกลับเข าไปต ำแหน งเดิม ปิดฝาครอบไส กรองอากาศกลับไปต ำแหน งเดิม การบ ำรุงรักษาตะแกรงกรองผง ข อสังเกต ควรปฏิบัติทุกๆ 6 เดือน ปิดวาล วเปิด ปิดน ำหรือระบบจ ายน ำหลัก ถอดฝาครอบด านหลังออก ไม ได...

Page 77: ...ตะกรันและเศษสิ งสกปรกต างๆ ออกจากตะแกรงกรองผง ตรวจสอบตะแกรงกรอง หากอยู ในสภาพที ดีให ติดตั งกลับไปยังต ำแหน งเดิม หากอยู ในสภาพเสื อมหรือช ำรุดให เปลี ยนใหม ประกอบตะแกรงกรองผงกลับเข าที เดิมโดยใส ตะแกรงกรองผงเข าไปในทางน ำเข า ดังภาพ ประกอบสายน ำดีกลับเข ากับทางน ำเข าและยึดให แน นด วยคลิป ประกอบฝาครอบด านหลังเข าไปต ำแหน งเดิม หากถูกถอดออก เปิดวาล วน ำและตรวจสอบการรั วซึม ...

Page 78: ...ท ำความสะอาดก านฉีดช ำระแบบแมนนวล ถอดหัวฉีดช ำระออกโดยใช อุปกรณ เล กๆ บางๆ เสียบเข าไปในรูข างใต ของก านฉีดช ำระและดันขึ นมา ตรวจสอบหัวฉีดช ำระ หากมีตะกรันติดอยู ในหัวฉีดช ำระให แช ไว ในน ำยาท ำความสะอาดจนกว าตะกรันจะหมด ท ำความสะอาดตะกรันบริเวณรอบช องใส หัวฉีดช ำระออกให หมด เปลี ยนหัวฉีดช ำระใหม หากจ ำเป น ประกอบหัวฉีดช ำระที ท ำความสะอาดแล วหรือประกอบหัวฉีดช ำระตัวใหม ให มั นใจว าหัวฉีดช ำระเรีย...

Page 79: ...นเซอร ภายในที รองนั งจับสัญญาณผู ใช งานได เด กเล กอาจจะมี4 ความสูงไม พอที จะให เซ นเซอร ท ำงาน เซ นเซอร จะจับสัญญาณที ความสูงประมาณ 122 ซม ระบบช ำระล างและระบบก านฉีด4 ช ำระจะไม ท ำงานหากเซ นเซอร จับสัญญาณไม ได เพื อให ได ประสิทธิภาพสูงสุดในการดูแลรักษาและทำ ความสะอาดสุขภัณฑ ของท านโปรดปฏิบัติตามคำ แนะนำ ดังนี ตรวจสอบผลิตภัณฑ ทำ ความสะอาดกับสุขภัณฑ ก อนใช งานทุกครั ง โดยทดสอบบนผิวสุขภัณฑ ที ไม สาม...

Page 80: ... าสัมพันธ เพื อขอรายละเอียดเพิ มเติม ค รีโมทคอนโทรลไม ท ำงาน ก อ านวิธีการแก ปัญหาเบื องต นเรื องรีโมทคอนโทรล ง วาล วท อน ำทิ ง ไม เปิดหรือ มีสิ งกีดขวาง ก ใช รีโมทคอนโทรลเพื อเปิดและปิดวาลว ท อน ำทิ งหลายๆ ครั ง โดยการเลือกค ำสั ง การตั งค า settings การท ำความสะอาด cleaning การท ำความสะอาด แบบแมนนวล manual clean เปิดวาล วโถสุขภัณฑ open bowl valve ปิด close ท ำซ ำหลายๆ ครั ง 2 ระบบช ำระล างอัตโนม...

Page 81: ...ในถังพักน ำ ข หากสุขภัณฑ ท ำการช ำระล างเองอย างต อเนื อง กรุณา ติดต อลูกค าสัมพันธ 5 ระดับน ำในโถสุขภัณฑ สูงเกินไป ก สุขภัณฑ เกิดการอุดตัน ก ปฏิบัติตามขั นตอนการแก ปัญหาเบื องต นในเรื องการ อุดตัน 6 ไม มีน ำในโถสุขภัณฑ หรือน ำในโถสุขภัณฑ 4 ลดลงไปเรื อยๆ ก น ำจะถูกระเหยไปเมื อสุขภัณฑ ไม ได ถูกใช งานเป นเวลานาน ก กดช ำระล างเพื อเติมน ำให เต ม ข มีการอุดตันเกิดขึ น ท ำให วาล วท อ น ำทิ งปิดไม สนิท ...

Page 82: ...และ ใกล near กลาง medium หรือ ไกล far ข ติดต อลูกค าสัมพันธ เพื อขอรายละเอียดเพิ มเติม 3 ฝารองนั งแกว งไปมาเมื อ อยู ต ำแหน งเปิดสุด ก เป นการท ำงานปกติ ก ไม ต องด ำเนินการใดๆ หากฝารองนั งแกว งไปมาเล กน อย ข ติดต อลูกค าสัมพันธ เพื อขอรายละเอียดเพิ มเติม 4 ที รองนั งไม เปิดในขณะที เซ นเซอร ด านข างท ำงาน ก ระบบเปิดอัตโนมัติถูกตั งค าเป น ปิด ก ใช รีโมทคอนโทรลเพื อเปิดระบบเปิดอัตโนมัติ โดยเลือกค ำส...

Page 83: ...ฉีดช ำระเคลื อนไหว หรือหยุดอย างผิดปกติ ก การท ำงานของก านฉีดถูกรบกวน อย างกะทันหัน ก กดปุ มเปิดระบบท ำงานที อยู ทางด านหลังของสุขภัณฑ ค างไว ประมาณ 2 วินาที เพื อให ระบบเริ มท ำงานใหม ข ติดต อลูกค าสัมพันธ เพื อขอรายละเอียดเพิ มเติม 5 ลมของระบบเป าแห ง ร อนเกินไป ก ตั งอุณหภูมิสูงเกินไป ให ปรับ อุณหภูมิให ต ำลง ก ใช รีโมทคอนโทรลเพื อปรับอุณหภูมิของระบบเป าแห ง โดยเลือกค ำสั ง ระบบเป าแห ง dryer แ...

Page 84: ...ื อให ระบบเริ มท ำงานใหม ง ใช ปากกาหรืออุปกรณ ที คล ายกันเพื อกดปุ มล างระบบ reset ที อยู ด านหลังรีโมทคอนโทรล ง เชื อมต อรีโมทคอนโทรลกับสุขภัณฑ โดยเลือกค ำสั ง การตั งค า settings การตั งค าระบบ feature settings การบ ำรุงรักษา maintenance รู จักกับรีโมทคอนโทรล learn remote หลังจากนั นให ปฏิบัติตามขั นตอนที แสดงบน หน าจอรีโมทคอนโทรล จ ติดต อลูกค าสัมพันธ เพื อขอรายละเอียดเพิ มเติม 3 ภาพจ ำลองระบบช...

Page 85: ...ดย เจ าหน าที ของบริษัทเท านั น ติดต อลูกค าสัมพันธ เพื อขอ รายละเอียดเพิ มเติม แสงไฟ ปัญหาที พบ สาเหตุที เป นไปได วิธีการแก ปัญหา 1 ไฟด านข างโถสุขภัณฑ ไม สว าง ก ระบบแสงไฟถูกตั งค าเป น ปิด ก ใช รีโมทคอนโทรลเพื อปรับระดับแสงไฟ โดยเลือกค ำสั ง แสงไฟ lighting ไฟด านข างโถสุขภัณฑ ambient light ข บริเวณนั นสว างอยู ข ไม ต องด ำเนินการใดๆ 2 มีเสียง ปิ บปิ บ เตือนที สุขภัณฑ เมื อถอดปลั กไฟ หรือเสียบปล...

Page 86: ...ากเครื องเล น เพลงภายนอก ก เครื องเล นเพลงภายนอกถูกหรี เสียงหรืออยู ในสถานะเงียบ ก เปิดเสียงเครื องเล นเพลงภายนอกให ดังขึ น หรือออกจาก สถานะเงียบ 3 คุณภาพเสียงของเครื อง เล นเพลงภายนอก ไม ค อยดี ก คุณภาพเสียงของเครื องเล นเพลง ภายนอกไม ดี ก เปลี ยนเครื องเล นเพลงภายนอกใหม ข ความดังของเสียงสูงหรือต ำเกินไป ข ตั งความดังของเสียงเครื องเล นเพลงภายนอกให อยู ใน ระดับกลาง 4 มีเสียง ปิ บปิ บ เตือนที สุขภ...

Page 87: ......

Page 88: ...3 Wattana Bangkok10110Thailand Call Center Tel 66 2204 6222 Fax 66 22046224 บริษัทโคห เลอร ประเทศไทย จำ กัด มหาชน ชั น16 อาคารจัสมิน ซิตี 2 ซอยสุขุมวิท 23 ถนนสุขุมวิท แขวงคลองเตยเหนือ เขตวัฒนา กรุงเทพฯ 10110 ลูกค าสัมพันธ โทร 022046222 โทรสาร 022046224 E mail callcenterthailand kohler com ...

Reviews: