6. Install the Waterway
CAUTION: Risk of personal injury.
If the rain panel is not securely held in place during
installation, the product may fall. Get help installing the light panel assembly and waterways.
IMPORTANT!
The following steps require two people.
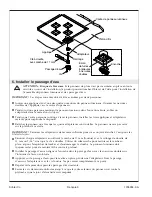
Insert an escutcheon into one of the four openings in the light panel. Orient the double ribs of the
escutcheon toward the center of the panel.
While another person holds the light panel in the rough opening, thread an adapter into the pipe
nipple.
While the other person continues to hold the panel, install the three remaining escutcheons and
adapters to hang the fixture.
Release the panel after the four adapters are installed. The panel will not be tight to the ceiling at
this time.
IMPORTANT!
Secure the adapters sufficiently to create a water-tight seal for the pipe threads.
Secure each adapter using the 11 mm bit (provided) with the 11 mm or 7/16
″
socket extension, and
socket wrench. Use masking tape to hold the bit in place to prevent it from falling off and causing
damage to your shower. The light panel should still sit loosely against the ceiling.
Install the waterway by aligning the notch in the waterway with the double ribs on the inside of the
leak shield.
Press the waterway into place over the adapter. Secure the waterway to the adapter with the screw
provided. Do not completely tighten at this time.
Repeat for the remaining waterways.
Tighten the screws evenly until the outer frame of the panel is against the ceiling, and the sealing
gasket is compressed.
IMPORTANT!
If the light panel frame does not meet the ceiling within 1/32
″
(1 mm), the pipe nipple is
too long. Check the rough depth. Try turning the threaded adapter further, or use a shorter pipe nipple.
Light Panel Frame
Finished Ceiling
Escutcheon
Adapter
Notch
Extension
Screw
Waterway
Socket Wrench
With 11 mm Bit
Double Ribs
Inside Leak
Shield
Kohler Co.
9
1235394-2-A


