background image

INSTALL THE BATH

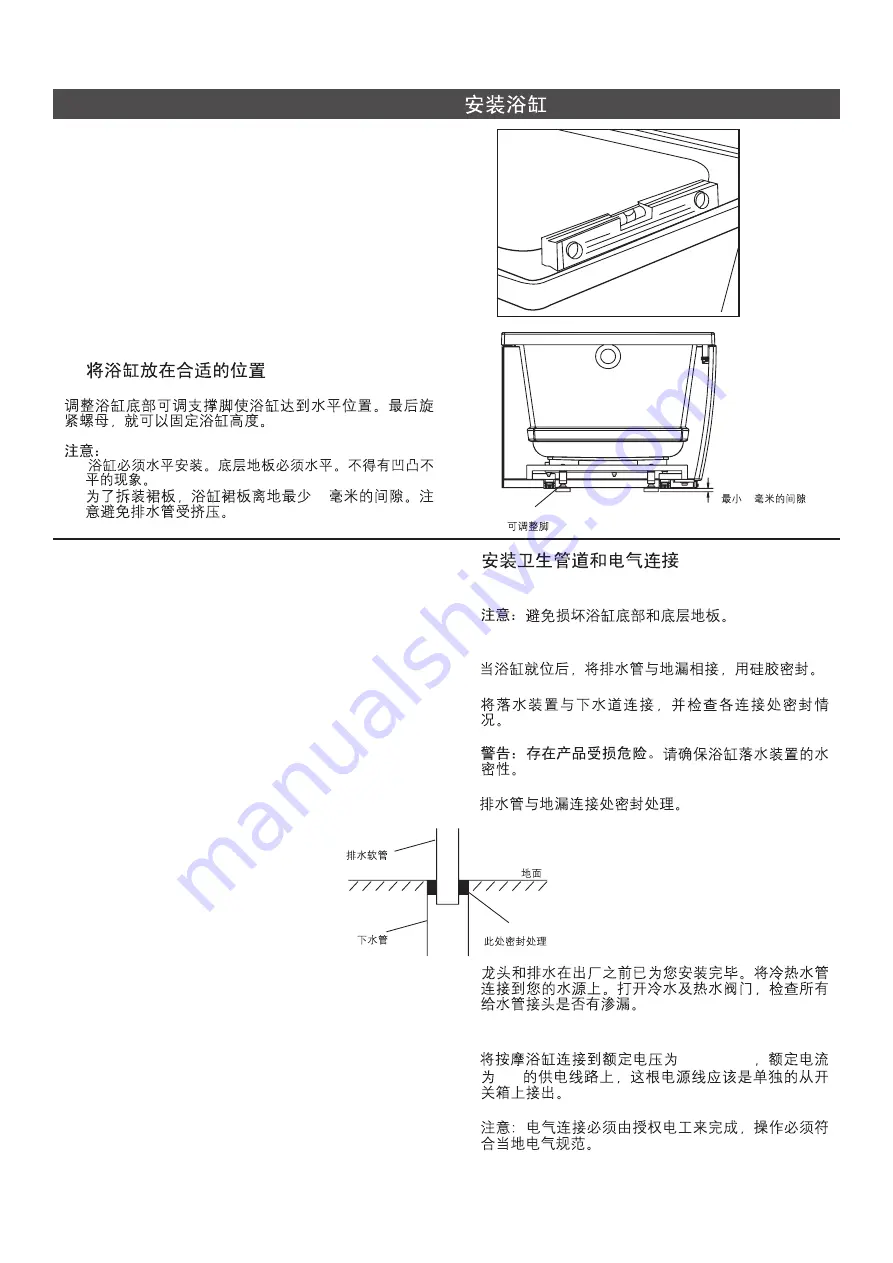
A. Locate the bath in the proposed position

Adjust the feet under the bath to make it level. Tighten
the nut to fix the height of the bath.

The bath must be installed level on all top edges.
Floor should be flat, level and free of any bumps or
protrusions.
Keep the clearance of minimum 15mm from floor to
the apron for removing the apron. Be careful with
the drain hose to prevent it to be squeezed.

15

IMPORTANT:

!

!

!

!

A.

Minimum 15mm Gap

15

Adjustable Feet

B. Plumbing Installation and Electric

Wiring

CAUTION: Risk of damage to bath bottom and
subfloor.

1 . When the bath is securely positioned, connect the

drain to the trap and apply silicone sealant.

2). Connect drain with drainage pipe and check all

connections for leak.

)

CAUTION: Risk of property damage.

Ensure a

watertight seal on the bath drain.

3). Ensure a seal on the bath drain and the floor drain.

4). The installation of the faucet and drain has been

completed before the bath leaves factory. Connect
cold and hot water supplies.

5). Connect power supply (220V/50Hz, 10A) to bath.

This should be a separato line, direct from the
switchboard.

The electrical connections must comply with

local authority regulations and must be done by an
authorized electriclan.

Open the hot and cold

water valves, and check the supply connections for
leaks.

Note:

-4-

Drain

Drain Pipe

Seal on the bath

Floor

B.

1).

2).

3).

4).

5).

220V/50Hz

10A

1206725-T01-A

Summary of Contents for K-99023T

Page 1: ...tain important care cleaning and warranty information Please provide adequate available space for the bath unit in accordance with rough in Arrange the location of drain in advance All installations m...

Page 2: ...nels or blower motor or use the air channels or blower motor for structural support of the bath Follow all local plumbing and electrical codes B Factory Assembled Features Factory installed components...

Page 3: ...optional Protective covering for bathtub Nails B Materials Required A Tools Required B A INSTALLATION REQUIREMENTS 3 B Prepare the Site Make sure the flooring offers adequate support for your bath and...

Page 4: ...positioned connect the drain to the trap and apply silicone sealant 2 Connect drain with drainage pipe and check all connections for leak CAUTION Risk of property damage Ensure a watertight seal on t...

Page 5: ...heck all the fittings for leaks and test the control functions NON OBSERVANCE WILL INVALIDATE FACTORY WARRANTY C 1 2 3 D Apply Sealant 1 After the bath is fixed apply sealant around the bath D 1 Apply...

Page 6: ...use metal scrapers wire brushes or other metal tools One of the powder type detergents may be used on a damp cloth to provide mild abrasive action to the residual plaster DIRLLING AND CUTTING ACRYLIC...

Page 7: ...etails of complaint 7 2 Mequiars 28 Consumer Responsibilities Cleaning Acrylic Surfaces Do not use abrasive cleansers on any acrylic surfaces as they will scratch and dull the surface Wipe out the bat...

Reviews: