background image

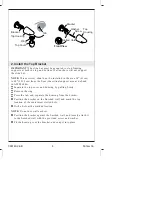
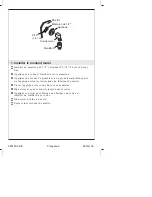
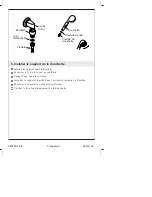
1. Install the Wall Bracket

Install a 1/2

nipple, extending 9/16

(1.4 cm) from the finished

wall.

Apply thread sealant to the nipple.

Apply a ring of plumbers putty or other sealant to the back of the
escutcheon according to the putty manufacturer’s instructions.

Thread the escutcheon and wall elbow to the nipple.

Securely tighten with a sturdy screwdriver inserted into the
outlet.

Apply thread sealant to the wall elbow threads, and install a
vacuum breaker to the wall elbow.

Securely wrench tighten.

Wipe away any excess putty.

Finished Wall

Wall Elbow

Vacuum Breaker

Escutcheon

1/2" Nipple

9/16" 
(1.4 cm)

Kohler Co.

3

088148-2-AB

Summary of Contents for MasterShower K-8520

Page 1: ... Hotel Handshower and Slide Bar M product numbers are for Mexico i e K 12345M Los números de productos seguidos de M corresponden a México Ej K 12345M Français page Français 1 Español página Español 1 K 8520 088148 2 AB ...

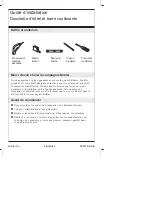
Page 2: ...one numbers and website are listed on the back cover Thanks again for choosing Kohler Company Tools and Materials Before You Begin Observe all local plumbing and building codes Shut off the main water supply Replace waste or supply tubing if necessary Kohler Co reserves the right to make revisions in the design of products without notice as specified in the Price Book Drill and Assorted Bits Tape ...

Page 3: ...cording to the putty manufacturer s instructions Thread the escutcheon and wall elbow to the nipple Securely tighten with a sturdy screwdriver inserted into the outlet Apply thread sealant to the wall elbow threads and install a vacuum breaker to the wall elbow Securely wrench tighten Wipe away any excess putty Finished Wall Wall Elbow Vacuum Breaker Escutcheon 1 2 Nipple 9 16 1 4 cm Kohler Co 3 0...

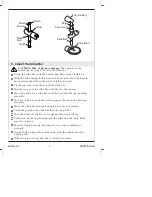
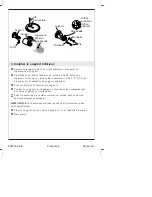
Page 4: ...lling firmly Remove the ring Press the tab and separate the housing from the bracket Position the bracket on the finished wall and mark the top location of the centermost slotted hole Drill a hole at the marked location NOTE Do not use wall anchors Position the bracket against the finished wall and loosely attach it to the finished wall with the provided screw and washer Fit the housing over the b...

Page 5: ...top out of the bracket Center the bracket over the mark and mark the top and bottom hole locations For tile or solid surface materials drill a hole at the marked locations NOTE Wall anchors are not required for this installation Attach the bracket to the finished wall with the screws and washers provided Tighten securely Screw Ring Tab Stop Bracket Soap Dish Bottom Housing Bracket Washer Washer Sc...

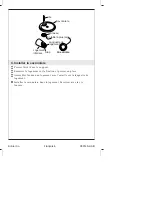
Page 6: ... over the bracket and snap it into place Assemble the ring to the housing with the indent over the housing tab Install the soap dish to the housing Secure with the provided screw Screw Ring Stop Soap Dish Back View Larger Indent Bottom Housing Housing Tab 088148 2 AB 6 Kohler Co ...

Page 7: ...nto the top housing assembly Turn the slide bar until the notch engages the tab in the housing assembly Move the slide bar and top housing up as far as possible Carefully position the slide bar into the soap dish Turn the slide bar slightly so it engages the soap dish tab Pull down on the top housing and the slide bar and hold them securely in place Securely tighten the top housing screw to ensure...

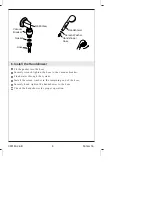
Page 8: ...acuum breaker Flush water through the system Install the screen washer in the remaining end of the hose Securely hand tighten the handshower to the hose Check the handshower for proper operation Wall Elbow Gasket Hose Vacuum Breaker Handshower Screen Washer Handshower Hose 088148 2 AB 8 Kohler Co ...

Page 9: ...uméros de téléphone et notre adresse du site internet sont au verso Merci encore d avoir choisi la compagnie Kohler Avant de commencer Respecter tous les codes de plomberie et de bâtiment locaux Couper l alimentation d eau principale Replacer les tubes d alimentation ou d évacuation si nécessaire Kohler Co se réserve le droit d apporter toutes modifications sur le design des produits et ceci sans ...

Page 10: ...applique selon les instructions du fabricant du mastic Visser l applique et le coude du mur au mamelon Bien serrer avec un tournevis inséré dans la sortie Appliquer un joint pour filetage aux filetages du coude et installer un reniflard à ce coude Bien serrer à l aide d une clé Essuyer tout excédent de mastic Mur fini Coude mural Reniflard Applique Mamelon de 1 2 9 16 1 4 cm 088148 2 AB Français 2...

Page 11: ...en tirant fermement Retirer l anneau Presser la languette et séparer le logement du montant Positionner le support sur le mur fini et marquer l emplacement supérieur de l orifice rainuré central Percer un trou à chaque endroit marqué REMARQUE Ne pas utiliser les montants du mur Positionner le support contre le mur fini et l y attacher légèrement avec la vis et la rondelle fournies Encastrer le log...

Page 12: ...rt Centrer le support sur la marque et marquer les emplacements des trous supérieurs et inférieurs Pour les matériaux à surface carrelée ou solide percer un trou aux emplacements marqués REMARQUE Les ancrages muraux ne sont pas nécessaires pour cette installation Fixer le support au mur fini à l aide des vis et rondelles fournies Bien serrer Vis Anneau Languette Arrêt Support Savonnière Logement i...

Page 13: ... presser en place Assembler l anneau au logement avec l entaille sur la languette de logement Installer la savonnière dans le logement Sécuriser avec la vis fournie Vis Anneau Stop Savonnière Vue arrière Entaille la plus large Logement inférieur Languette de logement Kohler Co Français 5 088148 2 AB ...

Page 14: ...e coulissante avec la languette faisant face vers le bas Insérer l extrémité de la barre coulissante dans le trou au dessus de l ensemble du logement Tourner la barre coulissante jusqu à ce que la cannelure engage la languette dans l ensemble du logement Déplacer la barre coulissante et le logement supérieur aussi haut que possible Positionner délicatement la barre coulissante dans la savonnière T...

Page 15: ...e et les maintenir en place Bien serrer la vis du logement supérieur pour assurer une force maximale Assembler l anneau dans le logement supérieur avec l entaille sur la languette du logement Glisser le couvercle supérieur et l engager en place fermement Kohler Co Français 7 088148 2 AB ...

Page 16: ...rger l eau dans le système Installer la rondelle à grille dans l extrémité restante du flexible Sécuriser à la main la douchette au flexible Vérifier le bon fonctionnement de la douchette Joint d étanchéité Flexible Reniflard Coude mural Douchette Rondelle à grille Flexible de douchette 088148 2 AB Français 8 Kohler Co ...

Page 17: ...eros de teléfono y nuestra página web se encuentran en la última página Gracias nuevamente por escoger a Kohler Antes de comenzar Cumpla con todos los códigos locales de plomería y de construcción Cierre el suministro principal de agua Reemplace las tuberías de desagüe o suministro de ser necesario Kohler Co se reserva el derecho de modificar el diseño de los productos sin aviso tal como se especi...

Page 18: ...as instrucciones del fabricante del sellador Enrosque el chapetón y el codo mural en el niple Apriete bien con un destornillador robusto inserto dentro de la salida Aplique cinta selladora de roscas a las rocas del codo mural e instale una válvula rompevacío en el codo mural Apriete bien con una llave Elimine el exceso de masilla Pared acabada Codo mural Válvula rompevacío Chapetón Niple de 1 2 9 ...

Page 19: ...el anillo Presione la lengüeta y separe el alojamiento del soporte Coloque el soporte sobre la pared acabada y marque la ubicación superior del orificio ranurado más cerca del centro Perfore un orificio en la ubicación marcada NOTA No utilice elementos de anclaje mural Coloque el soporte sobre la pared acabada y fíjelo sin apretar a la pared acabada con el tornillo y la arandela suministrados Colo...

Page 20: ...orte sobre la señal marcada y marque la ubicación del orificio superior e inferior Para los azulejos o materiales de superficie sólida perfore un orificio en los puntos marcados NOTA Los elementos de anclaje mural no son necesarios en esta instalación Monte el soporte a la pared acabada con los tornillos y arandelas suministrados Apriete bien Tornillo Anillo Lengüeta Fiador Soporte Jabonera Alojam...

Page 21: ...ájelo en su lugar Monte el anillo en el alojamiento con la muesca sobre la lengüeta del alojamiento Instale la jabonera en el alojamiento Fíjela con el tornillo suministrado Tornillo Anillo Fiador Jabonera Vista posterior Muesca grande Alojamiento inferior Lengüeta del alojamiento Kohler Co Español 5 088148 2 AB ...

Page 22: ...eslizante Encaje el anillo por la barra deslizante con el lado de lengüeta hacia abajo Inserte el extremo de la barra deslizante con el orificio dentro del montaje de alojamiento superior Gire la barra deslizante hasta que la ranura engrane con la lengüeta del montaje de alojamiento Suba la barra deslizante y el alojamiento superior lo más alto posible Coloque con cuidado la barra deslizante en la...

Page 23: ...téngalos bien en su lugar Apriete bien el tornillo del alojamiento superior para asegurar la máxima resistencia Monte el anillo en el alojamiento superior con la muesca sobre la lengüeta del alojamiento Deslice la cubierta superior hacia arriba y encájela bien en su lugar Kohler Co Español 7 088148 2 AB ...

Page 24: ...ar agua por el sistema Inserte la arandela de rejilla en el otro extremo de la manguera Fije la ducha de mano en la manguera y apriete bien con la mano Compruebe que la ducha de mano funcione correctamente Codo mural Empaque Manguera Válvula rompevacío Ducha de mano Arandela de rejilla Manguera de ducha de mano 088148 2 AB Español 8 Kohler Co ...

Page 25: ...088148 2 AB ...

Page 26: ...088148 2 AB ...

Page 27: ...088148 2 AB ...

Page 28: ...USA 1 800 4 KOHLER Canada 1 800 964 5590 México 001 877 680 1310 kohler com 2004 Kohler Co 088148 2 AB ...

Reviews: