background image

0 C

o

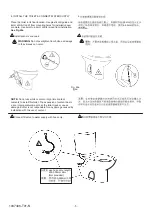
CONSUMER RESPONSIBILITIES

If you live in a hard water area, make certain that the holes in
the toilet rim are kept clean to ensure proper bowl flushing.
Toilet bowl cleaners should be used at least once a week.
Use a long-handled brush to clean the rim holes, and to clean
as far into the trap as possible to prevent mineral deposits
from forming.

Most toilet bowl cleaners are not harmful to the vitreous china
surface of the toilet bowl. Please follow the bowl cleaner
manufacturers instructions carefully.

Do not use abrasive cleaners or solvents.

Do not use in-tank cleaners. Products containing
chlorine (calcium hypochlorite) can seriously damage
fittings in the tank. This damage can cause leakage
and property damage.

Kohler Company shall not be responsible or liable for any
damage to these tank fittings caused by the use of cleaners
containing chlorine (calcium hypochlorite).

WARNING: Risk of property or product damage.

'

Please do not use hard materials (like

scouring pad) to clean product surface, especially the
product logo.

CAUTION:

CAUTION: Don t use any cement while installing
the toilet.

WARNING: Risk of product damage.

Heat expansion of the toilet may damage

the feet of the toilet. Kohler will not be responsible for
any damage because of using cement.

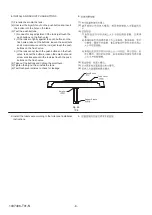
Do not throw into the toilet what is easy to block it,
such as newspaper, paper pilch, sanitary towel.
Do not bump the vitreous china with great force to
prevent it from damaging and leaking.
Do not use the product in the water below 0 C.

o

-10-

1037406-T01-N

Summary of Contents for ODEON K-8020T

Page 1: ...owl K 8709T 2 Includes Quiet close K 8827T ODEON P trap 180mm Toilet K 8711T 2 Includes Tank K 8710T Includes Bowl K 8709T 2 Includes K 8020T ODEON Toilet Seat Toilet Seat 180mm K 8711T 2 K 8710T K 8709T 2 K 8827T 180mm K 8711T 2 K 8710T K 8709T 2 K 8020T 1 INSTALLATION INSTRUCTIONS VITREOUS CHINA P S TRAP TOILET P S P TRAP 180mm K 8711T S2 K 8711T 2 S TRAP 305mm K 8766T S2 K 8766T 2 ODEON No 2 KO...

Page 2: ...oduct complies with GB 6952 2015 See Fig 1 155mm 6 1 8 60mm 2 3 8 245mm 9 5 8 1 ASME A112 19 2 2013 GB 6952 2015 TOOLS AND MATERIALS REQUIRED Not supplied 254mm adjustable wrench Metal file file cut Tape measure Tubing cutter Level Hacksaw Putty knife Screwdriver Straight pipe coupling Connection packing Toilet supply shut off valve 10mm 3 8 recommended The fill valve nut has been factory tightene...

Page 3: ...k and bowl 1 ROUGHING IN Fig 1 1 INSTALLATION Unit mm 3 Reference Value Kohler reserves the right to change marked dimensions without prior notice 204 776 10 392 93 474 305 K 8766T S2 K 8766T 2 736 344 259 363 162 155 430 390 Finished Wall S trap 12 5 30 Finished Floor 698 337 267362 166 155 429 390 204 777 10 388 90 396 180 159 102 K 8711T S2 K 8711T 2 Finished Wall P trap Finished Floor 1037406 ...

Page 4: ...ers from under bowl See Fig 2a See Fig 2b NOTE Do not use white cement or high lime content cements to install this toilet The expansion of cement due to a rise in temperature may make the toilet crack or cause damage Kohler is not responsible for any damage caused by installation with the use of cement 2 2a 2b 3 Fig 2a 2a Fig 3a 3a Fig 3b 3b S trap installation P trap installation Fig 2b 2b 100 1...

Page 5: ...n 3 See Fig 4a Install anchors and caps WARNING Do not overtighten floor bolts as damage to the vitreous can occur 4 8mm 4 4 5mm 4a 3 NOTE use hose only length 200 300mm mini Not provided 200 300mm 4 Fig 4a 4a NOTE Do not use white cement or high lime content cements to install this toilet The expansion of cement due to a rise in temperature may make the toilet crack or cause damage Kohler is not ...

Page 6: ...g OPEN direction To lower water level Move water cup down to a proper height and rotate screw anticlockwise to achieve the desired water level Refer to float adjustment instructions To elevate water level Rotate screw clockwise and raise float to the desired water level Elevate water cup to a proper position as well Refer to float adjustment instructions Fig 6a 6a Fig 6b 6b Fig 6c 6c Screw Snap SC...

Page 7: ...side and adjust tube height Push locking mechanism back into position to lock tube height See Fig 7 7 20mm 7 1 maxi 2 CLOSE E G 2 4mm Fasten the snap along CLOSE direction Float adjustment instructions Make sure the height of surface E is 2 4mm lower than surface G Fig 6d 6d Fig 6e 6e Screw E Float Water Cup G SCALE 5 1 OPEN CLOSE 1037406 T01 N ...

Page 8: ...htly against the push buttons on the flush valve take out the buttons loosen the small nuts and screw clockwise until the rods just touch the push buttons on the flush valve 3 If the rods cannot touch the push buttons on the flush valve take out the buttons loosen the small nuts and screw anticlockwise until the rods just touch the push buttons on the flush valve 4 Take out the buttons and tighten...

Page 9: ...structed B Soil pipe or vent is obstructed A Inspect clean and if necessary replace seal A Refer to Minor Adjustment of Water Level for waterline adjustment A Perform corrective action 2 A A Adjust the water level B Unclog trapway C Clear obstruction from soil pipe or vent D Open supply shut off valve tank A Use plunger to unclog B Clear obstruction from soil pipe or vent pipe A Float valve seal l...

Page 10: ...ings in the tank This damage can cause leakage and property damage Kohler Company shall not be responsible or liable for any damage to these tank fittings caused by the use of cleaners containing chlorine calcium hypochlorite WARNING Risk of property or product damage Please do not use hard materials like scouring pad to clean product surface especially the product logo CAUTION CAUTION Don t use a...

Reviews: