background image

9


Caution!

 Make sure that you avoid buried 

pipes and cables when you drill the wall.

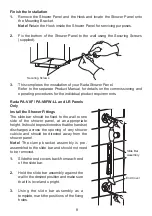
4.

  Drill the six fixing holes.

 Note!

 The installer should use an 

appropriate wall fixing arrangement to suit 

the wall type or surface (wall fixings not 

supplied).

5.

  Secure the slide bar assembly to the 

wall.

6.

  Fit the end covers over the end supports, 

making sure that they locate correctly.

7.

  Attach the hose to the handset. Make 

sure  that  the  hose  washer  is  fitted. 

Do 

not overtighten

.

8.

  Place the handset in the clamp bracket.

9.

  Attach the hose to the outlet of the shower 

panel. Make sure that the hose washer is 

fitted. 

Do not overtighten

.

End Cover

Summary of Contents for Rada PA-15TF

Page 1: ...1 Product Manual Shower Panels Important This manual is the property of the customer and must be retained with the product for maintenance and operational purposes ...

Page 2: ...5TFW white A Rada Shower Panel with a Rada 215 t3 Shower Control a TF 503 Timed Flow Control and a VR105 Shower Head Rada PA V8F stainless Rada PA V8FW white A Rada Shower Panel with a Meynell V8 shower Control and anAdjustable Shower Fittings Kit Rada PA V8F LL LR stainless Rada PA V8FW LL LR white A Rada Shower Panel with a Meynell V8 Shower Control and a separate Adjustable Shower Fittings kit ...

Page 3: ... Panel 1 Decide on a suitable location for the Panel taking into account the height of users of the Shower Important If you are installing a pipe shroud accessory refer to the pipe shroud accessory installation instructions before continuing with the installation of your shower panel 2 Position the Mounting Bracket for the top of the Shower Panel on the wall and mark the position of the holes Note...

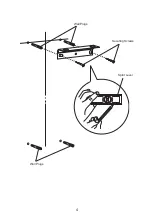
Page 4: ...4 Securing Screws Wall Plugs Spirit Level Wall Plugs ...

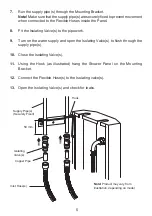
Page 5: ... the water supply and open the Isolating Valve s to flush through the supply pipe s 10 Close the Isolating Valve s 11 Using the Hook as illustrated hang the Shower Panel on the Mounting Bracket 12 Connect the Flexible Hose s to the Isolating valve s 13 Open the Isolating Valve s and check for leaks Note Product may vary from illustration depending on model Supply Pipe s Securely Fixed Inlet Hose s...

Page 6: ... Product Manual for instructions 3 The Shower Panel must be earthed by connecting the earth conductor to the Earth Terminal inside the Panel Supplementary bonding within the shower room all accessible conductive parts of electrical equipment and extraneous conductive parts metal parts that are likely to introduce earth potential must be electrically bonded to earth using a minimum cable size of 4 ...

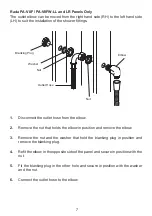
Page 7: ...the nut that holds the elbow in position and remove the elbow 3 Remove the nut and the washer that hold the blanking plug in position and remove the blanking plug 4 Refit the elbow in the opposite side of the panel and secure in position with the nut 5 Fit the blanking plug in the other hole and secure in position with the washer and the nut 6 Connect the outlet hose to the elbow Blanking Plug Out...

Page 8: ...V8F PA V8FW LL and LR Panels Only Install the Shower Fittings The slide bar should be fixed to the wall to one side of the shower panel at an appropriate height It should be positioned so that the handset discharges across the opening of any shower cubicle and should be directed away from the shower panel Note The clamp bracket assembly is pre assembled to the slide bar and should not need to be r...

Page 9: ...ace wall fixings not supplied 5 Secure the slide bar assembly to the wall 6 Fit the end covers over the end supports making sure that they locate correctly 7 Attach the hose to the handset Make sure that the hose washer is fitted Do not overtighten 8 Place the handset in the clamp bracket 9 Attach the hose to the outlet of the shower panel Make sure that the hose washer is fitted Do not overtighte...

Page 10: ...nctional order Cleaning Many household cleaners contain abrasive and chemical substances and should not be used for cleaning plated or plastic fittings These finishes should be cleaned with a mild washing up detergent or soap solution and then wiped dry using a soft cloth MAINTENANCE ACCESSORIES Various Pipe Shroud accessories are available for concealing the inlet pipe s to the top of your Shower...

Page 11: ...PA 215TFW 1613 020 Hose Inlets to Shower Control 1613 050 Hose Outlet to Showerhead Rada PA V8F PA V8FW LL LR 1613 020 Hose Inlets to Shower Control 1613 022 Hose Outlet to Showerhead 1613 035 Riser Rail 1613 036 Handset Holder 1603 137 Hose 1613 086 Elbow 1613 110 Blanking Plug and Nut 1703 351 Handset Rada PA V8VR2 PA V8VR2W 1613 020 Hose Inlets to Shower Control 1613 145 Hose Outlet to Showerhe...

Page 12: ...or electrical supply waste and isolation issues Compensation for loss of use of the product or consequential or indirect loss of any kind Damage or defects caused if the product is repaired or modified by persons not authorised by us or our appointed representative Routine maintenance or replacement parts to comply with the requirements of the TMV2 or TMV3 healthcare schemes Accidental or wilful d...

Reviews: