background image

-4-

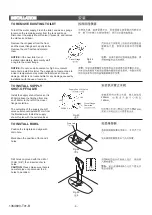
TO REMOVE EXISTING TOILET

Turn off the water supply. Flush the toilet, and use a sponge
to remove the remaining water from the tank and bowl.
Disconnect the supply shut-off valve (if present), and remove
the old tank and bowl.

(

)

INSTALLATION

Fig.#2

2

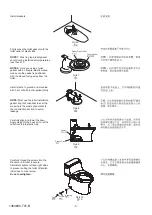
Remove the old gasket from the floor
and the closet flange with a putty knife.
Remove the old T-bolts and discard
them.

if the new toilet is not

installed immediately, temporarily stuff
a rag into the closet flange.

NOTICE:

T

NOTICE:

Do not use white cement or high lime content

cements to install this toilet. The expansion of cement due to
a rise in temperature may make the toilet crack or cause
damage. Kohler is not responsible for any damage caused by
installation with the use of cement.

Closet Flange

mm

67mm;

200mm
160

Fig.#3

3

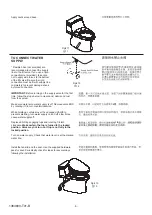
TO INSTALL SUPPLY
SHUT-OFF VALVE

Install the supply shut-off valve so it is
200mm above the finished floor line,
and 160mm to the left of the closet
flange centerline.

The centerline of the supply shut-off
valve outlet should extend 67mm from
the finished wall. Install the supply
shut-off valve with the outlet vertical.

Supply Shut-Off Valve

Closet Flange
Centerline

160

305/400

200

TO INSTALL BOWL

Position the template and align with
drain hole.

Mark down the position of foot and 5
holes.

Fig.#4

4

Fig.#5

5

Drain Hole

3/8

10mm

10mm

5

Drill holes on ground with the drill of
10mm (3/8"), then insert anchor to
holes.

CAUTION:

Please make sure there is

no water pipe or spool under the 5
holes to be drilled.

1364890-T01-B

Summary of Contents for SAN SOUCI K-21865T-HC

Page 1: ...eserves the right to make changes in product characteristics packaging or availability at any time without notice These instructions contain important care cleaning and warranty information please leave instructions for the consumer ORDERING INFORMATION SAN SOUCI C3 150 Skirted 1PC 305mm W O Seat K 21865T HC ISAN SOUCI C3 150 Skirted 1PC 400mm W O Seat K 20972T HC C3 150 305mm K 21865T HC C3 150 4...

Page 2: ...m 400mm 1 305mm 400mm 1 4 ASME A112 19 2 2018 GB 25502 2017 1 TOOLS AND MATERIALS REQUIRED Not supplied 254mm 10 adjustable wrench 305mm 12 pipe wrench Metal file file cut Tape measure Tubing cutter Level Hacksaw Putty knife Screwdriver Toilet gasket wax seal Toilet T bolts 2 8mm 5 16 diameter Toilet supply shut off valve 10mm 3 8 recommended Hose Pipe If the existing toilet does not have a supply...

Page 3: ...Fig 1 1 K 20972T HC Kohler reserves the right to change marked dimensions without prior notice Finished Wall 3 FRONT OF BOWL FRONT OF BOWL OF OUTLET C L 698 140 417 417 619 619 200 200 160 160 395 305 305 400 OF OUTLET C L 698 140 395 305 1364890 T01 B ...

Page 4: ...age Kohler is not responsible for any damage caused by installation with the use of cement Closet Flange mm 67mm 200mm 160 Fig 3 3 TO INSTALL SUPPLY SHUT OFF VALVE Install the supply shut off valve so it is 200mm above the finished floor line and 160mm to the left of the closet flange centerline The centerline of the supply shut off valve outlet should extend 67mm from the finished wall Install th...

Page 5: ...lastic to ground and mounted with 3 set of bolts not supplied firmly 3 NOTE Must use the toilet installation gasket ring not supplied to seal the area where the waste pipe contacts the construction section to avoid leakage Fig 6 6 Fig 9 9 Carefully align and lower the bowl Apply weight to the bowl rim to let the outlet insert into plastic trap Outlet Plastic Trap Fig 10 10 Carefully thread the scr...

Page 6: ...top is not fully in the locked position Before turning on the supply valve for the first time follow the steps below to clear sand debris and rust from the system Make sure water sure water supply is off Remove valve END by rotating it 1 8 turn counterclockwise While holding a container over the uncapped VALVE to prevent splashing turn water supply on and off a few times Leave water supply off Rep...

Page 7: ...o high 2 No Flush IMPORTANT Use only genuine Kohler parts as shown to avoid property damage 4 Tank takes excessive time to fill 5 There is excessive noise when the tank is filling 3 The fill valve turns on off by itself without the toilet being flushed or it runs allowing water to enter the tank A Reconnect the chain to the trip lever or flush valve B Adjust the chain assembly to remove excessive ...

Page 8: ...fittings in the tank This damage can cause leakage and property damage Kohler Company shall not be responsible or liable for any damage to these tank fittings caused by the use of cleaners containing chlorine calcium hypochlorite WARNING Risk of property or product damage CAUTION Please do not use hard materials like scouring pad to clean product surface especially the product logo CAUTION Don t u...

Reviews: