background image

7

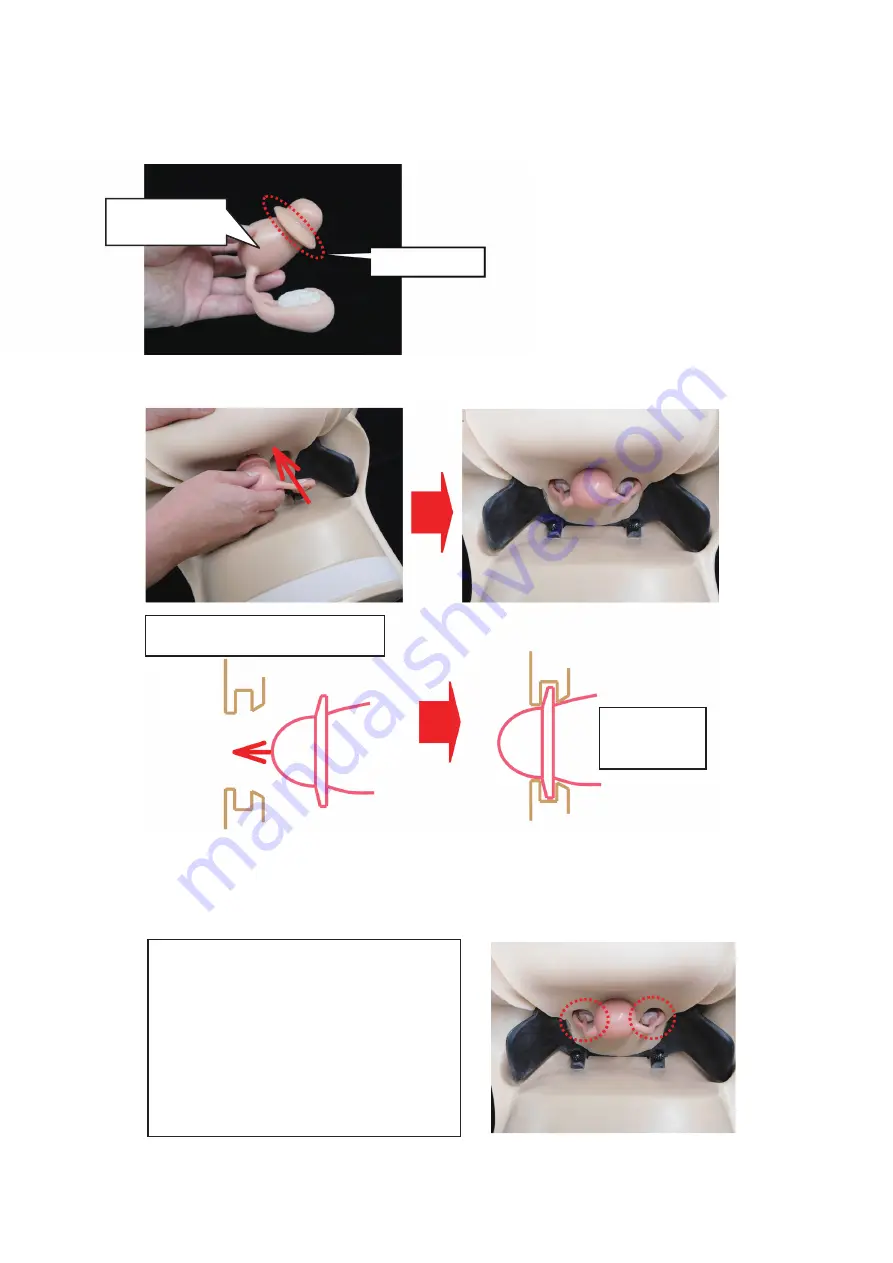
  4.  Apply glycerin to the stopper ring on the uterus

  5.  Insert the uterus into the hole for attaching the uterus.


  *On the inside of the hole for attaching the uterus is a groove into which the stopper ring will 

fit. Insert the uterus so that the stopper ring fits into this groove.

Picture is of the 

normal uterus

Stopper ring

Cross section of the insertion site

Set correctly

Insert the ovaries of the normal uterus into 
their respective compartments as shown 
in the photograph.

*When practicing with a diseased uterus, 
use without inserting the ovaries into their 
compartments.

External

genitals

Uterus

Summary of Contents for LM-110

Page 1: ...Examination Simulator Please read this instruction manual carefully to ensure correct use of the product and store it in a safe place for easy access KOKEN CO LTD 1 4 14 Koraku Bunkyo ku Tokyo 112 0004 JAPAN URL http www kokenmpc co jp E mail customer kokenmpc co jp 2016 2020 KOKEN CO LTD C 1 1026 1 01 04 ...

Page 2: ...lycerin This product does not come with glycerin Please purchase glycerin separately 4 Please do not use oily lubricant baby oil olive oil etc alcohol lubricant and lubricant containing organic solvent These may cause breakage of the model 5 In caring for the model do not use rubbing alcohol thinners or benzin or other organic solvents on the model as doing so may cause damage 6 Never draw on the ...

Page 3: ...ay from direct sunlight and UV 12 Please wear disposable gloves during a practical 13 Please beware that the ovarian cysts and the hydrosalpinx may rupture if pumped with too much air 14 This product is intended for use in standard operating environments Do not use it in heavy industrial settings 15 This model uses urethane foam for some of its parts and may be susceptible to damage from pests tha...

Page 4: ...eristics 2 Structure and components 3 Handling instructions 3 1 Instructions for use 3 2 Adjustment of ovarian cysts and hydrosalpinx 3 3 Possible examinations and procedures 3 4 Removal of the genital unit 4 Care instructions 5 Specifications ...

Page 5: ...product to recreate realistic examination of conditions such as cervical motion tenderness 3 Internal reproductive organs such as the uterus and ovaries have normal and abnormal states and the examination of their respective disease states intramuscularis hysteromyoma subserous myoma ovarian cyst hydrosalpinx etc can be practiced by changing the uterus The uterus can be changed easily 4 The size o...

Page 6: ...mal uterus 1 Early pregnancy uterus 1 Hysteromyoma 1 in tunica muscularis 1 Hysteromyoma 2 under endometrium 1 Ovarian cyst 1 ping pong ball size 1 Ovarian cyst 2 tennis ball size 1 Hydrosalpinx 1 Air pump 1 Storage case 1 Abdominal wall protective sheet 1 Baby powder 1 Instruction Manual this document 1 ...

Page 7: ...ective sheet from the storage case and take out the main body If the genital unit feels sticky apply the enclosed baby powder over the entire surface 2 Peel open the abdominal wall 3 Apply glycerin to the hole for attaching the uterus 6 6 6 Storage case Abdominal wall protective sheet ...

Page 8: ... ring will fit Insert the uterus so that the stopper ring fits into this groove Picture is of the normal uterus Stopper ring Cross section of the insertion site Set correctly Insert the ovaries of the normal uterus into their respective compartments as shown in the photograph When practicing with a diseased uterus use without inserting the ovaries into their compartments External genitals Uterus ...

Page 9: ...d hydrosalpinx The size of the ovarian cysts and the hydrosalpinx can be adjusted by injecting air with the air pump 1 Insert the ovarian cyst or hydrosalpinx uterus into the hole for attaching the uterus and attach the air pump connector to the straight stopcock If the abdominal wall around the ilium is not aligned properly adjust to align it The straight stopcock is combined with a luer lock sty...

Page 10: ...r pump valve to release the air Beware that pumping in too much air may cause the uterus to rupture 3 Once the amount of air has been adjusted close the handle on the straight stopcock and detach the air pump connector 4 Lay the straight stopcock on the underside of the uterus so it does not get in the way of the examination Close Open Close Detach ...

Page 11: ...10 5 Cover the main body with the abdominal wall and secure it with the hook and loop fasteners ...

Page 12: ...e the conditions of a normal uterus or uteri of various abnormal states Internal examination Bimanual examination Rectal examination Vaginoscopy Probing Collection of intimal smears Before a practical apply glycerin to the genitals vaginal cavity and rectum of the model before use If using an endoscope for vaginoscopy apply glycerin to the endoscope before use as well ...

Page 13: ...eplace the unit for instance if the genital part has split unscrew the fixing screws in 2 locations and unfasten the hook and loop fasteners around the leg in 2 locations to remove it Perform these procedures in reverse to assemble Peel off while holding the faster on the unit side ...

Page 14: ...cold or very hot environment The materials may also deteriorate warp or discolor if exposed to direct sunlight or UV When storing this product store the model in an environment with a temperature of 0 C to 50 C away from direct sunlight and UV 3 This model may release oil residues When storing this product wrap the model in the attached abdominal wall protective sheet and store in the storage case...

Reviews:

Related manuals for LM-110