background image

1.

2.

3.

3.

2

1

1.

2.

5.

5

3

4

3.

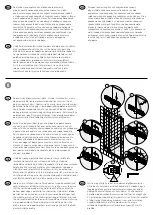
Nałóż uszczelkę magnetyczną. W celu łatwiejszego montażu najpierw 
posmaruj krawędź wodą z mydłem. Nałóż uszczelkę dolną na drzwi tak, 
aby jej koniec był równo z uszczelką magnetyczną. Przykręć uchwyt 
drzwiowy.

Монтирайте магнитното уплътнение

Навлажнете ръба с воден 

разтвор на сапун

за да улесните монтажа на уплътнението

Поставете долното уплътнение върху вратата

за да го подравните 

с магнитното уплътнение

Монтирайте дръжката на вратата

.

Nasaďte magnetickou těsnící lištu na dveře. Předtím navlhčete okraj
skla mýdlovým roztokem, montáž magnetické těsnící lišty se tím
usnadní. Spodní těsnící lištu nasaďte na dolní okraj dveří a zarovnejte ji
s magnetickou těsnící lištou. Připevněte na dveře madlo.

Slide on the magnetic stripping. Moisten the edge with soap water
solution to make installation of stripping easier. Place the bottom
stripping onto the door to align it with magnetic stripping. Attach the
door grip.

Helyezze fel a mágneses csíkot. Könnyebb lesz felhelyezni a csíkot, ha az
üveg szélét megnedvesíti szappanos vízzel. Helyezze az alsó zárócsíkot
az ajtóra, és igazítsa a mágneses csíkhoz. Szerelje fel az ajtófogantyút.

Glisaţi benzile magnetice. Umeziţi marginea cu o soluţie de apă şi
săpun pentru a facilita instalarea curelelor. Amplasaţi cureaua inferioară
pe uşă pentru a o alinia cu banda magnetică. Ataşaţi mânerul uşii.

Наложите магнитный уплотнитель

Для упрощения монтажа

прежде

всего

смажьте край водой с мылом

Наложите нижний уплотнитель

на дверь так

чтобы его конец равнялся с магнитным уплотнителем

.

Прикрутите дверную ручку

.

Nasaďte magnetickú tesniacu lištu na dvere. Predtým
navlhčite okraj skla mydlovým roztokom, montáž magnetickej
tesniacej lišty sa tým zjednoduší. Spodnú tesniacu lištu
nasaďte na dolný okraj dverí a zarovnajte ju s magnetickou
tesniacou lištou. Pripevnite na dvere držadlo.

Накладіть магнітний ущільнювач

Для полегшення монтажу

,

перш за все

змастіть край водою з милом

Накладіть

нижній ущільнювач на двері так

щоб його кінець рівнявся

з магнітним ущільнювачем

Прикрутіть дверну ручку

.

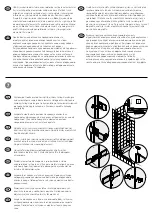
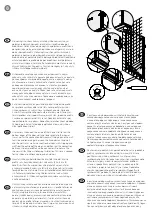
Nałóż dolną zaślepke zawiasu i nasmaruj wewnętrzne
części zawiasów przykręconych do elementu stałego drzwi,
a następnie zamocuj drzwi łącząc ze sobą elementy zawiasów.
Upewnij się, że magnesy w uszczelkach (drzwiowej i ścianki)
łączą się ze sobą.

Пъхнете долния покриващ елемент на пантите и смажете
вътрешността на пантите, прикрепени към фиксирания
елемент на вратата, после монтирайте вратите, като
скрепите елементите на пантите един към друг. Уверете
се, че магнитите в уплътнението (на вратата и на стената)
образуват контакт.

Nasaďte spodní krytky závěsů a promažte vnitřní části závěsů,
které jsou připojeny k pevnému dílu dveří. Poté nasaďte dveře
na závěsy pevného dílu dveří. Dbejte na to, aby se magnety,
které jsou uvnitř těsnících lišt, vzájemně dotýkaly.

Slide on the hinge lower covering element and lubricate the 
internal parts of hinges attached to the fixed door element 
and next install the doors by attaching hinge elements to each 
other. Ensure that magnets inside the stripping (door and wall) 
contact each other.

Helyezze fel az alsó zsanér fedőlapját, és kenőanyaggal kenje 
meg az ajtó fix részén lévő zsanérokat, majd szerelje fel az ajtót a 
zsanérok összeillesztésével. Ellenőrizze, hogy az ajtón és az 
oldalfalon lévő mágnesek megfelelően összeérnek-e.

Smar

Смазка

Mazací tuk

Grease

Kenőanyag

Grăsime

Смазка

Mazadlo

Мастило

Summary of Contents for NEXT HDRF 100

Page 1: ...de dou persoane Odpor ame aby mont sprchovacieho k ta vykon vali dve osoby Drzwi wn kowe drzwi do czenia ze ciank sta Instrukcja monta u K dlov dve e do niky dve e pro kombinaci s pevnou bo n st nou N...

Page 2: ...csok Ne haszn ljon s rol hat s tiszt t szereket Azuhanykabin tiszt t s hoz k m l hat s foly kony tiszt t szer haszn lat t javasoljuk Tov bbi inform ci kat tal l a garanciajegyen SK Pros me pre tajte s...

Page 3: ...v right jobbos dreapta prav lewa lev left balos stinga av 50 50 16 14 18 13 17 20 20 Z Y T 19 41 6 7 8 30 28 24 23 5 5 5 5 10 4 22 2 2 2 2 22 4 16 14 18 13 17 20 20 Z Y T 19 41 6 7 8 30 28 24 23 5 5 5...

Page 4: ...ent onto the wall in such a manner that the glass edge is located 15 mm 5 mm when the shower tray will be built in tiles from the shower tray edge level the element and mark the places for drilling of...

Page 5: ...lastikowy pro l uszczelniaj cy i wsu w niego pasek magnetyczny Nasu te na spodn podlahov pro l spojku pro lu pro spojen s pevnou bo n st nou zasu te tento pro l do spojky pro lu kter je namontov na na...

Page 6: ...Ata a i m nerul u ii Nasa te magnetick tesniacu li tu na dvere Predt m navlh ite okraj skla mydlov m roztokom mont magnetickej tesniacej li ty sa t m zjednodu Spodn tesniacu li tu nasa te na doln okra...

Page 7: ...tallation screws of xed element support brackets and adjust placement of shower stall elements in such a way as to ensure that the vertical door edges are parallel to each other and that the bottom do...

Page 8: ...k the mounting screws of the xed element support brackets and slide the wall pro le located on shower stall xed element to the wall using e g a wooden block If xed element glass needs to be slid in th...

Page 9: ...j zdi nasu te mont n prvek pro upevn n ke zdi Do mont n ho prvku pro upevn n na pevnou bo n st nu vlo te ochrannou podlo ku a potom tento prvek nasa te na rameno Rameno nasa te na pevnou bo n st nu v...

Page 10: ...n the wall place wall anchors in them and screw the wall support bracket in using type B screws H zza ki a tart pro lt az oldalfal tart elem b l H zza meg az oldalfal tart elem nek csavarj t Illessze...

Page 11: ...onsolei de sus inere n locurile n care se a ori ciile din elementul de xare a consolei de sus inere i apoi xa i cu uruburi de blocare de tip D D D 1 4 5 2 3 5 6 6 5 1 5 1 5 5 5 1 5 1 5 5 D D Upevnite...

Page 12: ...als l t az als pro l s a zuhanyt lca k z tti r st T m tse az oldals s als leket a x elem az oldalfal s a zuhanyt lca k z tt valamint a az als pro l s a zuhanyt lca k z tti r st k v lr l Tov bb t m ts...

Page 13: ...oisten the glass edge with a soap water solution to make installation of stripping easier Azokn l a zuhanykabinokn l amelyek ker miat lc ra vannak p tve a PVC cs kot a x elem al kell helyezni Helyezze...

Page 14: ...protective strip on the glued surface and attach the stripping to the wall Csatlakoztassa az sszek t elemet pro l fal fel li v g hez majd csatlakoztassa a pro lt az ajt x r sze fel li sszek t elemhez...

Page 15: ...om mont magnetickej tesniacej li ty sa t m zjednodu Spodn tesniacu li tu nasa te na doln okraj dver a zarovnajte ju s magnetickou tesniacou li tou Pripevnite na dvere dr adlo Na doln za lepke zawiasu...

Page 16: ...ical door edges are parallel to each other and that the bottom door edge is parallel to the shower tray This way you can adjust the wall position Adjustment of door position can be carried out in a si...

Page 17: ...manner on door hinges Lock the mounting screws of the xed element support brackets and slide the wall pro le located on shower stall xed element to the wall using e g a wooden block If xed element gl...

Page 18: ...torn mu a vonkaj iemu povrchu N sledne pripojte diely zakr vaj ce mont ne skrutky z vesov dver Sl bi i uruburile de instalare a consolelor de sus inere a elementului x i ajusta i pozi ia elementelor...

Page 19: ...ween the lower pro le and the connectors Do not use the shower stall for 24 hours following installation This time is needed for the silicone to achieve appropriate hardness Szaniter szilikonnal bel l...

Page 20: ...ezov oceli A Lze istit ANO Odoln v i n razu a rozbit ANO St lost vlastnost ANO Product description Shower stalls are designed for mounting on shower trays doors are designed for mounting in alcoves an...

Reviews: