background image

7


© 2020 Kolpin Outdoors Inc.


REV 00


RANCHER / FOREMAN / RUBICON WINCH          
INSTALLATION (continued):


8.


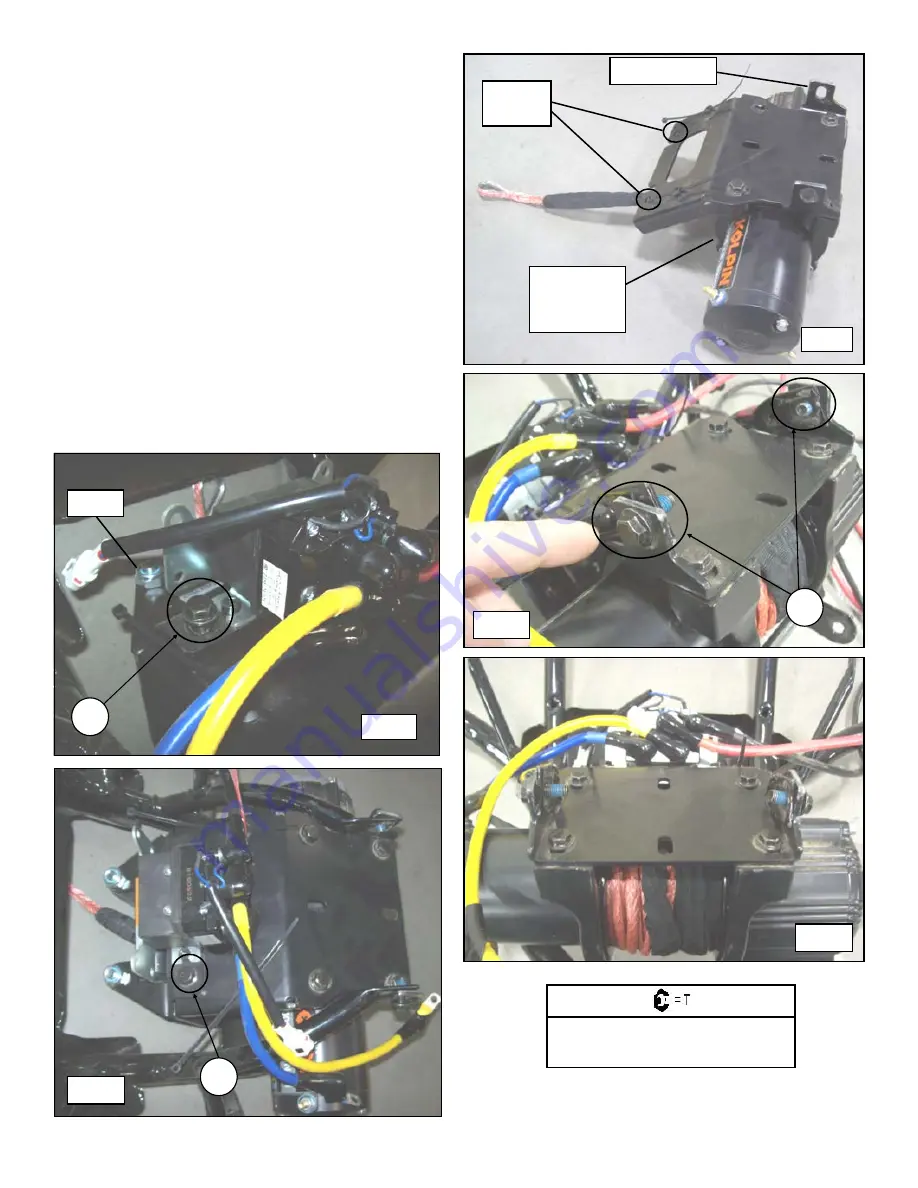
Mount winch to winch bracket (item #1) as shown using 
hardware from winch kit. Unspool a short portion of the 
cable from the winch mount sub

-

assembly as shown. 

(See illustration 1

-

9).


9.


Position the winch/mount sub

-

assembly into the bumper 

and align into the roller bracket (item #2) as shown. 
Align the rear upper tabs of winch/mount sub

-

assembly 

into the bumper and temporarily insert M8 bolts (item 
#3) into the holes, this will help keep the mounts aligned 
into the bumper. (See illustrations 1

-

9, 1

-

10, 1

-

11 and   

1

-

12).


10.


Fasten the winch/mount sub

-

assembly to the roller/

contactor sub

-

assembly using the M8 bolts (item #3)    

inserted into the thread holes as shown. Tighten to M8 
specification. (See illustrations 1

-

11, 1

-

12 and 1

-

13).


Ill. 1

-

9


Ill. 1

-

10


Ill. 1

-

12


8MM FASTENER TORQUE:


17 ft. lbs. (23 Nm)


Ill. 1

-

11


Winch (use 
hardware 
from winch 

3


Threaded 
holes


Ill. 1

-

13


3


Roller


3


Upper rear tabs


Summary of Contents for 25-1270

Page 1: ...1270 ASSEMBLY OWNERS MANUAL Application WINCH KIT NO 25 9xxx Before you begin please read these instructions and check to be sure all parts and tools are accounted for The following instructions cont...

Page 2: ...hardware may be designed to collapse or break when the equipment is over stressed Kolpin winch mount kits are designed to be compatible with Kolpin and Cycle Country winches along with many others but...

Page 3: ...REV 00 Kit Contents Item Qty Part Description Part Number 1 1 Winch Mount Bracket 2 1 Roller Bumper Mount Bracket 3 6 Hex Bolt Zinc Plated M8 1 25 x 20mm 4 2 Locknut Zinc Plated M8 1 25 5 1 Instructi...

Page 4: ...sts To facilitate installation make sure that your vehicle is clean and free of debris All directions referring to right and left are when the rider is sitting on the machine TOOLS REQUIRED Metric wre...

Page 5: ...bumper tubing from the vehicle as shown by removing the eight OEM fasteners two on front rack two secure plastic center grille and four attach frame tubing to vehicle main chassis Retain bolts for us...

Page 6: ...item 3 and M8 locknuts item 4 Using the hardware provided with winch kit install the roller fairlead included with winch kit onto the roller mount bracket See illustrations 1 6 1 7 and 1 8 Note conta...

Page 7: ...the rear upper tabs of winch mount sub assembly into the bumper and temporarily insert M8 bolts item 3 into the holes this will help keep the mounts aligned into the bumper See illustrations 1 9 1 10...

Page 8: ...Install front bumper winch assembly onto the vehicle frame using the longer M8 bolts item 3 for the two upper bumper locations as shown Re install the lower OEM M8 screws and OEM M6 shoulder screws Re...

Page 9: ...cal cables and components for the winch system 15 Secure all harnesses using cable ties provided with winch kit to prevent contact with hot components sharp edges or moving parts 16 Reconnect red posi...

Page 10: ...by accident alteration abuse improper maintenance normal wear or other causes beyond the manufacturer s control In order to protect you and your ATV certain parts of the accessory system and or hardwa...

Reviews: