Instr 26-3200; 26-3210
Rev 01 2020-11
Page 11 of 17
WINCH INSTALLATION
2013–2021 SPORTSMAN 850/1000 MODELS
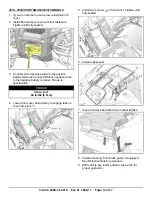
1. Make sure wire routing and connections are as
shown and make necessary adjustments.
2. Put red and black wires through the opening
where the winch will go. Move winch onto radiator
mount.
IMPORTANT
Check all wires are free to move, not pinched
between vehicle chassis and winch assembly.
3. Install two screws
y
on each side to attach winch.
Torque to specification.
TORQUE
Winch Mounting Screws
y
:
17 ft-lbs (23 N·m)
4. Put red (positive) and black (negative) power
cables to battery area.
IMPORTANT
Do not connect winch cables to battery at this time.
5. Attach cables to chassis frame with cable tie
r
.
6.
For 2015 and Newer Vehicles:
Locate white
contactor connector on frame tube behind front left
tire. Remove cap from main harness connector
and connect to white contactor winch connection.
7.
For 2014 and Older Vehicles:
Put SPMN winch
harness
w
from head light pod down to winch,
using same path behind radiator as the power
cables. Connect white harness connector to winch
contactor connector. Put red end of harness to
busbar area and connect to orange wire on vehicle
main harness.
HANDLEBAR SWITCH INSTALLATION
ALL MODELS
1. Install handlebar switch front
3.2
and switch rear
3.3
to handlebar with two screws
3.4
Torque to
specification.
NOTICE
Handlebar switch fits in between the main controls
and the brake mount.
TORQUE
Handlebar Screw
3.4
:
24 in-lbs (2.7 N·m)


