background image

11 


FIG-02. Vehicle Inspection


FRONT BRAKE ADJUSTMANT 

The front brake has two cables to control right and 

left side brake simultaneously. 

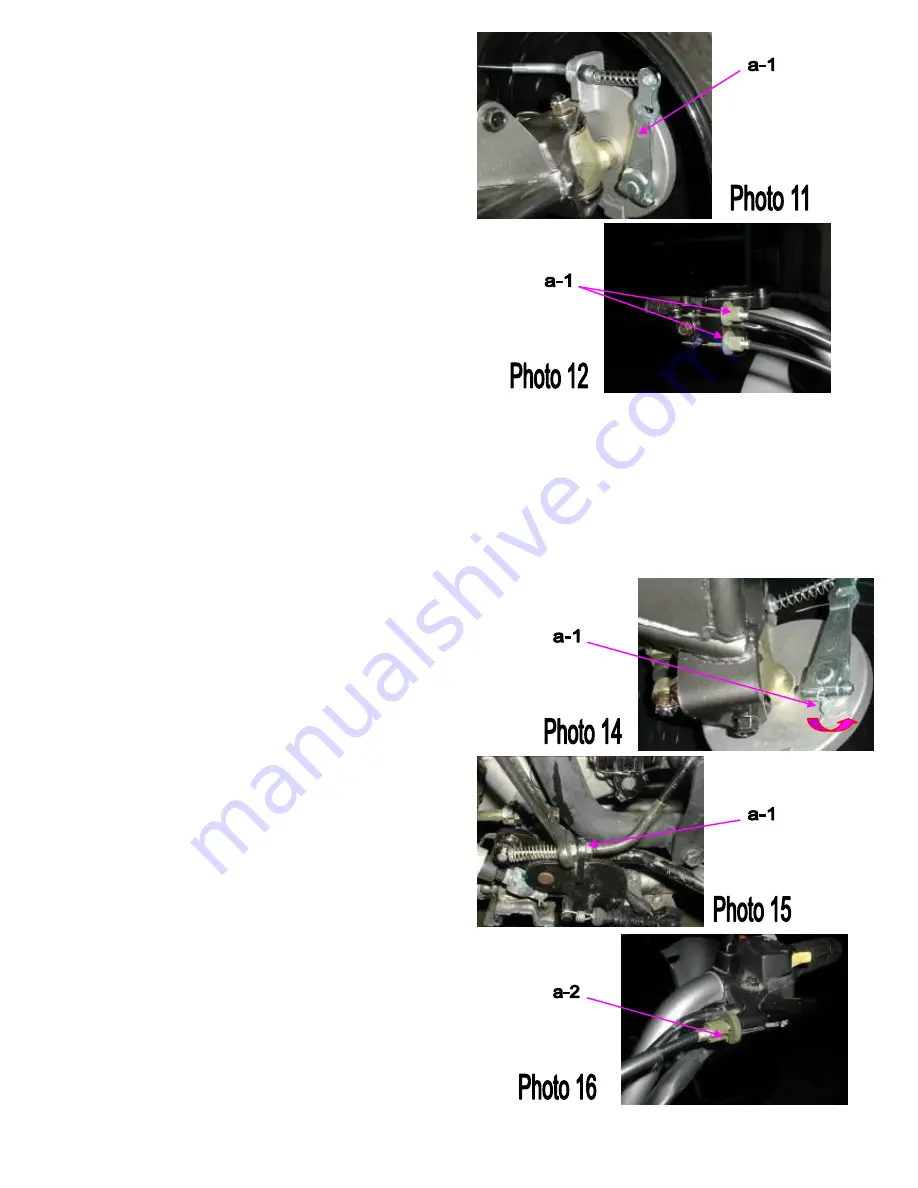
You could adjust the gap of the front brake (a-1). 

(Photo 11) 


Loosen the fix nut (a-1) and adjust the position of cable 

to proper situation. 

(Photo 12) 


Inspect the front brake lever and cable for excessive 

play or other damage. 

Replace or repair if necessary. 

Measure the free play of the brake lever at the end of 

the lever. The standard is 10~20 mm. 

Adjust the free play of the front brake lever by turning 

the adjuster on the brake lever assembly. 


The brake shoe uses an arrowhead on the front brake 

plate to indicate pad condition. 

When the arrowhead is beyond the wear limits shown, 

the brake shoes need to be changed. (a-1) 

(Photo 14) 


REAR BRAKE ADJUSTMENT


Install the rear brake cable fixing nut set & adjust the 

brake cable. 

1. Spin the gap adjuster on the left lever to the shortest 

position. (a-1)   

2. Adjust the adjusting screw and keep the gap within 

2-3 mm. (a-2) 

(Photo 15,16) 


Summary of Contents for 180??

Page 1: ...Kolpin Powersports 180cc Service Manual...

Page 2: ...BAR 24 FIG 08 ENGINE REMOVAL 26 FIG 09 TIRE AND RIM 27 FIG 10 FRONT BRAKE 28 FIG 11 REAR BRAKE 30 FIG 12 SUSPENSION 32 FIG 13 SUSPENSION ARM KNUCKLE 33 FIG 14 REAR AXLE ASS Y 34 FIG 15 STEERING SHAFT...

Page 3: ...area thoroughly with water If you get the electrolyte in your eyes flush with water and contact a doctor immediately HOT PARTS Engine and exhaust pipe become very hot and remain hot for one hour afte...

Page 4: ...ARTING Electric Kick back up LUBRICATE Forced pressure and wet sump LUBR CAPABILITY 1 Liter TRANSMISSION Automatic C V T V belt system SUSPENSION FRONT Single A Arm REAR Single Swing Arm BRAKE FRONT D...

Page 5: ...3 FIG 01 INFORMATION SERIAL NUMBER The frame serial number is stamped on the front frame The engine number is stamped under the crankcase...

Page 6: ...Rear axle nut Rear wheel bolt Exhaust muffler mounting bolt Engine hanger bolt Rear axle holder bolt Swing arm pivot nut Rear shock absorber mounting nut 5 N m 3 5 lbs ft 10 N m 7 2 lbs ft 22 N m 16 l...

Page 7: ...5...

Page 8: ...ake lever free play Drive chain slack Front rear tire size Front rear tire pressure Toe in TORQUE VALUES Spark plug Tie rod lock nut ENGINE OIL Viscosity GEAR LUBRICATION OIL Viscosity 0 6 0 7mm NGK C...

Page 9: ...Service First 30 hours Every 100 hours Every 200 hours Every 300 hours ENGINE OIL R R GEAR OIL R R FUEL FILTER R AIR VLEAN FILTER R ENGINE OIL FILTER C CARBURETOR I SPARK PLUG C VALVE GAP A IGNITION...

Page 10: ...the throttle cable at the upper end Lubricate the cable with commercially lubricant to prevent premature wear Photo 2 THROTTLE CABLE ADJUSTMENT Slide the rubber cap of the adjuster off the throttle ho...

Page 11: ...by carefully bending the side electrode 6 Check the sealing washer and replace with a new one if damaged 7 With the sealing washer attached thread the spark plug in by hand to prevent cross threading...

Page 12: ...g nut Tighten the axle holder lock nut a 1 Torque 90N m 65 Ft lbs Photo 9 When the drive chain becomes very dirty it should be removed cleaned and lubricated with the specified lubricant 1 Clean the d...

Page 13: ...free play of the brake lever at the end of the lever The standard is 10 20 mm Adjust the free play of the front brake lever by turning the adjuster on the brake lever assembly The brake shoe uses an a...

Page 14: ...19 NOTICE Do not over adjust it might result in the brake pump malfunction and cause the brake to activate 1 Remove any air in the brake line to prevent the brake from losing power a 1 2 Open the bra...

Page 15: ...AKE FLUID REFILLING METHOD 1 Remove the oil tank cover a 1 2 Refill with the recommended DOT 3 brake fluid until the level reaches the upper limit Photo 22 CAUTION Be careful when filling the brake oi...

Page 16: ...N 1 Check the rear suspension for proper spring preload a 1 Inspect the shock for oil leakage if any is present replace shock 2 Check the welding of frame bracket that connects with rear shock and the...

Page 17: ...oval a 1 Photo 28 Torque steering shaft holder bolt 33N m 24 Ft lbs TOE IN Park the vehicle on level ground with the front wheels facing straight ahead Mark the centers of the tires to indicate the ax...

Page 18: ...et the dirty oil flow out catching the oil in a proper container for later disposal 2 Reinstall the drain hole bolt and tighten 3 Fill with new gear oil through the oil fill hole located on the engine...

Page 19: ...17 0 6 0 7 mm...

Page 20: ...REAR SUSPENSION 17 SEAT 18 TAIL LIGHT ASS Y 19 REVERSE LIGHTS 20 REFLECTOR 21 REAR METAL RACK 22 TRAILER HITCH MOUNT 01 HANDLE BAR COVER 02 FRONT FENDER CARRIERS 03 HEAD LIGHT ASS Y 04 POSITION LIGHT...

Page 21: ...RACK Loosen the bolts a 1 and Remove the front metal rack a 2 from the frame body Photo 2 REAR METAL RACK Loosen the screws a 1 Loosen the bolts a 3 Remove the rear rack bracket a 2 Loosen the bolts a...

Page 22: ...nnect with the lights wire a 3 Remove the license plate a 4 Photo 6 SEAT ASS Y Pull the Seat Release Bar to take off the seat a 1 This seat release bar is under the right side of the rear fender Remov...

Page 23: ...21 FIG 04 Fender FOOTREST Loosen the bolts a 1 Remove the footrest ass y a 2 Photo 10 Note Refer to the preceding disassembly instructions for re assembly...

Page 24: ...um shut off a 4 Remove the fuel tube a 5 with the fuel filter ass y a 6 Remove the air tube a 7 Remove the fuel tank a 8 leave the frame body Photo 11 12 CAUTION 1 There are rubbers on the frame body...

Page 25: ...CAUTION 1 The muffler is hot during operation 2 Do not touch the muffler or the heat shields 3 Please check the gasket of muffler before mounting the muffler Loosen the bolts a 1 of the muffler a 2 on...

Page 26: ...connect with the head light wire Photo 15 Remove the fuel gauge ass y a 1 Loosen the nut remove the neutral indicator a 2 Loosen the nut remove the reverse indicator a 3 Remove the main switch clip an...

Page 27: ...in the throttle box 2 There is a park brake on the R level 3 It is design for safety assurance When the vehicle stopped on the slope ground please operate the park brake MANUAL CHOKE WIRE Remove the m...

Page 28: ...fork link a 4 Photo 24 RADIATOR Loosen the bolts a 1 on the frame body Loosen the bolts a 2 on the oil hose outlet Remove the radiator a 3 Photo 25 WIRE Take off the main wire connect with the generat...

Page 29: ...R WHEELASS Y Take off the rubber cap a 1 and cotter pin a 2 Loosen the insert lock nut a 3 Remove the washer a 4 and plain washer a 5 Photo 31 32 REAR WHEELASS Y Loosen the nylon insert lock nuts a 1...

Page 30: ...28 FIG 10 Front Brake BRAKE SYSTEM Brake Parts Location...

Page 31: ...TION 1 Brake pads must be changed when the friction material is worn out see indicator on brake face 2 Assemble the front brake plate ass y on the knuckle with the fixed position FRONT BRAKE DRUM Ther...

Page 32: ...changed to a new set a 1 Photo 38 Loosen the bolts a 1 Remove the caliper ass y a 2 Loosen the bolts a 3 on the caliper Remove the brake pad kit a 4 Photo 39 CAUTION 1 When changing the brake pad kit...

Page 33: ...a 3 Remove the wave washer a 4 Photo 43 HYDRAULIC CYLINDER LEVER Loosen the bolts a 1 Remove the master cylinder a 2 Remove the hydraulic cylinder lever a 3 Remove the hydraulic parallel pin a 4 Remov...

Page 34: ...f the 50cc 100cc can be adjusted to the proper damper according driver s preference REAR SUSPENSION The rear suspension is mounted on the frame a 1 and swing arm sub ass y a 2 Loosen the bolts a 3 Rem...

Page 35: ...the suspension a 2 Loosen the bolts a 3 and nuts a 4 with the frame body a 5 Photo 51 CAUTION 1 The suspension arm marked R is for the right side 2 The suspension arm marked L is for the left side 3 T...

Page 36: ...to 53 REAR AXLE FIX SEAT ASS Y Loosen the bolts a 1 Remove the rear axle fix seat ass y a 2 Remove the adjuster chain a 3 and nuts a 4 Photo 54 SWING ARM SUB ASS Y Loosen the bolts a 1 and nut a 2 Rem...

Page 37: ...n the steering shaft oil seal Take off the cotter pin a 1 Loosen the nut a 2 Remove the steering tie rod ass y a 3 Take off the cotter pin a 4 Loosen the nut a 5 Remove the steering shaft ass y a 6 Ph...

Page 38: ...36 FIG 16 Frame Comp FRAME COMP Take off the o ring a 1 Remove the steering bearing seat a 2 Photo 58 Note Refer to the preceding disassembly instructions for re assembly...

Page 39: ...specifications is 12V 20W TAIL LIGHT ASS Y Loosen the screws a 1 Remove the tail light cover a 2 Photo 61 CAUTION 1 When change the bulb only loosen the screws and then open the cover 2 The tail ligh...

Page 40: ...38 0 6 0 7 mm...

Page 41: ...ust muffler Disconnect the carburetor cable by unscrewing two screws on top of the carburetor Disconnect the wire connectors There are three connectors for carburetor auto choke starter motor and gene...

Page 42: ...ations OIL PUMP STANDARD Cover to rotor clearance Rotor tip clearance End clearance TORQUE VALUE Oil Drain Bolt TROUBLE SHOOTING Oil level too low high oil consumption Normal oil consumption External...

Page 43: ...he engine on the level plane Check the oil level with the oil level gauge but do not screw it in when making this check a 1 Photo 1 OIL LEVEL GAUGE Add the recommended oil up to the upper level if the...

Page 44: ...a new oil filter screen and spring then install the cap Photo 4 Install a new oil filter screen and spring then install the cap Install the oil drain bolt with sealing washer TORQUE 20 30 n m 2 0 3 0...

Page 45: ...osition a 2 Photo 7 GENERATOR ASS Y Loosen the nut a 1 Use the special tool Remove the generator face flywheel a 2 Loosen the bolts Remove the stator comp Photo 8 RIGHT CRANKCASE COVER Loosen the bolt...

Page 46: ...P Loosen the bolts a 1 Remove the oil separator a 2 Photo 11 Remove the oil pump chain a 1 Remove the oil pump drive a 2 Photo 12 Loosen the bolts a 1 Remove the oil pump ass y a 2 Photo 13 Note Refer...

Page 47: ...SERVICE LIMIT 0 12 mm Install the oil pump shaft and measure the pump clearance Photo 16 SERVICE LIMMIT 0 12 mm Remove the oil pump shaft and measure the pump and clearance Photo 17 SERVICE LIMMIT 0 2...

Page 48: ...ins are in place SPECIFICATIONS TORQUE VALUES Cylinder head bolts Camshaft holder flange nuts Tappet adjusting nut 8 12 n m 0 8 12 kg m 20 24 n m 2 0 2 4 kg m 9 12 n m 0 9 1 2 kg m ITEM STANDARD SERVI...

Page 49: ...valve adjustment Worn or damaged valve seats Burned or bent valve Incorrect valve timing Weak valve spring Cylinder head Leaking or damaged head gasket Warped or cracked cylinder head Faulty cylinder...

Page 50: ...R Relax the cam chain adjuster screw a 1 Remove the screw and O ring and tighten the cam chain adjusting bolt with clockwise direction a 2 Photo 20 CYLINDER HEAD COVER ASS Y Loosen the bolts a 1 Remov...

Page 51: ...arings for wear or damage and replace them if necessary Photo 25 Screw a 5 mm bolt into the rocker arm shaft threaded end and pull on the bolt to remove the shafts and rocker arms Photo 26 Inspect the...

Page 52: ...50 FIG 18 Engine Disassembly CYLINDER HEAD REMOVAL Remove the flange bolts and cylinder head Photo 29 Remove the cylinder head gasket and dowel pins Photo 30 Remove the cam chain guide Photo 31...

Page 53: ...to 35 SERVICE LIMITS Inner 31 2 mm Outer 34 1 mm Inspect each valve stem for turning burning scratches or abnormal wear Check the valve for movement in the guide Photo 36 Measure and record each valve...

Page 54: ...compress the valve springs more than necessary INSTALLATION Install the new gasket and dowel pins Photo 38 Install the cam chain guide Photo 39 Install the cylinder head Photo 40 CAMSHAFT ASS Y INSTA...

Page 55: ...e hole towards the front Photo 43 Install the dowel pins and camshaft holder Tighten the washers and nuts Photo 44 Torque 20 n m 2 0 kg m Adjust the clearance between the rocker arm and valve stem by...

Page 56: ...n m 0 8 1 2 kg m 20 24 n m 2 0 2 4 kg m 9 12 n m 0 9 1 2 kg m ITEM STANDARD SERVICE LIMIT Cylinder I D 52 400 52 410 61 730 61 740 52 50 61 830 Taper 0 10 Out of round 0 10 Warp across top 0 10 Pisto...

Page 57: ...rings Overheating Excessive carbon build up on piston or combustion chamber wall Knocking or abnormal noise Worn piston and cylinder Excessive carbon build up Excessive smoke Worn cylinder piston or p...

Page 58: ...CYLINDER REMOVAL Remove the cylinder head Photo 47 Remove the cylinder Photo 48 Remove the cylinder gasket and dowel pins Photo 49 Clean off any gasket materials from the cylinder surface Photo 50 NO...

Page 59: ...piston Photo 52 Spread each piston ring and remove it by lifting up at a point opposite the gap Photo 53 54 INSPECTION Inspect the cylinder walls for scratches or wear Photo 55 56 Measure and record...

Page 60: ...MITS TOP 0 12 mm SECOND 0 12 mm Inspect the piston for wear or damage Insert each piston ring into the cylinder and measure the ring end gap Photo 59 60 NOTE Push the rings into the cylinder with the...

Page 61: ...ves thoroughly and install the piston ring with the marks facing up NOTE Don t interchange the top and second rings to avoid piston and piston ring damage during installation Space the piston ring end...

Page 62: ...NOTE Be carefully not to damage the gasket surface Install the dowel pins a new gasket Coat the cylinder bore and piston rings with engine oil and install the cylinder Photo 69 70 NOTE Avoid piston r...

Page 63: ...ning Damaged driven face spring Low engine power Worn driven belt Worn weight roller Dirty driven face 55 N m 5 5 kg m 55 N m 5 5 kg m ITEM STANDARD mm SERVICE LIMIT mm Driven the width 19 8 20 2 19 0...

Page 64: ...move the C V T inlet duct Photo 72 Loosen the screws a 1 Remove the air cleaner case a 2 Photo 73 Loosen the bolts a 1 Remove the bolts and LH crankcase cover a 2 Photo 74 Remove the gasket and dowel...

Page 65: ...a 2 Photo 77 Relax the flange nut a 1 Remove the drive pulley ass y and driven belt a 2 Photo 78 Remove the drive face boss a 1 and movable driven face ass y a 2 Photo 79 Remove the ramp plate and we...

Page 66: ...3 SERVICE LIMIT 14 6 16 6 mm Inspect the drive face collar for wear or damage Measure the I D of drive face collar Photo 84 SERVICE LIMIT 24 098 mm Inspect the drive face boss for wear or damage Measu...

Page 67: ...ace ass y and replace them if necessary Photo 89 KICK STARTER DISASSEMBLY Remove the kick starter a 1 Remove the LH crankcase cover a 2 Photo 90 Remove the ex Circle clip and washer from kick starter...

Page 68: ...or damage Photo 93 Inspect the kick starter return spring for fatigue or damage Inspect the kick starter spindle bush for wear of damage Photo 94 Inspect the kick starter gear and spring for wear or...

Page 69: ...67...

Page 70: ...Between alternator and CDI unit Between CDI and engine stop switch Between ignition coil and spark plug Between generator and CDI unit ENGINE STARTS BUT RUNS POORLY IGNITION PRIMARY CIRCUIT Faulty gen...

Page 71: ...seat rear fender and front fender disconnect the exciter coil wire Measure the resistance between the yellow or white or green wire and ground STANDARD 467 700 Battery Electrolyte is poisonous Drink l...

Page 72: ...ltage using a voltmeter Photo 1 VOLTAGE Fully charged 13 1 V Undercharged Below 12 0 V BATTERY REMOVAL Remove the seat and then you can see the battery Disconnect the negative cable and then the posit...

Page 73: ...rter motor may be damaged Troubleshooting Starter motor turns slowly Weak battery Poorly connected starter motor cable Faulty starter motor Poorly connected battery ground cable Starter motor will not...

Page 74: ...72 0 6 0 7 mm...

Page 75: ...Engine does not fire Engine fires but does not start 1 Fuel tank empty 2 Throttle valve jammed 3 Fuel filter jammed Remove the spark plug again Spark plug dry Spark plug wet 1 Spark plug electrode wor...

Page 76: ...re normal Pressure not enough or without pressure 1 Fuel tank empty 2 Throttle valve jammed 3 Fuel filter jammed Check the throttle valve operation Throttle works smoothly Jammed 1 Clean the soot off...

Page 77: ...ndition Trouble Cause Check carburetor air adjust screw Check carburetor gasket seal Adjusted correctly Adjusted incorrectly Tight seal Air leaks 1 Too rich turn screw out 2 Too lean turn screw in 1 C...

Page 78: ...eck for loose spark plug Spark plug dry Spark plug wet 1 C D I no good 2 Generator no good 1 Cylinder piston burn or worn out 2 Cylinder gasket leak air 1 Clean each jammed throttle cable 1 Clean the...

Page 79: ...gh or without pressure Tight seal Air leak 1 C D I no good 2 Generator no good Remove the spark plug and install the spark plug cap to contact with engine Check for spark Spark plug with spark Spark p...

Page 80: ...djust Trouble Condition Trouble Cause Check the ignition timing Check the amount of fuel Normal Not normal Check for jammed carburetor Good No good No Yes 1 C D I no good 2 Generator no good 1 Fuel le...

Page 81: ...rn 5 Final gear broken 6 Gear final to worn out 1 Rear brake shoe return spring broken 2 Primary clutch rollers and ramp not activating or broken 3 Axle spline worn stripped out 1 V BELT worn 2 Weight...

Page 82: ...ension and Suspension cover damaged Front and rear tire pressure normal Trouble Condition Trouble Cause When the brake is abnormally noisy Brake power low Brake plate and brake arm aim at mark 1 Brake...

Page 83: ...joint Bulb good Bulb no good Good No good 1 Bulb blown 1 Line joint loose 2 Main switch wire broken 3 Wiring incorrect Good No good Remove the oil level gauge test the piston and warning lamp 1 Oil le...

Page 84: ...d 1 Fuse blown 2 Battery voltage low 1 Battery voltage too low or dead 3 Brake light switch no good 4 Wires loose 5 Main switch wire broken Push start switch check the starting relay action Starting m...

Page 85: ...No good Starting motor rotates Starting motor does not rotate 1 Starting motor no good 1 Battery voltage low or no good Crankshaft rotation When main switch Off Rotate slowly Starting motor rotate do...

Page 86: ...84 0 6 0 7 mm...

Page 87: ...85 FIG 21 MAIN WIRING DIAGRAM...

Reviews: