background image


Vers. 291020 


19


1-


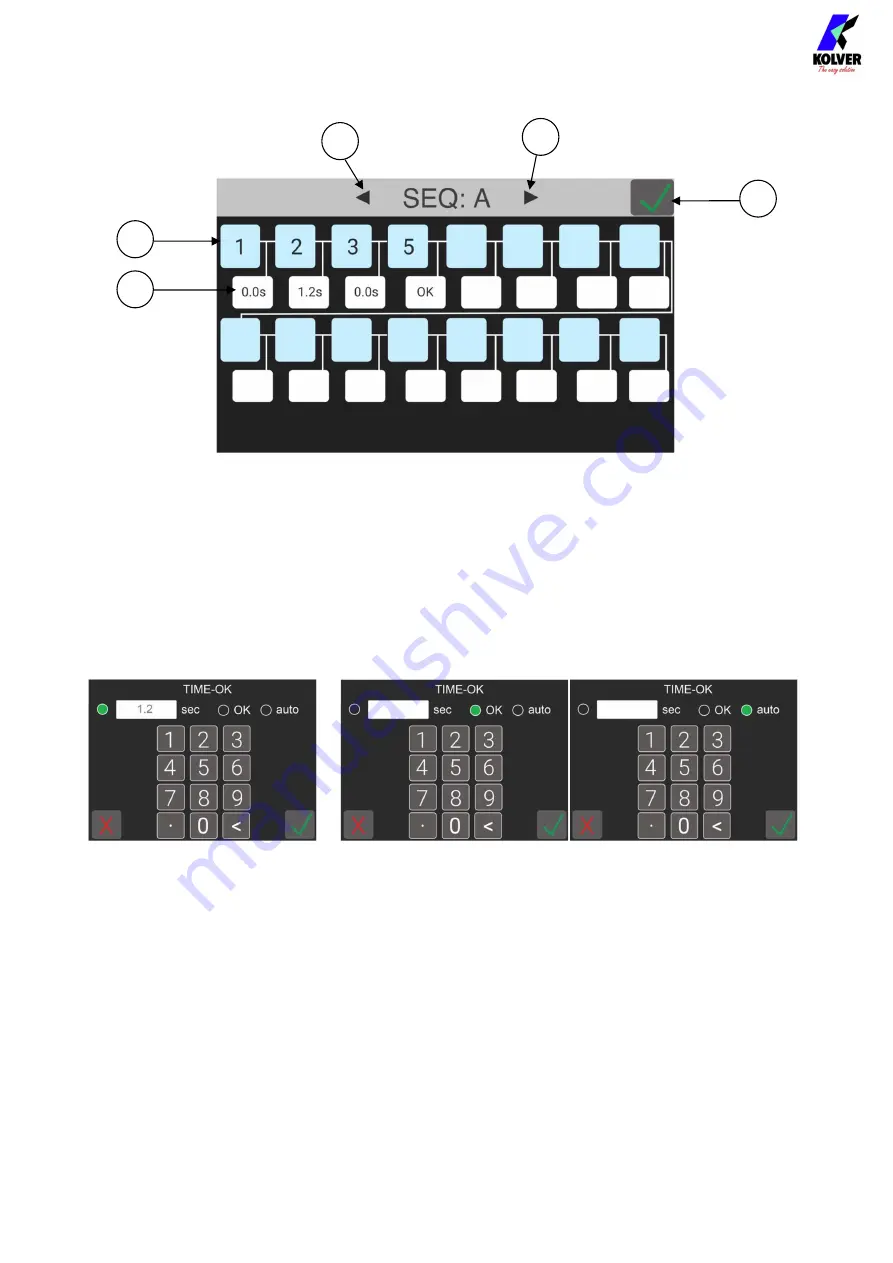
TO  ENTER  PROGRAM  INTO  SEQUENCE:  in  the  blue  cells,  it  can  set  the  desired 
program into the sequence. Up to 16 programs per sequence.  

2-


Time between programs: to set a time between one program and another. Besides the time 
you can also set the OK flag in the TIME-OK screen; this function will require an OK from 
the  display  or  remote  to  continue  to  the  next  program.  It’s  also  possible  to  set  the Auto 
function to move from a program to another one without releasing the lever.  
IMPORTANT: the AUTO function will result in the loss of the screw counting previously 
set (see Menu Other, point 3). 


Time function  


OK function                             Auto function 


3-


To go to the previous sequence.  

4-


To go to the following sequence.  

5-


Saving key: to save parameters and/or return to the previous menu. If you have changed any 
parameters, after touching this key, the SAVE CHANGES screen appears and you have to 
choose to save or not. After the, you will return to the main menu screen.  


3


1


2


4


5


Summary of Contents for 035001

Page 1: ...40V DC POWER 600W DECLARATION OF CONFORMITY KOLVER S r l declares that the new tool here described control units model KDU 1 KDU 1A are in conformity with the following standards and other normative...

Page 2: ...0 850 135006 A ESD KDS PL6ANG 0 5 5 5 50 850 135010 KDS PL10 0 8 10 50 600 135010 ESD KDS PL10 0 8 10 50 600 135011 ESD KDS PL10P 0 8 10 50 600 135011 U ESD KDS PL10P U 0 8 10 50 600 135110 KDS PL10CA...

Page 3: ...aching the preset torque or angle The AC 90 260V 50 60Hz power supply is converted into 40VDC required by the KDS series screwdrivers through a switching board IMPORTANT K DUCER is a highly accurate u...

Page 4: ...ly adjustable bracket code 010401 Installation of KDS screwdriver The KDS screwdrivers series require a 2 5m male female cable code 250064 or 5m code 250564 Or cables with strain relief 2 5m 250064 H...

Page 5: ...light pressure of the cable connector towards the fixed connector and turn counterclockwise the nut Turn the unit on through the on off switch on the lower panel The unit will carry a general system...

Page 6: ...recognized by the unit and the CONNECTED SCREWDRIVER screen will appear for a few seconds also showing the model and serial number NB All parameters read during the recognition of the screwdriver can...

Page 7: ...torque set in the program is above the limit of the screwdriver In torque control the maximum torque set in the program is higher than 20Nm TorqueMaxUnderMinLim In angle control the maximum torque set...

Page 8: ...Menu 8 Key to display the chart Active only after screw reached It is possible to see TORQUE VS TIME and TORQUE VS ANGLE 9 Unit Nm lbf in or kgf cm 10 Status bar ready OK NOK errors 11 Pre set torque...

Page 9: ...programming menu relative to the parameters of each single program 4 GENERAL SETTING to enter the programming menu relative to all the parameters of all the programs 5 USB to enter the Menu to manage...

Page 10: ...time Max time and Prevaling torque functions can be set In the same line the set values of the main parameters can be seen in small format 7 REV PRE REV Access to the menu where Reverse Speed Reverse...

Page 11: ...rol mode 4 MIN Torque to set the min torque value Min Torque and Target functions define the acceptable torque range for each single application When the reached torque is within this range Screw OK w...

Page 12: ...e is reached the screwdriver will be stopped the screw will be result as NOK and Err Angle Max error displayed The maximum angle the operator can set is 30000 In case of Angle Monitoring function max...

Page 13: ...able from 0 1 to 19 9 sec and angle from 1 to 360 To disable the function select the OFF flag This function overlaps with the other settings starting from the motor start on ATTENTION This function is...

Page 14: ...parameters and or return to the previous menu If you have changed any parameters after touching this key the SAVE CHANGES screen appears and you have to choose to save or not After the you will retur...

Page 15: ...is released before the end of the reverse unfinished screw will be displayed and a red led will light up You will hear two beep sounds too 12 Flags of PRE TIGHTENING REVERSE function This function can...

Page 16: ...entifies the number of line feeds between a string and another Useful 6 SWBX88 CBS880 if ON it allows to enter a digit from 1 to 8 and to match it to a tray or a button from CBS880 and SWBX88 of Kolve...

Page 17: ...released before reaching the torque When OFF this function doesn t work 15 DEFIX ALLOW when OFF reverse is NOT active 16 COMPENSATION It allows to change the calibration factor for each individual pro...

Page 18: ...EQ It allows to view sequence in progress and to access the SEQ screen see 4 The sequences that can be set are 8 and are distinguished by letters from A first sequence to H eighth sequence 3 To enter...

Page 19: ...also possible to set the Auto function to move from a program to another one without releasing the lever IMPORTANT the AUTO function will result in the loss of the screw counting previously set see M...

Page 20: ...in green 2 PROGRAM it shows in a bigger font which program is on 3 SEQUENCE PROGRAMS it shows with smaller characters which programs are active in the sequence If more than 8 the screen will adapt 4 S...

Page 21: ...mperature of 40 C activates the temperature protection preventing the screwdriver from working as soon as the temperature returns below 37 C the error is reset and the screwdriver can continue working...

Page 22: ...tart will always reverse led fuchsia on if you press the reverse button the LEDs turn off and pressing the screwdriver start lever will turn to start white LED on 6 Saving key to save parameters and o...

Page 23: ...onnector see input menu related to the selection of sequences the setting must be done in binary The sequences that can be set remotely are 7 5 BARCODE MODE it allows to choose the barcode mode OFF ba...

Page 24: ...ossible to set the date and time that will be used by the unit in the print string and in the savings The displayed date format will be day month year while the time has 0 24 format 6 BRIGHTNESS BAR t...

Page 25: ...PLAY CALIBRATION it allows to calibrate the display so that the point it is pressed is aligned with the information in that position To do this simply press the blue dots in sequence in the display sc...

Page 26: ...rotocol modes but must be appropriately set so that the settings match with those of the unit otherwise a connection error will be displayed Only on MODBUS TCP mode and related to the network settings...

Page 27: ...oad the selected file in green Once selected the file push on LOAD adn the unit will display a warning screen Here you have to If YES the selected program will be saved and overwrite the previous one...

Page 28: ...set the name of the file you want to save for the entire unit programming Once saved the file can be recalled from the LOAD menu see point 2 The saved file will have a kdu extension and can be copied...

Page 29: ...0 If not used with the Barcode a serial string will be printed see Serial Print PIN NAME FUNCTION 2 RX RS232 reception 3 TX RS232 transmission 5 GND Common to every input Signals have to be enabled ma...

Page 30: ...t re start working as long as the signal stays active 14 START Remote start with torque control screwing function 15 REVERSE Remote motor reverse with torque control unscrewing function The operating...

Page 31: ...3 PR 31 BIT4 PR 32 BIT5 PR 33 BIT6 PR More significant weight bit to enable Program see the chart below 34 NOT USED 35 NOT USED 36 READY This signal is active when the screwdriver is in stand by 37 ST...

Page 32: ...ax ferrule without sheath mm 0 75 Flexible cable section with min ferrule with sheath mm 0 25 Flexible cable section with max ferrule with sheath mm 0 5 INPUT All inputs Pin from 1 to 20 of the CN3 co...

Page 33: ...SEQ input as shown in the table Sequence BIT3 SEQ PIN 5 BIT2 SEQ PIN 4 BIT1 SEQ PIN 3 0 0 0 A 0 0 1 B 0 1 0 C 0 1 1 D 1 0 0 E 1 0 1 F 1 1 0 G 1 1 1 H Not Selectable NB For security reasons Kolver has...

Page 34: ...23 0 1 0 1 1 1 55 1 1 0 1 1 1 24 0 1 1 0 0 0 56 1 1 1 0 0 0 25 0 1 1 0 0 1 57 1 1 1 0 0 1 26 0 1 1 0 1 0 58 1 1 1 0 1 0 27 0 1 1 0 1 1 59 1 1 1 0 1 1 28 0 1 1 1 0 0 60 1 1 1 1 0 0 29 0 1 1 1 0 1 61 1...

Page 35: ...PR PIN30 BIT2PR PIN29 BIT1PR PIN 28 PR BIT6PR PIN33 BIT5PR PIN32 BIT4PR PIN31 BIT3PR PIN30 BIT2PR PIN29 BIT1PR PIN 28 0 0 0 0 0 0 32 1 0 0 0 0 0 1 0 0 0 0 0 1 33 1 0 0 0 0 1 2 0 0 0 0 1 0 34 1 0 0 0 1...

Page 36: ...ed NB To be aligned even with remote inputs Kolver chose not to display the program 64 on the outputs CN4 male serial connector Used to connect printers or to Kolver accessories When used with Kolver...

Page 37: ...OK PR 8 KDS PL10 s n 1814914 TARGET 2 0Nm ST 1 23 S 600rpm Screw 1 8 Seq A 1 1 T 1 99Nm A 114deg 18 01 18 17 44 50 BC Codice barcode it begins with BC and it s followed by the code of the scanned pro...

Page 38: ...e able to choose up to a maximum of 8 programs or desired sequences To set the correct bit or button it is necessary to activate the function on the menu OTHER SWBX88 CBS880 and enter a number from 1...

Page 39: ...d and set read the programs by the PC USB Connector to be used with USB key to save any results of the programming CN5 Connector only on KDU 1A unit In order to connect a network cable to read or to s...

Page 40: ...nside the K Ducer unit and have the same functions INTERFACE SELECTION It is necessary to select in which mode you want to go to modify monitor the parameters of the unit There are 2 possible modes US...

Page 41: ...not be modified as defined by the protocol MODBUS TCP the Ip Address must be set with the address of the unit Then once pressed Scan Now the software will attempt to initiate communication with the un...

Page 42: ...gram and Nr Sequence In particular 1 Screw Mode Working mode of the unit according to program or according to sequence of programs 2 Nr Program program active in the unit in the case of Screw Mode Pro...

Page 43: ...s each It is necessary to select the position of each program and hot to move from one program to another after a pre set time or after OK on the display or by remote To enable further programs after...

Page 44: ...osition 2 It is also possible to insert the bar code of the piece on which you want to operate It is used only if you want to select the sequence remotely by scanning the bar code of the piece itself...

Page 45: ...same as the KDS unit with the same characteristics To change it simply enter the cell select a number in the correct range then press Enter Or you can press the keyboard and type the desired value Th...

Page 46: ...Vers 291020 46 ACTIONS Upload to unit To upload all the setting to the KDU unit It is necessary that the unit is connected to the pc In case of any connection error an error message will be displayed...

Page 47: ...e displayed Save to file Press Save to file to save all settings in a file This file can be copied to the USB key and then loaded onto the unit or re opened with the K EXPAND software The file format...

Page 48: ...the inputs outputs in the KDU unit By selecting the ehternet MODBUS TCP interface it is also possible to test the remote control via ethernet in particular Start Reverse Stop Motor Reset ESC Also by p...

Page 49: ...ween the values shown by pressing the right and left directional arrows The system acts as a monitor and it updates graphics and print strings in real time among which it is possible to move by pressi...

Page 50: ...Vers 291020 50 EXPLODED VIEW KDU 1 KDU 1A...

Page 51: ...SCREW TSP M3X8 TX10 ZN 16 801009 16 CONNECTOR I O 44PIN 1 872526 17 SCREW M3 X 5 ZN TX10 18 872444 18 CONNECTOR M12 8 POLI FEMALE 1 872537 19 CONNECTOR M16 10 PIN FEMALE 1 201668 HU 20 FLAT CABLE 4 P...

Page 52: ...Vers 291020 52 EXPLODED VIEW KDS PLxx...

Page 53: ...RANSDUCER 1 231522 E 15 SCREW TSP M2X4 TX6 ZN 21 231531 16 MOTOR SEAT 1 234505 TD 17 SCREW TSP M2X6 TX6 ZN 8 231527 18 BEARING 1 231533 19 WASHER 1 231532 20 RING 1 200007 21 RING 1 230020 1 22 BALL 2...

Page 54: ...Vers 291020 54 EXPLODED VIEW KDS PLxxP...

Page 55: ...47 14 WASHER M3 2 800041 15 GROUND WIRING KDS P 1 231546 P GROUND WIRING KDS PU 1 231546 PU 16 SCREW M2 5X6 TX8 ZN TX8 1 872487 17 MALE CONNECTOR M16 10 PIN KDS PLxxP 1 201667 P MALE CONNECTOR M16 10...

Page 56: ...Vers 291020 56 EXPLODED VIEW KDS PLxxCA...

Page 57: ...TOR KDS 6x 231509 L MOTOR KDS 10x 1 231509 L MOTOR KDS 15x 1 231509 15L 12 SENSOR 1 231534 13 SCREW TSP M2X4 TX6 ZN 20 231531 14 ENCODER 1 231528 15 BOARD 1 852528 16 MALE CONNECTOR M16 10 PIN 1 20166...

Page 58: ...Vers 291020 58 EXPLODED VIEW KDS MT1 5...

Page 59: ...T1 5 1 231509 2L 13 SENSOR 1 231534 14 TRANSDUCER 1 210050 T 15 REDUCTION GEARS KDS MT1 5 1 250040 TMT 16 SCREW TSP M2X4 TX6 ZN 3 231531 17 MOTOR SEAT 1 234504 TD 18 BEARING 1 231533 19 RING 1 230020...

Page 60: ...Vers 291020 60 EXPLODED VIEW KDS MT1 5P...

Page 61: ...REW ZN M3X10 TX10 7 231539 14 SCREW M3X12 TESTA ZN TX10 2 231547 15 WASHER M3 3 800041 16 GROUND WIRING KDS P 1 231546 P GROUND WIRING KDS PU 1 231546 PU 17 SCREW M2 5X6 TX8 ZN TX8 1 872487 18 MALE CO...

Page 62: ...9 2L REDUCTION GEARS KDS 15x 1 231510 15D 10 TRANSDUCER 1 231522 E 11 ENCODER 1 231528 12 ENCODER WIRING 1 231536 13 BOARD 1 852528 14 MALE CONNECTOR M16 10 PIN 1 201667 15 PCB FLEX LED 1 852531 16 LE...

Page 63: ...ree of charge such items 3 This guarantee does not cover repair or replacement required as a consequence of products which have been abused misused or modified or which have been repaired using not or...

Page 64: ...Menu Torque Angle page 11 Torque Control page 11 Angle Control page 12 Ramp Time Menu page 13 Rev Pre Rev Menu page 14 Menu Other n screws external box barcode serial printer compensation page 16 Sequ...

Reviews: