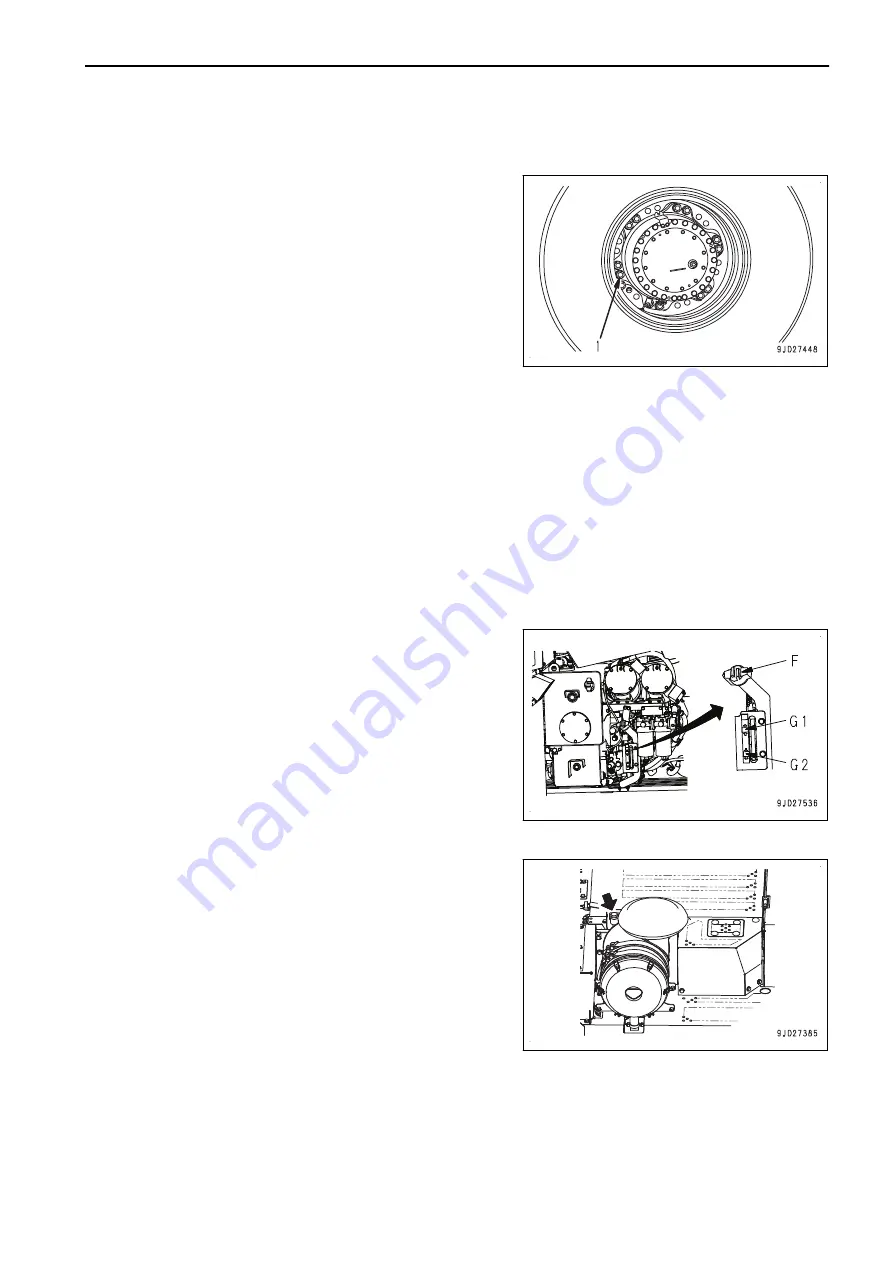
METHOD FOR CHECKING LOOSENESS OF WHEEL HUB BOLTS, RETIGHTEN-
ING BOLTS
Check the wheel hub bolts (1) for breakage or looseness.
If any wheel hub bolt (1) of a wheel is broken, replace all the
wheel hub bolts (1) for that wheel.
If any bolt is loose, retighten it.
Tightening torque: 1520 to 1850 Nm {155 to 189 kgm}
Insert a socket wrench in a pipe, then apply a force of 1685 N
{172 kg} at point 1 m from the fulcrum. This will give a tighten-
ing torque of 1685 Nm {172 kgm}.
When the hub bolts are tightened after the tires are replaced,
drive the machine for 5 to 6 km, and check the tightening tor-
que to ensure that there are no loose bolts.
METHOD FOR CHECKING OIL LEVEL IN TRANSMISSION CASE, ADDING OIL
NOTICE
• The oil level changes according to the oil temperature, so check the oil level after completing the
warming-up operation.
• Be sure to check the oil level while running the engine at low idle and after completing the warming-
up operation. Consider the oil level check when the engine is stopped only as a guide.
• Some bubbles may be seen in the sight gauge after the machine travels at high speed, however, it is
not a trouble.
Wait until the bubbles disappear, and then check the oil level in the transmission case.
1.
Start the engine.
2.
Run the engine at low idle and check the oil level with the
“Low temperature” scale on the sight gauge (G2).
It is correct if the oil level is between marks H and L.
REMARK
Use the sight gauge (G1) as a guide for checking the oil
level when the engine is stopped.
3.
If the oil is insufficient, add oil through the oil filler port (F).
METHOD FOR CHECKING DUST INDICATOR
1.
Check that the red line in the transparent portion of dust in-
dicator does not indicate 7.5 kPa {0.076 kg/cm
2
}.
If it indicates 7.5 kPa{0.076 kg/cm
2
}, clean or replace the
air cleaner element immediately.
For the cleaning method of the element, see “METHOD
FOR CHECKING, CLEANING AND REPLACING AIR
CLEANER (4-15)”.
2.
After cleaning or replacing, press the top of dust indicator
to return the red line to its original position.
OPERATION
MACHINE OPERATIONS AND CONTROLS
3-163
Summary of Contents for HD325-8
Page 2: ......
Page 13: ...FOREWORD INTRODUCTION 1 11 ...
Page 25: ...LOCATION OF SAFETY LABELS SAFETY SAFETY LABELS 2 3 ...
Page 26: ...SAFETY LABELS SAFETY 2 4 ...
Page 340: ......
Page 424: ......
Page 425: ...SPECIFICATIONS 5 1 ...
Page 429: ...ATTACHMENTS AND OP TIONS Before reading this chapter read and understand the SAFETY 6 1 ...
Page 447: ...REPLACEMENT PARTS 7 1 ...
Page 463: ......


